Yubikey and GPG: Securing Your Communications

Introduction
The Web of Trust (WoT) is a concept used in the field of computer security and cryptography. It is a decentralized trust model that allows for the verification of digital identities and ensures the integrity of communications.
In the context of public key cryptography, the Web of Trust is used to validate users’ public keys. Each user can generate a key pair, consisting of a private key and a public key. The private key is kept secret by the user, while the public key is shared with others. When someone wants to communicate securely, they can verify the authenticity of their counterpart’s public key.
Well, that was the academic definition. To make it easier to understand, here’s a concrete example.
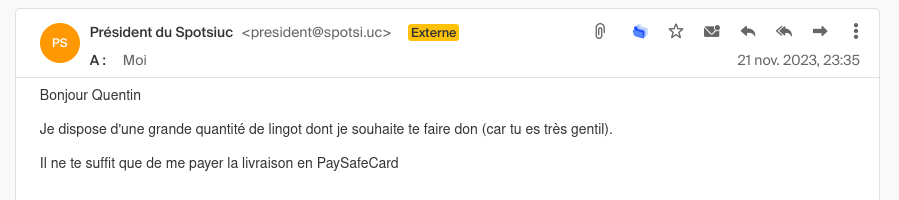
Sorry english folks, this is a french email. But let me translate it for you :
Hello, I am the president of a country you don’t know. I have a lot of gold bars that I want to give you. Please send me your bank details so I can transfer them to you.
I receive this email indicating that a president of a country I do not know wants to give me gold bars. What luck! I will immediately go buy a PSC card to pay the processing fees.
And as you already suspect, it is indeed spam.
But how can I know? In this example, it’s quite simple: this kind of email is a classic spam. But in other cases, it can be more difficult to distinguish legitimate messages from fraudulent ones. Let’s take a new example:
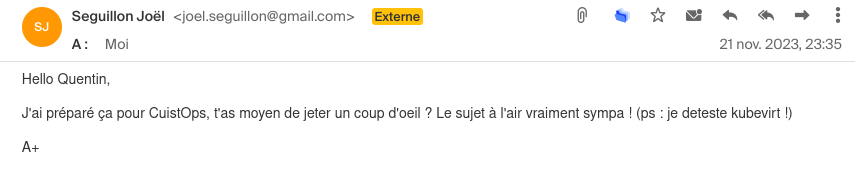
Joël is the biggest fan of Kubevirt, this mail is saying that he hates it. It’s obviously a fake mail.
Joël just sent me this email to prepare our next CuistOps show. But did you notice something strange?
Of course, Joël loves Kubevirt, so this message must be a fake! Joël’s email account has been hacked and someone else sent this email on his behalf.
How can we be certain? Isn’t there a secure way to verify the authenticity of an email?
The answer is yes, with PGP keys.
What is PGP?
PGP (Pretty Good Privacy) is a method of cryptography that allows for the encryption and signing of electronic messages. It uses a system of public and private keys to ensure the confidentiality and integrity of communications.
For example, I have a pair of PGP keys: a private key that I keep secret and a public key that I share with other users. When Joël sends me an email, he can encrypt it with my public key so that only I can decrypt it with my private key. Similarly, if I want to send him an email, I can sign it with my private key to verify my identity and the integrity of the message.
Unless someone compromises one of our private keys, it is theoretically impossible to decrypt (modulo the computational power of quantum computers that could break RSA) or sign a message without the corresponding private key.
GPG
GPG (GNU Privacy Guard) is a free and open-source implementation of PGP. It allows for encrypting, signing, and verifying electronic messages using public and private keys. GPG is widely used in the world of computer security and cryptography to ensure the confidentiality and integrity of communications (especially with package managers like apt or yum).
CA vs GPG
It might be tempting to compare GPG to a Certification Authority (CA) like Let’s Encrypt. But there is a major difference between the two: CAs are centralized systems in which a trusted third party (the CA) signs users’ keys. This means that we have to trust the CA to validate the public keys of other people.
On the other hand, GPG is a decentralized system in which users validate the keys of their peers themselves.
How to obtain someone’s public key?
An important concept of the Web of Trust is verifying the authenticity of public keys. If Joël sends me his public key via email, how can I be sure that it’s really his and not a pirate’s?
Ideally, I would verify Joël’s public key through a secure and reliable method (such as meeting in person or through a phone call). There are even Key Signing Parties where users meet to exchange and validate their public keys.
But what about people I don’t know? How can I verify their public key?
For this, there are PGP key servers that allow storing and sharing users’ public keys.
I personally use keys.openpgp.org and pgp.mit.edu to store and share my public key.
Anyone can consult these servers to retrieve a user’s public key. But beware, it is important to use multiple sources to verify the authenticity of the key (for example, by checking several key servers).
Email addresses are used to search for public keys, but nothing prevents me from putting a different email address than mine in my public key (there is no email verification when submitting a key to these servers).
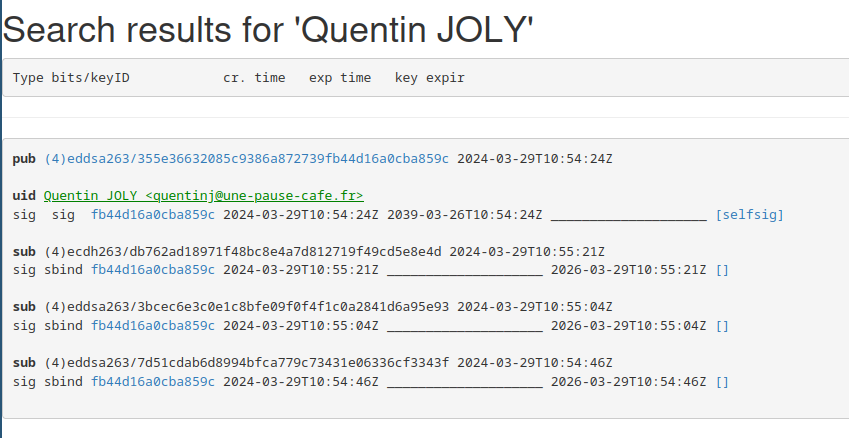
For those who use Github (and if not, we’ll see that later), you can also add your public key to your profile.
To display a member’s key on Github, simply add .gpg at the end of their profile URL like this.
Smartcards (Yubikey)
Smartcards are smart cards that allow for the storage of private keys. They provide additional security by isolating the private keys from the host system.
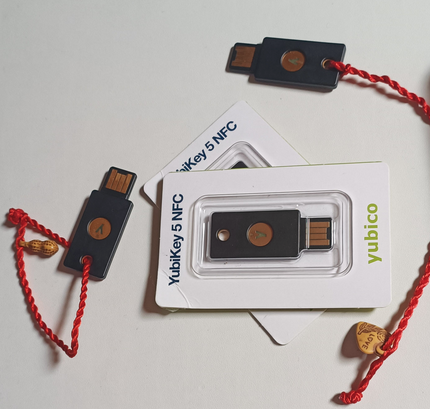
For example, the most well-known type of smartcard is the Yubikey, but there are others like the Nitrokey or some Ledger.
There are several formats with various connectors, in this article, I will use a Yubikey 5 NFC.
Context
It all started with the article by Joseph Ligier: Creating a Terraform provider.
I developed my own provider to learn the internal workings of Terraform (and for fun).
And when I published my first version on the Hashicorp registry, I realized that I needed to generate a GPG key to sign my release. I had briefly used GPG before, but I was just copying and pasting commands without really understanding what I was doing.
I started researching the topic, especially since I have a few Yubikeys lying around in my drawers (Thanks Cloudflare).
My goal is to learn how to use GPG keys to sign my commits, encrypt my email exchanges, and secure my deliverables.
Warning
I am completely new to the field of cryptography, I will apply what I have seen on the internet and what I have understood. If you see any mistakes, please let me know.
How does a GPG key work?
This was the first question I asked myself. I quickly came across the incredible article by Dave Steele Anatomy of a gpg key which seems to be a reference on forums.
This article explains the different concepts to understand how a GPG key works.
For example, a GPG key can have multiple permissions:
- C (Certify): Allows certifying the public keys of other users.
- S (Sign): Allows signing electronic messages.
- E (Encrypt): Allows encrypting electronic messages.
- A (Authenticate): Allows authenticating the user.
These permissions can be combined on a single key or distributed among multiple subkeys. Thus, it is possible to create a main key with permission C and subkeys with permissions S, E, and A (to separate the uses).
A subkey is a secondary key to a main key. As mentioned earlier, it has its own permissions and its own expiration date. The main key is the key that certifies or revokes the subkeys.

There are also several ways to display a GPG key:
- The long version (e.g.:
355E36632085C9386A872739FB44D16A0CBA859C) - The short version (e.g.:
0CBA859C) corresponding to the last eight characters of the long version. - The fingerprint (e.g.:
355E 3663 2085 C938 6A87 2739 FB44 D16A 0CBA 859C) corresponding to the long version with spaces every four characters.
Depending on the medium on which you want to display the key, it may be more or less convenient to use one or the other of these versions.
Generate our GPG key
Now let’s get to the heart of the matter. We will generate an ed25519 key that will be used to certify our identity. The other actions (Encrypt, sign, authenticate) will be in separate keys (subkeys).
Info
Why use an ed25519 key instead of an RSA key?
RSA keys are based on the factorization of large prime numbers, while ed25519 keys are based on elliptic curves. Ed25519 keys are generally shorter than RSA keys for the same level of security, making them more efficient in terms of storage, transmission, and resource usage.
Source : OLLAMA
gpg --expert --full-gen-key
During the question about the key capabilities, we will choose “Certify” only (thus removing encryption, signing, and authentication).
Possible actions for an RSA key: Sign Certify Encrypt Authenticate
Currently allowed actions: Certify

      (S) Toggle signing capability
      (C) Toggle encryption capability
      (A) Toggle authentication capability
      (Q) Done

What is your choice?
I chose 4096 bits for the key size and an expiration of 15 years.
We verify that we have our GPG key in our keyring:
$ gpg --list-keys
/home/quentinj/.gnupg/pubring.kbx
---------------------------------
pub   ed25519/0CBA859C 2024-03-28 [C] [expire : 2029-03-27]
 Empreinte de la clef = B57F A3AD 4B0E 03E3 74FB  1F80 E12F DC61 2638 EC5E
uid
It expires in 15 years and has an “ultimate” trust level (since we just generated it). Its only permission is C (Certify).
To verify that our key is imported correctly, we can list the keys again. (now, the trust in our key is “unknown” because we don’t know its origin)
$ gpg --list-keys
/home/quentinj/.gnupg/pubring.kbx
---------------------------------
pub   ed25519/0CBA859C 2024-03-28 [SC] [expire : 2029-03-27]
 Key fingerprint = CC52 8FF7 528A 6637 62F7  807F 93DB 5081 C95D 5F29
uid                  [unknown] Quentin JOLY (une-tasse-de.cafe) <quentinj@une-pause-cafe.fr>
sub   rsa4096/0xC5185FB21336FF05 2024-03-28 [E] [expire : 2029-03-27]
To give our key an ultimate trust level, we will inform our keyring that we trust our key.
$ gpg --edit-key quentinj@une-pause-cafe.fr
gpg> trust
sec  ed25519/0CBA859C
      created: 2024-03-28  expire: 2029-03-27  usage: C
      trust: unknown       validity: unknown
[ unknown] (1). Quentin JOLY (une-tasse-de.cafe) <quentinj@une-pause-cafe.fr>

Now decide how much you trust this user to verify the keys of other users (by checking passports, verifying fingerprints from various sources, etc.)

  1 = I don't know or have no opinion
  2 = I do NOT trust
  3 = I trust marginally
  4 = I fully trust
  5 = I assign ultimate trust
  m = back to the main menu

What is your decision? 5
Do you really want to assign ultimate trust to this key? (y/N) y

sec  ed25519/0CBA859C
      created: 2024-03-28  expire: 2029-03-27  usage: C
      trust: ultimate      validity: unknown
[ unknown] (1). Quentin JOLY (une-tasse-de.cafe) <quentinj@une-pause-cafe.fr>
Please note that the displayed validity for the key may not be correct until you restart the program.
Next, let’s generate the subkeys dedicated to encryption, signing, and authentication actions.
Note
Why use subkeys?
Subkeys allow for the separation of different actions that can be performed with a GPG key. These subkeys can be used independently and can be revoked separately from the main key.
Often, a long-term main key is created along with shorter-term subkeys for encryption, signing, and authentication actions.
Furthermore, in the context of our Yubikey, we can store the subkeys on the card and keep the main key in a secure location. This way, if I ever lose my Yubikey (and the associated codes), I can revoke the subkeys without having to revoke the main key.
Key for encryption only (E):
gpg --edit-key --expert quentinj@une-pause-cafe.fr
gpg> addkey
--> (8) RSA (select capabilities manually)
gpg> 8
Possible actions for an RSA key: Sign Encrypt Authenticate
Currently allowed actions: Encrypt

      (S) Toggle signing capability
      (E) Toggle encryption capability
      (A) Toggle authentication capability
      (Q) Quit
I do the same for the signing and authentication keys.
---------------------------------
pub   ed25519 2024-03-29 [C] [expire : 2039-03-26]
      355E36632085C9386A872739FB44D16A0CBA859C
uid          [unknown] Quentin JOLY <quentinj@une-pause-cafe.fr>
sub   ed25519 2024-03-29 [S] [expire : 2026-03-29]
sub   ed25519 2024-03-29 [A] [expire : 2026-03-29]
sub   cv25519 2024-03-29 [E] [expire : 2026-03-29]
If you want to see the complete process in video:

Backup your key
Now that we have generated our key, it is important to back it up in a safe place (in case we lose it or need to revoke it).
To export my public key, I will export the main key and its subkeys.
gpg --export --armor quentinj@une-pause-cafe.fr > public.key
Info
When using your key with GPG, you can directly specify the email address associated with the key if you only have one key corresponding to that address. Otherwise, you will need to use the key ID (long version, short version, or fingerprint).
I will also backup my main private key as well as the private keys of the subkeys:
gpg --export-secret-keys --armor quentinj@une-pause-cafe.fr > private.key
gpg --export-secret-subkeys --armor quentinj@une-pause-cafe.fr > private-subkeys.key
To test if our key is exported and functional, I will delete it from my keyring and reimport it.
gpg --delete-secret-keys quentinj@une-pause-cafe.fr
gpg --delete-keys quentinj@une-pause-cafe.fr
The commands gpg --list-keys and gpg --list-secret-keys should no longer return anything.
gpg --import private.key
To test if our key is functional and the subkeys are imported correctly, we can sign a message and verify it.
$ echo -n "Coffee break? " | gpg --clear-sign | gpg -d
Coffee break?
gpg: Signature made Fri, 29 Mar 2024 09:20:35 CET
gpg:                using EDDSA key 6C696783A87F328594ECB3A079C81E0291249128
gpg: Good signature from "Quentin JOLY <quentinj@une-pause-cafe.fr>" [ultimate]
Yubikey Configuration
The first thing to do is to customize the unlock and administration codes of the Yubikey.
But before that, I will make sure that the key is properly recognized by my system.
$ gpg --card-status
Reader ...........: Yubico YubiKey OTP FIDO CCID 00 00
Application ID ...: D2760001240103040006224123450000
Application type .: OpenPGP
Version ..........: 3.4
Manufacturer .....: Yubico
Serial number ....: 22412345
Name of cardholder: [non positionné]
Language prefs ...: [non positionné]
Salutation .......:
URL of public key : [non positionné]
Login data .......: [non positionné]
Signature PIN ....: non forcé
Key attributes ...: rsa2048 rsa2048 rsa2048
Max. PIN lengths .: 127 127 127
PIN retry counter : 3 0 3
Signature counter : 0
KDF setting ......: off
Signature key ....: [none]
Encryption key....: [none]
Authentication key: [none]
General key info..: [none]
Great! We obtain lots of information such as the number of incorrect PIN attempts before the key gets blocked, the brand, and empty metadata (like the key owner’s name).
Let’s start by changing the administration code and the unlock code.
gpg --card-edit
gpg/carte> passwd
You will be asked to enter the current unlock code (which is 123456 by default). Then, you can enter the new unlock code.
After that, we switch to admin mode to change the administration code.
gpg/card> admin
Admin commands are allowed
gpg/card> passwd
gpg: OpenPGP card no. D2760001240103040006224123450000 detected

1 - change PIN
2 - unblock PIN
3 - change Admin PIN
4 - set the Reset Code
Q - quit

What is your choice? 4
The administration code allows you to bypass the unlock code and rewrite the keys on the card. By default, it is 12345678.
You can also take this opportunity to put your information on the card:
- Name
- Gender
- URL of the public key (essential for using the private key)
Migrate your private key to a Yubikey
Now that we have our GPG key and our Yubikey is configured, we will migrate our private key to the Yubikey. To do this, we will first migrate our main key, then select each subkey one by one to migrate them to the Yubikey.
The Yubikey has 4 slots for keys:
- One for signing messages
- One for encrypting messages
- One for authenticating the user
- One for storing the master key
Of course, it is possible to use the same key for all actions (but if you have followed the previous steps, you have generated subkeys for each action).
We will start by sending the main key and selecting each key one by one to send them to the Yubikey.
gpg --edit-key quentinj@une-pause-cafe.fr
gpg> keytocard # send the main key to the card
gpg> key 1 # select the encryption key
gpg> keytocard # send the encryption key to the card
gpg> key 2 # select the signing key
gpg> key 1 # deselect the encryption key
gpg> keytocard # send the signing key to the card
gpg> key 3 # select the authentication key
gpg> key 2 # deselect the signing key
gpg> keytocard # send the authentication key to the card
gpg> save
It may be more understandable in video format:

We should have a similar output to this:
$ gpg --list-secret-keys --keyid-format short
/home/quentinj/.gnupg/pubring.kbx
---------------------------------
sec#  ed25519/0CBA859C 2024-03-29 [C] [expire : 2039-03-26]
      355E36632085C9386A872739FB44D16A0CBA859C
uid        [ inconnue] Quentin JOLY <quentinj@une-pause-cafe.fr>
ssb>  ed25519/6CF3343F 2024-03-29 [S] [expire : 2026-03-29]
ssb>  ed25519/D6A95E93 2024-03-29 [A] [expire : 2026-03-29]
ssb>  cv25519/CD5E8E4D 2024-03-29 [E] [expire : 2026-03-29]
sec#means that the key is not present in our keyring and is not usable (it is on the Yubikey).ssb>means that our GPG keyring refers to a key stored on the Yubikey.
Tip
Once our keys are stored on the Yubikey, we can also enable the requirement to touch the key to sign or decrypt a message.
ykman openpgp keys set-touch sig on
ykman openpgp keys set-touch dec on
This practice ensures that an attacker cannot use our key with just shell access to our machine.
Signing commits with your key
While scrolling through Xwitter during the discovery of the xz vulnerability (CVE-2024-3094), I came across this tweet.
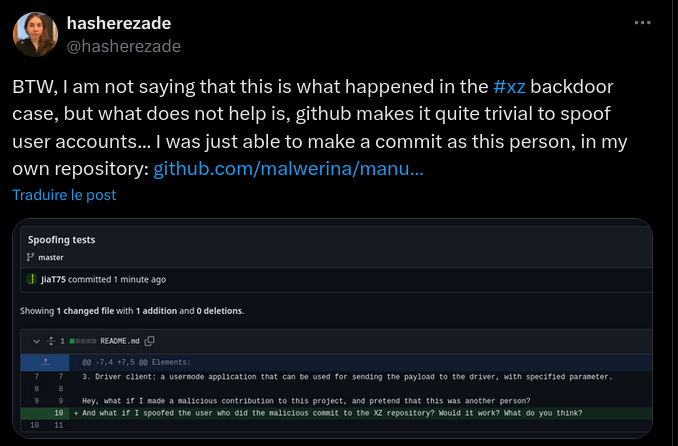
We all know that with Git, it is possible to modify the author’s email/name of a commit, it’s no secret. But how can we be sure that a commit was actually made by the person claiming to have done it? I could easily log into my Github account and make a commit using Joël’s name/email (Github authentication only allows authorizing a commit to be pushed, not its content).
To do this, there is no magic solution: you need to sign your commits.
The first step is to share your public key with the Git server (Gitlab, Github, Bitbucket, etc).
To display your public key in ASCII format, simply type the command gpg --armor --export {KEYID}.
gpg --armor --export quentinj@une-pause-cafe.fr
For Github, paste the content of your public key in the “GPG keys” section using this URL
Now that Github recognizes our key, we will configure Git to use it for signing our commits.
Make sure to use the same email address that was used to generate your GPG key.
$ git config --get user.email
quentinj@une-pause-cafe.fr
Ask Git to use this same key:
git config user.signingkey quentinj@une-pause-cafe.fr
To sign a commit, you can use the -S option:
git commit -S -m "chore: update docker image to 1.2"
To encrypt commits systematically, you can add the commit.gpgsign option to true in the Git configuration (or for a single repository without using the --global flag):
git config --global commit.gpgsign true
Future commits will require you to unlock your Yubikey (and touch the Yubikey if you have enabled this setting) to sign the commit.
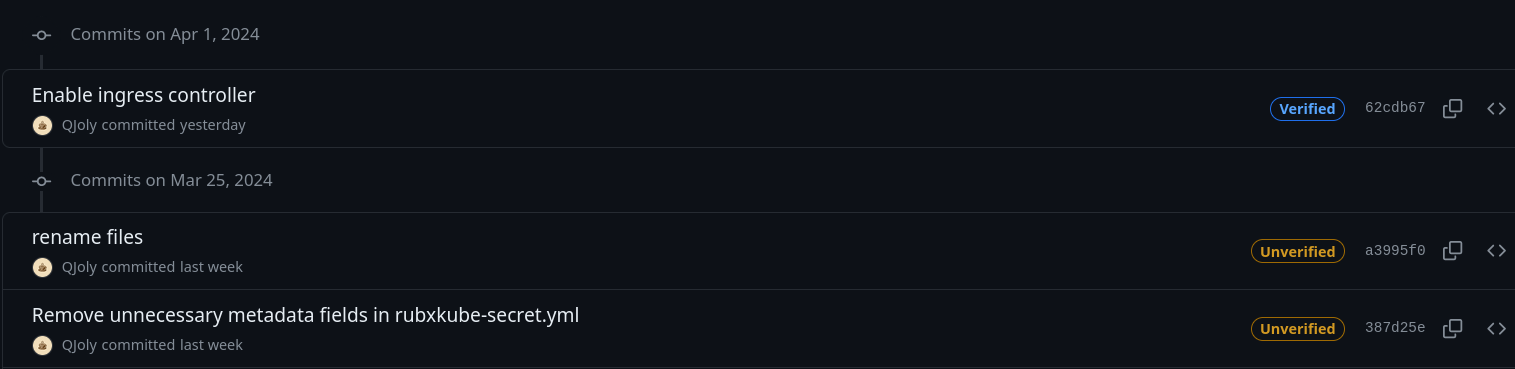
In the commit history, you can directly see on Github whether a commit is signed or not.
Or directly in the terminal with the command git log --show-signature:
commit ade7e85223f55d36438d0a1148e0ddb6048ab4ce (HEAD -> page/yubikey, origin/page/yubikey)
gpg: Signature made Tue, 01 April 2024 15:04:25 CEST
gpg:                using EDDSA key 7D51CDAB6D8994BFCA779C73431E06336CF3343F
gpg:                issuer "quentinj@une-pause-cafe.fr"
gpg: Good signature from "Quentin JOLY <quentinj@une-pause-cafe.fr>" [unknown]
gpg: Warning: This key is not certified with a trusted signature.
gpg:          Nothing indicates that the signature belongs to the owner.
Primary key fingerprint: 355E 3663 2085 C938 6A87  2739 FB44 D16A 0CBA 859C
      Subkey fingerprint: 7D51 CDAB 6D89 94BF CA77  9C73 431E 0633 6CF3 343F
Author: QJoly <quentinj@une-pause-cafe.fr>
Date:   Tue Apr 1 15:04:25 2024 +0200

    Update Yubikey blog post

commit e7f2a4036d41d62f1fd9ddb0d23830f047543524
gpg: Signature made Tue, 01 April 2024 14:44:45 CEST
gpg:                using EDDSA key 7D51CDAB6D8994BFCA779C73431E06336CF3343F
gpg:                issuer "quentinj@une-pause-cafe.fr"
gpg: Good signature from "Quentin JOLY <quentinj@une-pause-cafe.fr>" [unknown]
gpg: Warning: This key is not certified with a trusted signature.
gpg:          Nothing indicates that the signature belongs to the owner.
Primary key fingerprint: 355E 3663 2085 C938 6A87  2739 FB44 D16A 0CBA 859C
      Subkey fingerprint: 7D51 CDAB 6D89 94BF CA77  9C73 431E 0633 6CF3 343F
Author: QJoly <quentinj@une-pause-cafe.fr>
Date:   Tue Apr 1 14:44:45 2024 +0200

    Update email address in fr.json
Knowing that my key is trusted as unknown, Git correctly notifies me that the commit signature comes from an unknown trust source.
If I change the trust level of my public key to “ultimate”, Git will no longer display this warning.
Info
For those who do not want to switch to GPG, I discovered that it is also possible to sign commits with an SSH key: GitLab Documentation.
Encrypting email communications
Let’s move on to encrypting our emails with Thunderbird (one of the main objectives of this article).
Most email clients now natively support PGP (previously, you had to install a plugin like Enigmail). Thunderbird is my email client for work and personal emails, so I will be using it in the rest of this article (but many other clients support PGP).
Add your public key
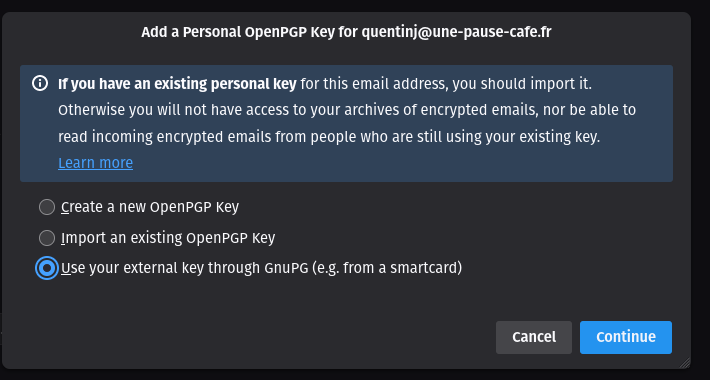
Go to the settings of the account on which you want to enable PGP, then “End-to-end encryption”.
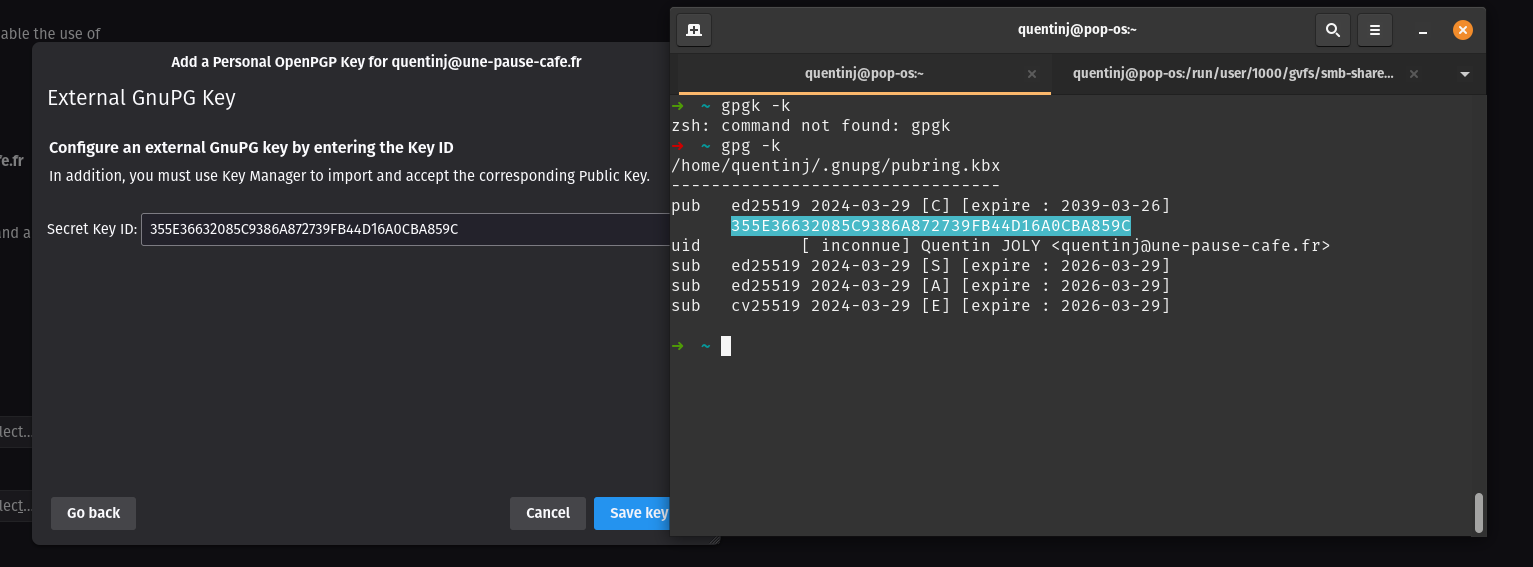
In the “OpenPGP” section, click on “Add key”, then select the option to use an external key (your Yubikey).
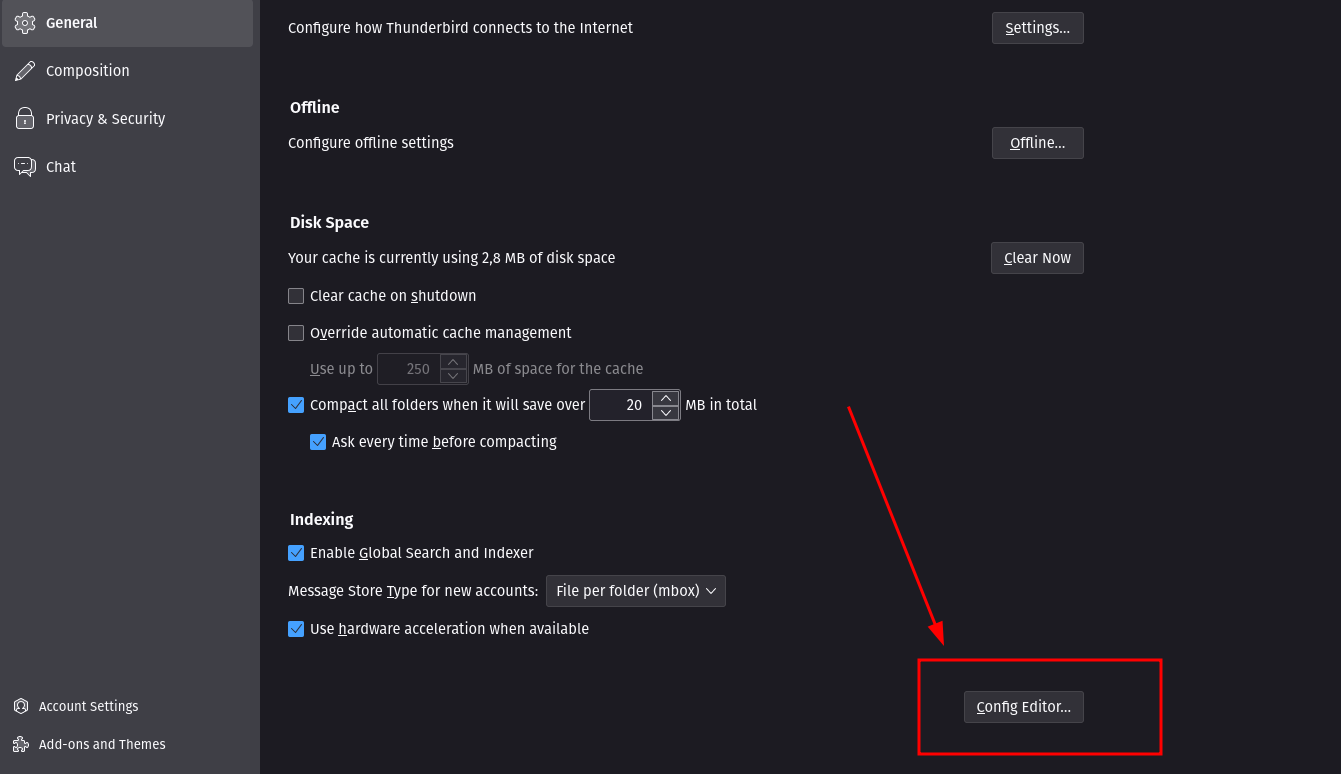
If the option is not displayed, it means that it is not enabled in Thunderbird. To make it available, you need to open the Thunderbird configuration editor and enable the mail.openpgp.allow_external_gnupg option to true.

You can enter the ID of your key (available via gpg -k).
Next, open the key manager and import your public key.
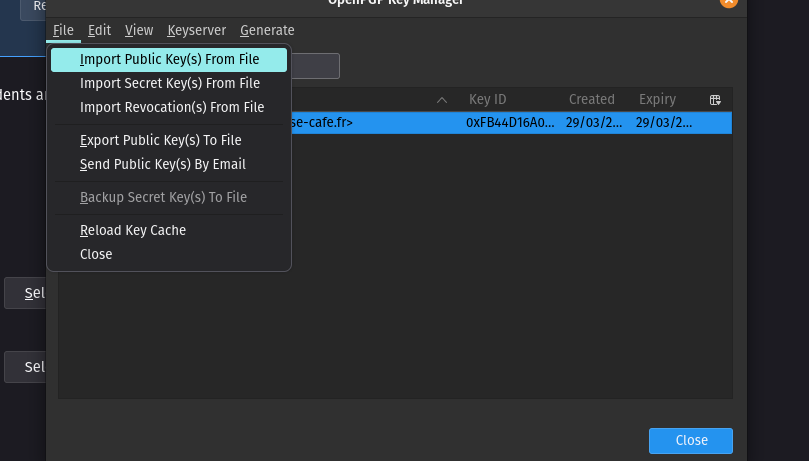
You are now ready to send and receive encrypted emails.
Testing the sending of an encrypted email
To test sending an encrypted email, you can send an email to Edward, a bot that will automatically respond to your emails.
Use your freshly configured account to send an email to edward-fr@fsf.org.
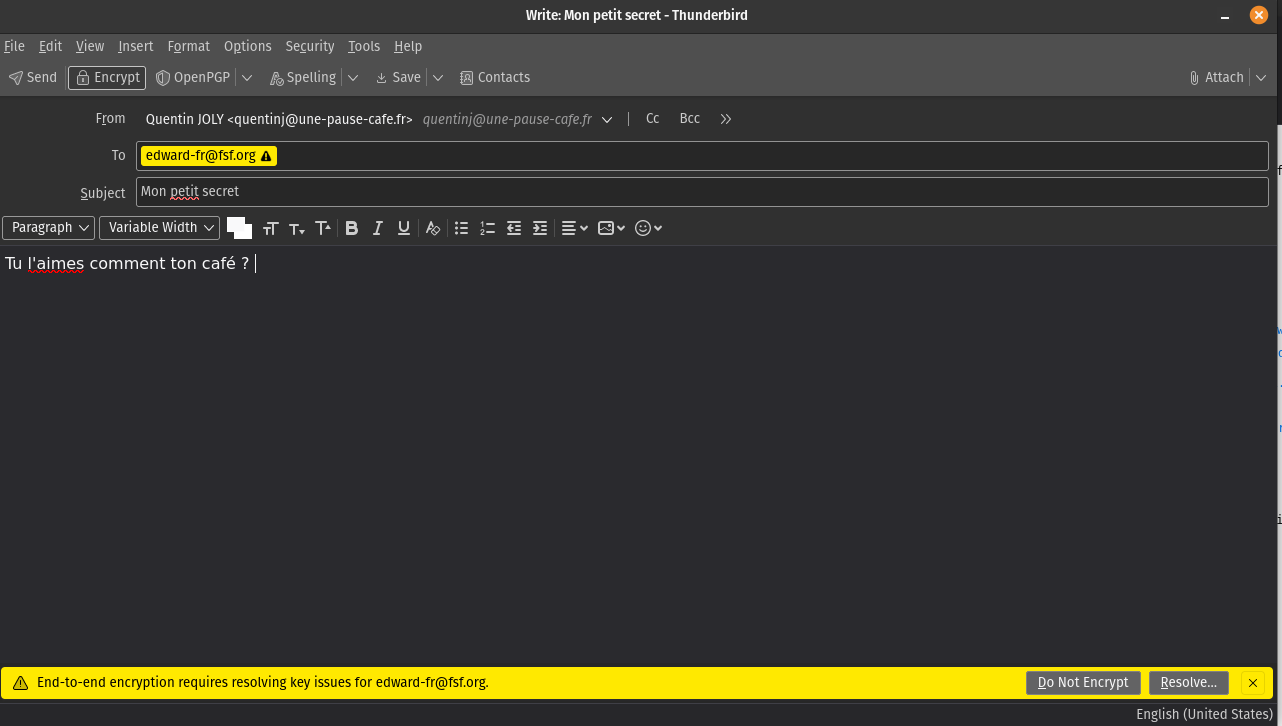
Thunderbird displays a warning that Edward’s public key is not known.
Click on “Resolve” to be presented with two options:
- Import Edward’s public key from a file.
- Contact different key servers to find Edward’s public key (based on his email).
It is important to note that regardless of the chosen method, the imported key should always be validated (by contacting your contact through a secure and reliable means, or by verifying this public key from another source).
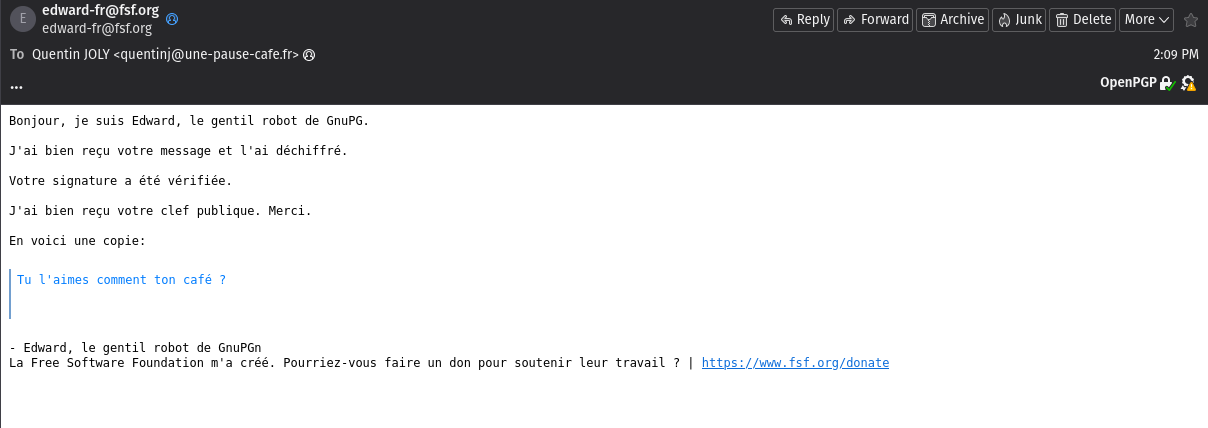
After a few seconds, you will receive Edward’s response, which should be as follows:
When instructing Thunderbird to encrypt an email, it will enable 3 options:
- Encrypt the content of the email.
- Encrypt the subject of the email.
- Sign the email.
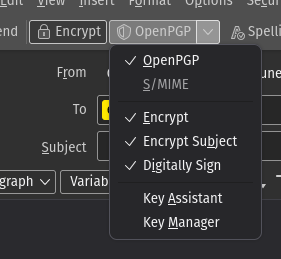
A signature is used to prove to your recipient that the message was indeed sent by you. It guarantees the integrity of the message (and its origin). This mechanism can be enabled systematically since the receiver does not need a key pair to verify the signature. Therefore, my wife (who does not use PGP) can read my signed emails without having to decrypt anything.
For a client that is not compatible with PGP, a signature will be in the form of a text file attached to the email.
And on Android?
I regularly check my emails on my phone, so it is vital that I can decrypt my emails directly from my phone. Luckily, the app I use on a daily basis is compatible with PGP: k-9 mail.
In the settings of my email account, then “End-to-end encryption”, I will enable PGP encryption. K-9 then asks me to install the OpenKeychain application, which will link my Yubikey to my email client.
Once installed, I open OpenKeychain to add my key. I use the NFC chip on the back of my phone to import my key from my Yubikey.

Now, I can try to send an encrypted email from my phone.
Before sending the email, I can check the option to encrypt/sign my email. OpenKeyChain will prompt me to scan with Yubikey (via NFC).

I can also manage the identities of my contacts just like in GPG:

Signing your deliverables
It is possible to generate signature files to ensure the integrity of the files you share (as well as their origin). The principle is the same as a checksum, except that this signature is generated with my private key and can be verified with my public key (so I am the only one who can generate this signature, while a checksum can be created by anyone).
To generate a signature, you can use the following command:
gpg --sign [fichier]
To verify a signature, you can use the following command:
gpg --verify [fichier.gpg]
For example, I want to send the file sujet-cuistops.pdf to Joël.
Joël already has my public key in his GPG keyring.
joel@cuistops:~$ gpg -k
/home/joel/.gnupg/pubring.kbx
------------------------
pub   ed25519 2024-03-29 [C] [expires: 2039-03-26]
      355E36632085C9386A872739FB44D16A0CBA859C
uid           [ultimate] Quentin JOLY <quentinj@une-pause-cafe.fr>
sub   ed25519 2024-03-29 [S] [expires: 2026-03-29]
sub   ed25519 2024-03-29 [A] [expires: 2026-03-29]
sub   cv25519 2024-03-29 [E] [expires: 2026-03-29]
I can create the signature of the file sujet-cuistops.pdf with the following command:
quentin@cuistops:~$ gpg --sign sujet-cuistops.pdf
I obtain the file sujet-cuistops.pdf.gpg which I will send to Joël.
He can then verify that the file indeed comes from me.
joel@cuistops:~/Documents$ gpg --verify sujet-cuistops.pdf.gpg
gpg: Signature made Sun 31 Mar 2024 11:55:32 CEST
gpg:                using EDDSA key 7D51CDAB6D8994BFCA779C73431E06336CF3343F
gpg: Good signature from "Quentin JOLY <quentinj@une-pause-cafe.fr>" [ultimate]
If the file is correctly signed, it can be decrypted with the following command:
joel@cuistops:~/Documents$ gpg --output sujet-cuistops.pdf --decrypt sujet-cuistops.pdf.gpg
gpg: Signature made Sun 31 Mar 2024 11:55:32 CEST
gpg:                using EDDSA key 7D51CDAB6D8994BFCA779C73431E06336CF3343F
gpg: Good signature from "Quentin JOLY <quentinj@une-pause-cafe.fr>" [ultimate]

joel@cuistops:~/Documents$ file sujet-cuistops.pdf
sujet-cuistops.pdf: PDF document, version 1.7, 2 pages
Of course, this only works if Joël has imported my public key into his GPG keyring.
Encrypting files with GPG
Now, in addition to signing files, I want to encrypt them so that only Joël can read them.
To do this, I have his public key that he just gave me through a reliable channel (via a USB key from his hand to mine).
I import his key with gpg --import jseguillon.pub and give it ultimate trust (gpg --edit-key joel.seguillon@cuistops then trust and 5).
$ gpg -k
/home/quentinj/.gnupg/pubring.kbx
---------------------------------
pub   ed25519 2024-03-29 [C] [expires: 2039-03-26]
      355E36632085C9386A872739FB44D16A0CBA859C
uid          [unknown] Quentin JOLY <quentinj@une-pause-cafe.fr>
sub   ed25519 2024-03-29 [S] [expires: 2026-03-29]
sub   ed25519 2024-03-29 [A] [expires: 2026-03-29]
sub   cv25519 2024-03-29 [E] [expires: 2026-03-29]

pub   rsa3072 2024-04-01 [SC]
      85DD92335057613C268B117A3BF41286C1CA636A
uid          [ultimate] Joël Seguillon <joel.seguillon@cuistops>
sub   rsa3072 2024-04-01 [E]
I want to send him a file ./kube/config that allows access to a Kubernetes cluster on our infrastructure.
I will start by encrypting the file, specifying Joël’s email address (whose key is stored in my keyring).
gpg --encrypt --recipient joel.seguillon@cuistops ~/.kube/config
This command will create the file ~/.kube/config.gpg that I will send to Joël via Google Drive (or any other file sharing method).
If I try to read the encrypted file, I will get an error message because I don’t have Joël’s private key to decrypt it.
$ gpg --decrypt ~/.kube/config.gpg
gpg: encrypted with a 3072-bit RSA key, ID D3352725C53827D9, created on 2024-04-01
      "Joël Seguillon <joel.seguillon@cuistops>"
gpg: decryption failed: No secret key
Joël, on the other hand, can decrypt the file with his private key.
joel@cuistops:~$ gpg --output .kube/config --decrypt config.gpg
gpg: encrypted with 3072-bit RSA key, ID D3352725C53827D9, created 2024-04-01
      "Joël Seguillon <joel.seguillon@cuistops>"
SSH with a smart card
Natively, it is possible to store a private key using the FIDO2 protocol on a Yubikey independently of the GPG key.
But since I already have a GPG key stored on my Yubikey, I also want to use my GPG keyring to connect to SSH servers.
Because yes, the encryption algorithms used by GPG and SSH are the same (RSA, DSA, ECDSA, ED25519, etc)!
I will start by exporting my public key in SSH format:
$ gpg --export-ssh-key quentinj@une-pause-cafe.fr
ssh-ed25519 AAAAC3NzaC1lZDI1NTE5AAAAIHPcu52OwmMIV8ImVzVfzBncjl+fL6/QN7HOZQ4Rkom8 openpgp:0xD6A95E93
Next, we will enable SSH support in GPG:
echo "enable-ssh-support" >> ~/.gnupg/gpg-agent.conf
Then, we restart the GPG service:
gpg-connect-agent reloadagent /bye
In this state, GPG can act as a Unix socket manager for SSH. We just need to override the SSH_AUTH_SOCK variable to point to GPG’s Unix socket.
export GPG_TTY="$(tty)"
export SSH_AUTH_SOCK=$(gpgconf --list-dirs agent-ssh-socket)
gpgconf --launch gpg-agent
To confirm this, we can check that the key is present in the SSH keyring:
$ ssh-add -L
256 SHA256:mOVlK0yr1tCSyjN1qi0Q2Fj9Y9ScUHHv4sNsKEPku/8 cardno:000622412322 (ED25519)
After configuring the public key on Github, I can test SSH key authentication:
$ ssh git@github.com
PTY allocation request failed on channel 0
Hi QJoly! You've successfully authenticated, but GitHub does not provide shell access.
Connection to github.com closed.
Migrating from one smartcard to another
I have two smartcards, both of them being Yubikeys. They both have the same private key, but when I want to sign my commits with Yubikey B, my computer prompts me for Yubikey A.
In reality, GPG remembers that my private key is on Yubikey A, and even if another Yubikey with the same private key is available, GPG will not recognize it and will ask for the Yubikey it has in memory.
To address this issue, you need to remove the reference of the private key to the smartcard.
# Display known keys
$ gpg-connect-agent 'KEYINFO --list' /bye
S KEYINFO 7E47CF933E1E4F50F2EDAB6DFA07FE5882F7BA43 T D2760001240103040006224123450000 OPENPGP.2 - - - - -
S KEYINFO 648A03F4E5198FB941E8B6991E76C9B7D962CB78 T D2760001240103040006224123450000 OPENPGP.3 - - - - -
S KEYINFO 72C18AEB4B31EDC1CEE8B365DC795F7909A2E854 T D2760001240103040006224123450000 OPENPGP.1 - - - - -
OK
The value D2760001240103040006224123450000 refers to the serial number of the Yubikey that I want to “forget”.
To remove these references, I will use the command gpg-connect-agent "DELETE_KEY [SERIAL]" /bye.
gpg-connect-agent "DELETE_KEY 7E47CF933E1E4F50F2EDAB6DFA07FE5882F7BA43" /bye
gpg-connect-agent "DELETE_KEY 648A03F4E5198FB941E8B6991E76C9B7D962CB78" /bye
gpg-connect-agent "DELETE_KEY 72C18AEB4B31EDC1CEE8B365DC795F7909A2E854" /bye
Info
If you are sure of what you are doing, you can delete all known smartcards with the following command:
list_key=$(gpg-connect-agent 'KEYINFO --list' /bye)
for key in $list_key; do
    echo $key | cut -d' ' -f3 | xargs -I {} gpg-connect-agent "DELETE_KEY {}" /bye
done
By inserting my new Yubikey and refreshing its status using gpg --card-status, I will automatically recreate these references with the new smartcard.
Arriving on a new workstation
Let’s consider the case where I arrive at a new workstation where I want to develop (and therefore sign my commits).
I arrive at a workstation that is not initialized at all (no key, no configuration). My Yubikey is inserted, but I haven’t imported my public key yet, so it doesn’t display any information.
$ gpg --card-status
gpg: directory '/home/quentinj/.gnupg' created
gpg: keyring '/home/quentinj/.gnupg/pubring.kbx' created
Reader ...........: 1050:0407:X:0
Application ID ...: D2760001240103040006224123220000
Application type .: OpenPGP
Version ..........: 3.4
Manufacturer .....: Yubico
Serial number ....: 22412322
Name of cardholder: Quentin JOLY
Language prefs ...: fr
Salutation .......:
URL of public key : https://github.com/qjoly.gpg
Login data .......: [non positionné]
Signature PIN ....: non forcé
Key attributes ...: ed25519 cv25519 ed25519
Max. PIN lengths .: 127 127 127
PIN retry counter : 3 0 3
Signature counter : 0
KDF setting ......: off
Signature key ....: E8D5 9EBC C28B 4ACC BEEB  74D2 312D FBFE 3C29 D864
      created ....: 2024-03-29 07:52:51
Encryption key....: 89F6 D00D E754 7C9C 7B32  143E 96F9 9A5D 69C1 54F7
      created ....: 2024-03-29 07:53:53
Authentication key: 82DB 8659 D803 833E A58C  07AF 4572 02EB 5C92 137C
      created ....: 2024-03-29 07:53:34
General key info..: [none]
I will start by importing my public key. It can be directly downloaded from Github (see the URL of public key variable).
wget https://github.com/qjoly.gpg
gpg --import public.key
I can then verify my key and let GPG know that I trust it.
gpg --list-keys
gpg --edit-key quentinj@une-pause-cafe.fr
gpg> trust
gpg> 5
Now, my GPG keyring recognizes the private key stored on my Yubikey.
$ gpg --card-status
Reader ...........: 1050:0407:X:0
Application ID ...: D2760001240103040006224123220000
Application type .: OpenPGP
Version ..........: 3.4
Manufacturer .....: Yubico
Serial number ....: 22412322
Name of cardholder: Quentin JOLY
Language prefs ...: fr
Salutation .......:
URL of public key : https://github.com/qjoly.gpg
Login data .......: [non positionné]
Signature PIN ....: non forcé
Key attributes ...: ed25519 cv25519 ed25519
Max. PIN lengths .: 127 127 127
PIN retry counter : 3 0 3
Signature counter : 0
KDF setting ......: off
Signature key ....: E8D5 9EBC C28B 4ACC BEEB  74D2 312D FBFE 3C29 D864
      created ....: 2024-03-29 07:52:51
Encryption key....: 89F6 D00D E754 7C9C 7B32  143E 96F9 9A5D 69C1 54F7
      created ....: 2024-03-29 07:53:53
Authentication key: 82DB 8659 D803 833E A58C  07AF 4572 02EB 5C92 137C
      created ....: 2024-03-29 07:53:34
General key info..: pub  ed25519/312DFBFE3C29D864 2024-03-29 Quentin JOLY <quentinj@une-pause-cafe.fr>
sec>  ed25519/312DFBFE3C29D864  créé : 2024-03-29  expire : 2039-03-26
                                nº de carte : 0006 22412322
ssb#  ed25519/79C81E0291249128  créé : 2024-03-29  expire : 2026-03-29
ssb>  ed25519/457202EB5C92137C  créé : 2024-03-29  expire : 2026-03-29
                                nº de carte : 0006 22412322
ssb>  cv25519/96F99A5D69C154F7  créé : 2024-03-29  expire : 2026-03-29
                                nº de carte : 0006 22412322

$ gpg --list-secret-keys
sec>  ed25519 2024-03-29 [C] [expire : 2039-03-26]
      E8D59EBCC28B4ACCBEEB74D2312DFBFE3C29D864
      Nº de série de carte = 0006 22412322
uid          [  ultime ] Quentin JOLY <quentinj@une-pause-cafe.fr>
ssb#  ed25519 2024-03-29 [S] [expire : 2026-03-29]
ssb>  ed25519 2024-03-29 [A] [expire : 2026-03-29]
ssb>  cv25519 2024-03-29 [E] [expire : 2026-03-29]
Now, I can use my Yubikey to sign my commits.
Conclusion
Initially, I found the interest of an article on PGP quite limited. But by delving into the subject and discovering the various possible applications, I realize that it can be a very powerful tool to secure exchanges and ensure the integrity of files.
Furthermore, I have always put off my understanding of PGP by thinking it was too restrictive and didn’t add much. I am very happy to have embarked on these experiments.
I am still far from having explored all the possibilities of PGP; I will continue to use it and delve deeper to make the most of it.
Until then, you can still send me a little encrypted email to let me know what you thought of this article 😉 (my public key is available on my Github)
A huge thank you to Jérémy for reviewing this article!