talosctl-oidc: adding SSO to Talos Linux
If you follow my blog regularly, you know I have a genuine fondness for Talos Linux. It’s the OS I recommend without hesitation for running Kubernetes: immutable, minimalist, SSH-free, with a gRPC API for all administration. In short, it’s what a cloud-native OS should be.
But there’s one thing that has always bothered me a little: authentication. Talos uses mTLS (mutual TLS) to protect its API. In practice, for a user to run talosctl, they need a client certificate signed by the Talos CA. That certificate is something you generate and distribute manually.
For a solo homelab, that’s acceptable. But as soon as you’re working in a team, it quickly becomes a nightmare: managing certificates per person, revoking them when someone leaves, making sure nobody shares the same cert… All of that by hand. In 2026. While my cluster already runs a GoAuthentik with SSO everywhere.
So I built talosctl-oidc.
The problem with Talos certificates
To manage a Talos cluster, every user needs a ~/.talos/config file (called talosconfig) that contains:
- The addresses of the Talos nodes
- The cluster CA (to verify the server)
- A client certificate + private key (to authenticate)
context: my-cluster
contexts:
    my-cluster:
        endpoints:
            - 192.168.0.10
        ca: LS0tLS1CRUdJTi...
        crt: LS0tLS1CRUdJTi...
        key: LS0tLS1CRUdJTi...
These certificates are generated when the cluster is installed and have a default lifetime of one year. The problem: if you have 5 developers on your team, you need to generate 5 distinct certificates, distribute them securely, and have a method to renew them. And if someone leaves the team? You can’t revoke a single certificate — you have to regenerate the entire CA and redistribute to everyone.
# The "classic" way of giving a new contributor access
talosctl config new --roles os:admin contributor.yaml
This is exactly the kind of manual, fragile management you want to avoid in a production infrastructure 😅. You don’t want a checklist of things to revoke every time a colleague leaves.
And normally, in an ideal world, you don’t manage application access individually. You have a centralized identity system (an IdP like Authentik, Keycloak, Dex…) that manages users, groups, and which population is allowed to access which application.
This is relatively easy to integrate with the Kubernetes API (see this article on Authentik where I configure the Kubernetes API), but it’s not possible on Talos, unless you manage your clusters through Omni, the excellent product for managing multiple Talos clusters at scale. But if you have minimalist and airgapped environments, Omni isn’t necessarily the ideal solution.
So I racked my brain to find a solution that could bridge OIDC and Talos mTLS, without having to touch Talos itself (I clearly don’t have the skills to maintain a Talos fork).
The solution: a certificate exchange server
The idea behind talosctl-oidc is simple: build a bridge between the OIDC world (your IdP: Authentik, Keycloak, Dex…) and the Talos mTLS world.
Here’s how it works:

The generated certificate lasts 5 minutes. After that, you need to re-authenticate — or use --watch mode which automatically renews in the background.
Installation
Concretely, talosctl-oidc is a Go application that exposes an HTTPS API to exchange OIDC ID tokens for Talos client certificates. It’s a simple binary that runs somewhere (deployable via Docker, Helm, or systemd) and holds the Talos CA to sign certificates. On your side, that same binary is used to log in, interact with the server, and update your talosconfig.
Binaries are available on GitHub. For macOS and Linux:
# macOS Apple Silicon
brew install qjoly/tap/talosctl-oidc

# Linux x86_64
curl -sL -o talosctl-oidc \
  https://github.com/qjoly/talosctl-oidc/releases/latest/download/talosctl-oidc-linux-amd64
chmod +x talosctl-oidc
sudo mv talosctl-oidc /usr/local/bin/

# Verify
talosctl-oidc version

talosctl-oidc 0.0.4
  commit: 0.0.4
  built:  2026-04-05T19:37:26Z
Server configuration and startup
As mentioned above, I only maintain a single talosctl-oidc binary that can operate in server mode (serve) or client mode (login, status, logout). This approach is simpler to maintain (and the binary is only 10MB, so no weight concerns).
The talosctl-oidc serve server is the central component. It runs somewhere accessible by users (in the cluster, on a VPS, in your homelab…) and holds the Talos CA to sign certificates (we’ll see right away how to give it access to the CA).
Retrieving the Talos CA
To configure the server, we need the Talos CA (certificate + private key) to be able to sign client certificates. If you installed your cluster with talosctl, you already have a controlplane.yaml file that contains the CA encoded in base64 (and if you only have a talosconfig and your cluster is already installed, you can use talosctl get mc -n $NODE -o yaml to get the controlplane.yaml).
# Extract the CA from the Talos secret (if using talosctl)
yq '.machine.ca.crt' controlplane.yaml | base64 -d > talos-ca.crt
yq '.machine.ca.key' controlplane.yaml | base64 -d > talos-ca.key
Warning
The Talos CA private key is extremely sensitive. It allows signing certificates with any role. Treat it as a production secret: store it in a vault (Vault, Sealed Secrets, SOPS…) and NEVER share it.
Now we have everything we need on the Talos side. The talosctl-oidc server will never interact directly with the Talos API — it simply signs certificates with the CA. (This also means the machine running talosctl-oidc serve doesn’t need access to your Talos clusters to function.)
Creating an OIDC client in your IdP
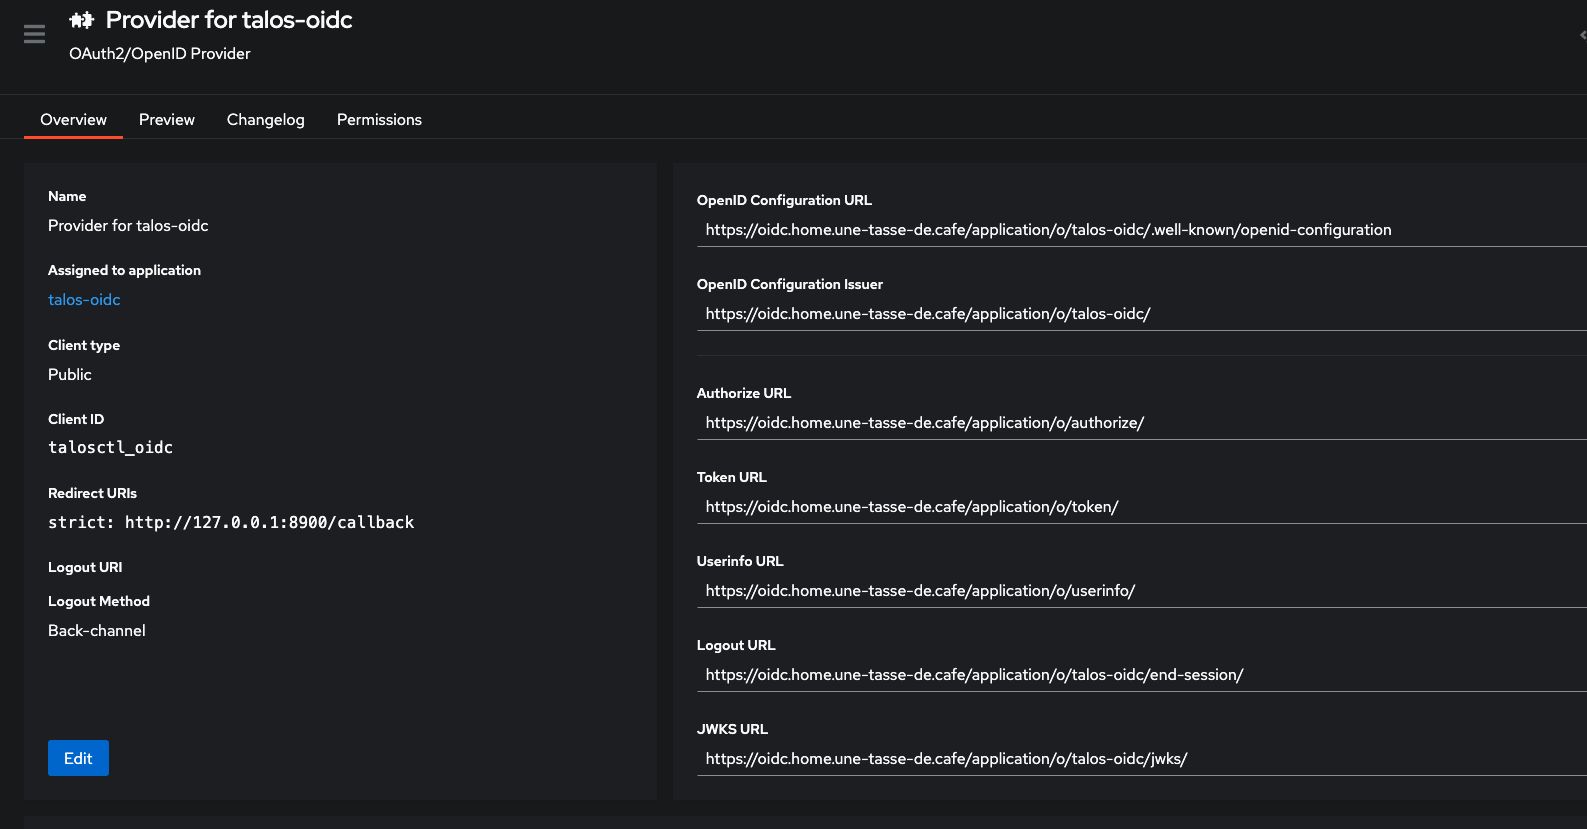
Whatever your IdP, you need to declare an OIDC client with these parameters:
- Client ID: a free identifier, e.g.
talosctl-oidc - Public client (no
client_secret) - Redirect URI:
http://127.0.0.1:8900/callback— this is where thetalosctl-oidc loginclient intercepts the authorization code after login - Scopes:
openid,profile,email,offline_access(the last one for the refresh token)
To illustrate concretely, here’s the config for an Authentik client — an open-source, highly flexible OIDC IdP I use for my homelab.
We can now deploy talosctl-oidc locally to test with our IdP.
Configuration file
Create a config.yaml file for the server:
# config.yaml
issuer_url: https://oidc.home.une-tasse-de.cafe/application/o/talos-oidc/
client_id: talosctl_oidc

ca_cert: ./talos-ca.crt
ca_key: ./talos-ca.key

listen: ":8443"

endpoints:
  - 192.168.0.124

cert_ttl: "5m"

roles:
  - os:admin
Info
To make the program configurable from anywhere, all configuration options can be passed via environment variables. For example, issuer_url can be configured with the TALOSCTL_OIDC_ISSUER_URL environment variable. Keys are detailed in the official project documentation on GitHub, but basically: TALOSCTL_OIDC_ + key name in uppercase + _ instead of dots.
Starting the server
Once the configuration is in place, start the server:
talosctl-oidc serve --config config.yaml
Here’s what the server displays at startup:
talosctl-oidc serve --config config_oidc.yaml
2026/04/05 22:03:41 Configuration loaded from file: config_oidc.yaml (env vars override)
2026/04/05 22:03:41 Loaded Talos CA from ./talos-ca.crt
2026/04/05 22:03:41 Audit log: stdout
2026/04/05 22:03:41 Admin API: disabled (set admin_token / TALOSCTL_OIDC_ADMIN_TOKEN to enable)
2026/04/05 22:03:41 Rate limiting: disabled
2026/04/05 22:03:41 IP allowlist: disabled
2026/04/05 22:03:41 RBAC: disabled (using static roles: [os:admin])
2026/04/05 22:03:41 Cert exchange server listening on :8443
2026/04/05 22:03:41 OIDC issuer: https://oidc.home.une-tasse-de.cafe/application/o/talos-oidc/
2026/04/05 22:03:41 Certificate TTL: 5m0s
2026/04/05 22:03:41 Roles: [os:admin]
2026/04/05 22:03:41 Endpoints: [192.168.0.124]
2026/04/05 22:03:41 TLS mode: generating self-signed certificate
2026/04/05 22:03:41 Self-signed CA fingerprint (SHA-256): 77ea5763a39629c9594f99285d4bd002293869b9bab61f1f161176bb375c3ef3
2026/04/05 22:03:41 Self-signed CA PEM (use with --server-ca on the login command):
-----BEGIN CERTIFICATE-----
MIIBvjCCAWSgAwIBAgIQflYwrB5fbBTHALlBCSQXMzAKBggqhkjOPQQDAjA/MRYw
FAYDVQQKEw10YWxvc2N0bC1vaWRjMSUwIwYDVQQDExx0YWxvc2N0bC1vaWRjIHNl
bGYtc2lnbmVkIENBMB4XDTI2MDQwNTIwMDI0MVoXDTM2MDQwMjIwMDM0MVowPzEW
MBQGA1UEChMNdGFsb3NjdGwtb2lkYzElMCMGA1UEAxMcdGFsb3NjdGwtb2lkYyBz
ZWxmLXNpZ25lZCBDQTBZMBMGByqGSM49AgEGCCqGSM49AwEHA0IABBV/WSiaIrso
9EEKsJdbQ8f1OZZD4kUpjj4nw93R8HaBs/QBViUv3hC3T2v/idFqHsCrc+GHQfus
w1uxdUpJC5ijQjBAMA4GA1UdDwEB/wQEAwIBBjAPBgNVHRMBAf8EBTADAQH/MB0G
A1UdDgQWBBTnTNFqdLlNGgBWTv5L+9pcyw400jAKBggqhkjOPQQDAgNIADBFAiEA
x0ishJkUcmYRdWVpHBZ/0ezUCv0dEc0GuHds07f7CD4CIE9Jvw5oRR+ydcvysdDp
T1F1zDdIBdX8grhKcs8lLNsN
-----END CERTIFICATE-----
By default, the server generates a self-signed TLS certificate. You can provide your own:
# config.yaml — with a real TLS certificate
tls_cert: ./server.crt
tls_key: ./server.key
If you’re using a self-signed certificate generated by serve (as in the example configuration), you’ll need to retrieve the public key of that certificate to provide to the client at login time (via the --server-ca option), so the client can verify the server’s identity. You can also tell talosctl-oidc to persist the self-signed certificate generated at startup (instead of generating a new one each time) by providing a storage path:
data_dir: ./data # Or via the TALOSCTL_OIDC_DATA_DIR environment variable
We therefore create a server-ca.crt file containing the public part of the self-signed certificate that will be used by the client.
-----BEGIN CERTIFICATE-----
MIIBvjCCAWSgAwIBAgIQflYwrB5fbBTHALlBCSQXMzAKBggqhkjOPQQDAjA/MRYw
FAYDVQQKEw10YWxvc2N0bC1vaWRjMSUwIwYDVQQDExx0YWxvc2N0bC1vaWRjIHNl
bGYtc2lnbmVkIENBMB4XDTI2MDQwNTIwMDI0MVoXDTM2MDQwMjIwMDM0MVowPzEW
MBQGA1UEChMNdGFsb3NjdGwtb2lkYzElMCMGA1UEAxMcdGFsb3NjdGwtb2lkYyBz
ZWxmLXNpZ25lZCBDQTBZMBMGByqGSM49AgEGCCqGSM49AwEHA0IABBV/WSiaIrso
9EEKsJdbQ8f1OZZD4kUpjj4nw93R8HaBs/QBViUv3hC3T2v/idFqHsCrc+GHQfus
w1uxdUpJC5ijQjBAMA4GA1UdDwEB/wQEAwIBBjAPBgNVHRMBAf8EBTADAQH/MB0G
A1UdDgQWBBTnTNFqdLlNGgBWTv5L+9pcyw400jAKBggqhkjOPQQDAgNIADBFAiEA
x0ishJkUcmYRdWVpHBZ/0ezUCv0dEc0GuHds07f7CD4CIE9Jvw5oRR+ydcvysdDp
T1F1zDdIBdX8grhKcs8lLNsN
-----END CERTIFICATE-----
There are many configuration options to customize the server’s behavior; we’ll cover some of them later. For now, the server is running and ready to receive authentication requests.
Client-side authentication
First login
Once the server is running, users can authenticate:
talosctl-oidc login \
  --provider https://oidc.home.une-tasse-de.cafe/application/o/talos-oidc/ \
  --client-id talosctl_oidc \
  --server https://localhost:8443 \
  --server-ca ./server-ca.crt   # if the server uses a self-signed cert
A browser opens automatically on your IdP.

After authentication, the terminal displays:
Waiting for authentication callback...
2026/04/05 22:11:56 Keychain unavailable (data passed to Set was too big), using file-based token cache
2026/04/05 22:11:56 Token cached in /Users/qjoly/Library/Application Support/talosctl-oidc/tokens.json
Authentication successful.
Exchanging token with cert server at https://localhost:8443...
Received ephemeral certificate (TTL: 300s)
Talosconfig updated: context "oidc" set with endpoints [192.168.0.124]
Config written to: /Users/qjoly/.talos/config
Certificate expires in 5m0s
And that’s it, talosctl works:
talosctl --context oidc version -n 192.168.0.124
Client:
        Tag:         v1.12.6
        SHA:         undefined
        Built:       2026-03-19T12:51:43Z
        Go version:  go1.26.1
        OS/Arch:     darwin/arm64
Server:
        NODE:        192.168.0.124
        Tag:         v1.12.6
        SHA:         a1b8bd61
        Built:
        Go version:  go1.25.8
        OS/Arch:     linux/amd64
        Enabled:     RBAC
Now you can run any talosctl command using the oidc context that was created… for 5 minutes (configurable). Because after that time is up… you’re out!
talosctl-oidc status
Context: oidc

--- OIDC Token ---
Issuer:    https://oidc.home.une-tasse-de.cafe/application/o/talos-oidc/
Client ID: talosctl_oidc
Status:    expired (at 2026-04-05T22:16:56+02:00)
Refresh:   available

--- Talosconfig ---
Path:      /Users/qjoly/.talos/config
Status:    context "oidc" exists
Endpoints: [192.168.0.124]
Active:    yes (current context)
Client cert: present
But 5 minutes isn’t very long for cluster operations. That’s where --watch mode comes in.
Automatic background renewal
If you added the offline_access claim to the OIDC client scopes, the server provides a refresh token in addition to the ID token. This refresh token allows the client to request a new ID token without the user having to re-authenticate on Authentik. Thus, we can add a --watch login mode that runs in the background and automatically renews the certificate before it expires.
# Launch background renewal
talosctl-oidc login \
  --provider https://oidc.home.une-tasse-de.cafe/application/o/talos-oidc/ \
  --client-id talosctl_oidc \
  --server https://localhost:8443 \
  --server-ca ./server-ca.crt \
--watch
--watch mode uses the refresh token to renew the ID token without user intervention, then exchanges that new token for a fresh certificate before expiration.
Tip
For macOS users, you’ll likely see this log:
2026/04/05 23:10:09 [DEBUG] Attempting to store in keychain (size: 3497 bytes)
2026/04/05 23:10:09 Keychain unavailable (data passed to Set was too big), using file-based token cache
Unfortunately, the macOS keychain has an entry size limit that is often exceeded by OIDC tokens (especially with refresh tokens). talosctl-oidc handles this case by automatically falling back to a file-based token cache, but this means tokens are stored in plaintext on disk. This is a trade-off I had to make to ensure macOS compatibility, but be aware that it may present a security risk if other users have access to your user account.
The refresh token has a longer lifetime (configurable on the IdP side, often several days or weeks). As long as the refresh token is valid, the client can keep renewing the certificate without the user needing to log back in.
Info
And when you’re done and don’t want to wait for the certificate to expire, you can simply log out to clear the token from the cache and remove the context from talosconfig:
talosctl-oidc logout
Cached token cleared.
Context "oidc" removed from talosconfig.
Revoking a certificate
For revocation, you must go through the IdP. Since certificates are ephemeral, simply revoking the user’s refresh token in the IdP is enough to make all certificates issued from that token invalid at their expiration (5 minutes max). No need to touch the CA or regenerate certificates for the entire team.
Access management with RBAC
This is where it gets really interesting. Until now, all authenticated users receive the same role (os:admin in our config). But Talos supports multiple roles with different access levels:
| Role | Access |
|---|---|
os:admin | Full access |
os:operator | Common operations (reboot, etc.) |
os:reader | Read-only |
os:etcd:backup | etcd backup only |
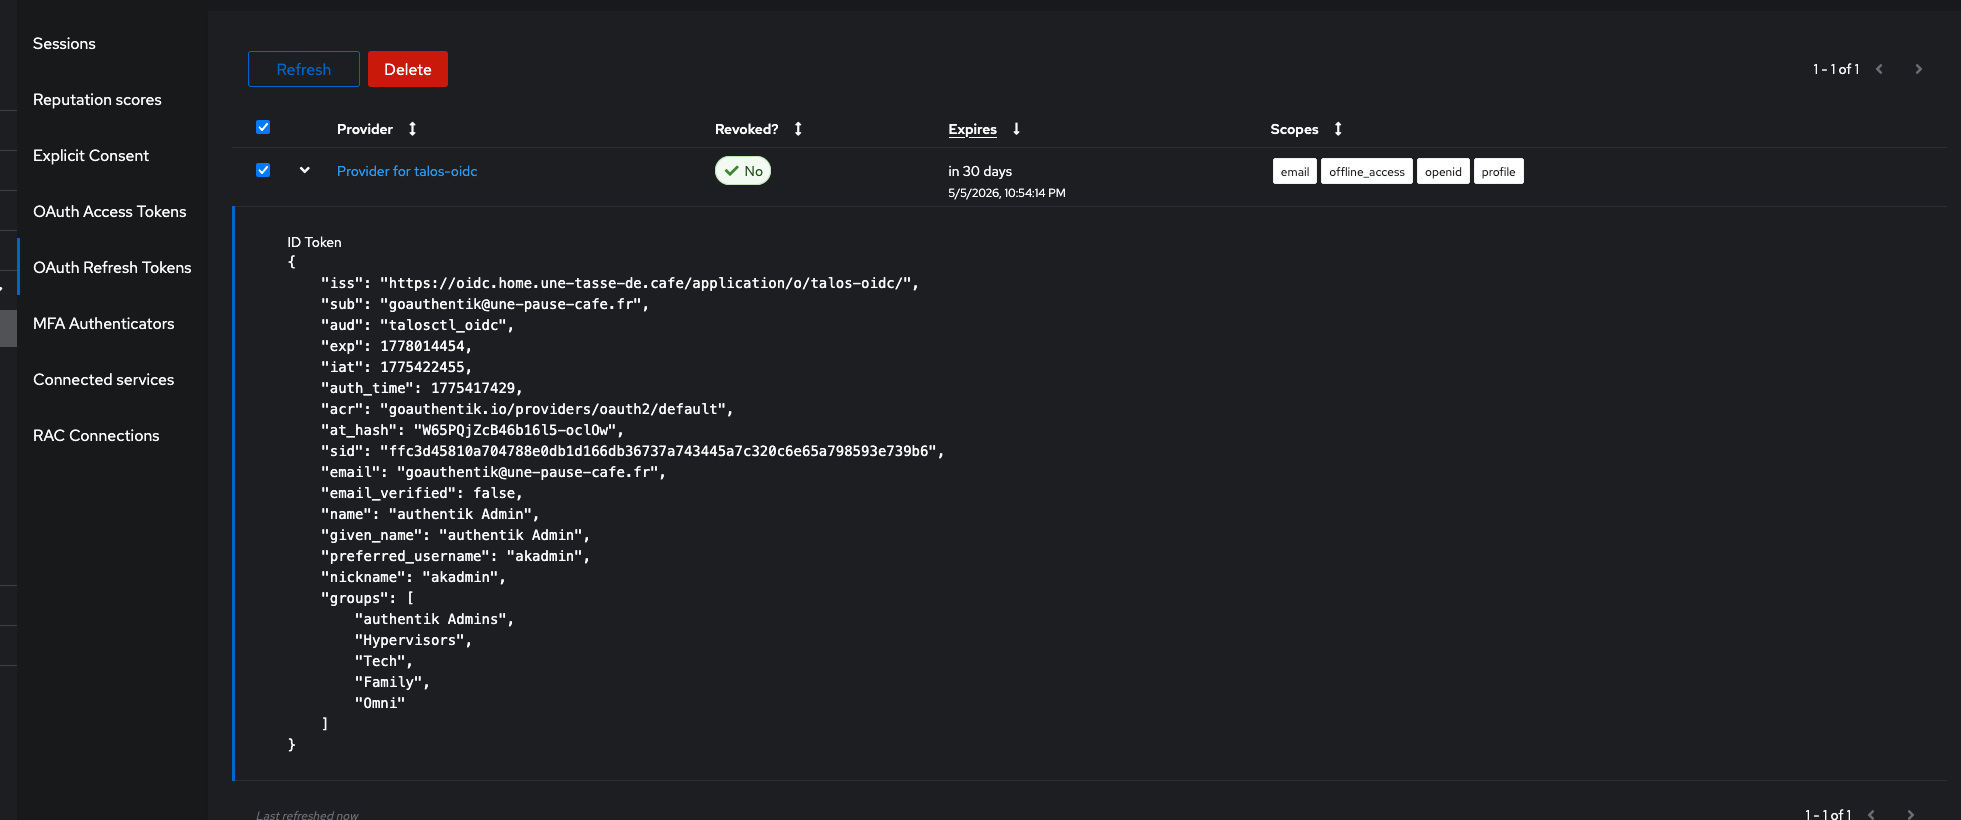
With talosctl-oidc, you can map OIDC claims to Talos roles. For example, if your IdP populates a groups claim in the JWT token, you can write:
# config.yaml
roles: []   # no default role = deny if no rule matches

rbac:
  rules:
    - claim: groups
      value: platform-admins
      roles:
        - os:admin

    - claim: groups
      value: developers
      roles:
        - os:reader

    - claim: groups
      value: system-team
      roles:
        - os:operator
        - os:etcd:backup
A user in the developers group receives only os:reader — they can inspect the cluster but not modify it. A member of platform-admins gets os:admin. Rules accumulate: a user in both groups gets the union of roles.
Info
The OIDC claim can be a string or an array. talosctl-oidc supports both formats automatically. Check what your IdP sends by decoding your ID token with jwt.io.
Admin interface
The server exposes an admin API (protected by a Bearer token) to monitor issued certificates:
# config.yaml
admin_token: my-secret-token
data_dir: ./data   # stats storage
# List active certificates
curl -H "Authorization: Bearer VivLeCafe" \
  https://localhost:8443/admin/certs -k
[
  {
    "subject": "goauthentik@une-pause-cafe.fr",
    "email": "goauthentik@une-pause-cafe.fr",
    "issued_at": "2026-04-05T20:43:14.941923Z",
    "expires_at": "2026-04-05T22:48:14.941874+02:00",
    "client_ip": "[::1]:59853",
    "roles": [
      "os:admin"
    ],
    "ttl": "5m0s",
    "fingerprint": "417ea770c83cd6332d7f3d3d40abc1d1ca2b0cb5d734844e8b8a833649a23374"
  },
  # ...

# Global statistics
curl -H "Authorization: Bearer VivLeCafe" \
  https://localhost:8443/admin/stats -k
{"started_at":"2026-04-05T20:23:50.096935Z","uptime":"8m53s","total_certs_issued":39,"active_certs":22,"total_auth_successes":39,"total_auth_failures":0,"total_cert_errors":0}
AI usage in this project
This open-source project was developed by me, but I made heavy use of AI to accelerate certain tasks. While I consider myself capable of writing Go, understanding the OIDC protocol and its implementation, and building a web application, I’m far from being able to do all of this quickly and robustly without an AI boost.
This project is also a huge sandbox for me to experiment with AI capabilities in software development. For the curious, I have a Claude subscription which proved quite useful for implementing certain features. The AI was a good pair-programming companion that also helped me organize GitHub issues, write documentation, and keep it up to date throughout development.
And if you think this is just another totally vibe-coded open-source project: think again, because I learned a lot building this project and even though AI participated, there is not a single line of code I didn’t review, not a PR I didn’t read through, not an issue I didn’t triage. AI is a tool, not a substitute for my thinking.
Conclusion
That’s the project I’ve been working on for a few weeks. The initial idea is simple — a certificate exchange server — but there are many details to get right to make it genuinely usable in a team setting.
What I appreciate about this approach is that it doesn’t touch Talos itself. We respect the OS design while adding a modern identity management layer on top. The 5-minute ephemeral certificates are actually far more secure than the annual certificates we were distributing before.
If this project interests you, I invite you to take a look at the GitHub repo: github.com/qjoly/talosctl-oidc, and if you’d like: contribute! Whether it’s adding features, improving documentation, or simply testing and giving feedback, any contribution is welcome and greatly appreciated.
Happy brewing, everyone ☕