Customizing Talos with Extensions

When I present Talos, I often start by showcasing the speed of cluster deployment, the lightweight OS, the security, the simplicity of deployment, and I conclude by emphasizing that despite being minimalist, it is still extensible.
To recap, Talos is an OS dedicated to deploying Kubernetes nodes. It is immutable and minimalist, with the unique characteristic that it is not managed like a traditional Linux system via SSH but rather through a gRPC API that allows secure OS management. This API enables you to perform installation, updates, resets, configuration, and management of Kubernetes nodes.
In this article, I want to show you how to customize Talos to adapt it to your needs.
Why Install Extensions?
Since Talos is a minimalist OS, it doesn’t include all the tools you might expect from a traditional OS. If you want to install an EDR agent (like CrowdStrike), a driver for an NVIDIA card, or any other program that cannot run in Kubernetes (including static pods), you’ll need to use extensions.
There are two ways to install an extension on Talos:
- By using a custom Talos image that already includes the extension;
- Or by specifying an OCI image containing the extension to be installed.
Each method corresponds to a different use case.
The custom image is useful when the extension is necessary for Talos in maintenance mode (when it is waiting for its configuration). A common example of this case could be a driver (e.g. a RAID card) whose presence is mandatory for Talos to detect the device (if it doesn’t find a disk, it cannot be installed).
The other method, which involves installing the node using a specific OCI image(installer), is useful when the extension needs to be active while the node is already running. For example, a RuntimeClass to launch MicroVMs in Kubernetes, a Tailscale VPN…
Of course, it is possible to use both methods simultaneously. In the case of the RAID driver, it must be present in the base Talos image for the disk to be recognized, and then reinstalled via the OCI image so that the extension is retained after the OS installation. Thus, it is needed both before and after installation.
An important point to keep in mind: if you specify in the Talos configuration an image providing an extension (in the machine.install.image field or during an upgrade), it will replace the extensions already present.


In summary, here’s what you need to remember:
- If you install a custom Talos image and use the default OCI image (
ghcr.io/siderolabs/installer:v1.x.x), the extension will be retained after the node installation. - If you install a custom Talos image and use a different OCI image (in the configuration or during an update), the extension will not be retained.
How do we install an extension?
Let’s take a concrete example. I often use Proxmox in my labs. It’s a hypervisor I appreciate for its flexibility and simplicity of use. Notably, it has a handy feature: displaying the IPs of VMs in the web interface. To achieve this, you need to install an agent on each VM so they can report this information.
Thus, we need to install the qemu-guest-agent on our nodes. Let’s see how to do this.
Installing a Custom Talos Image
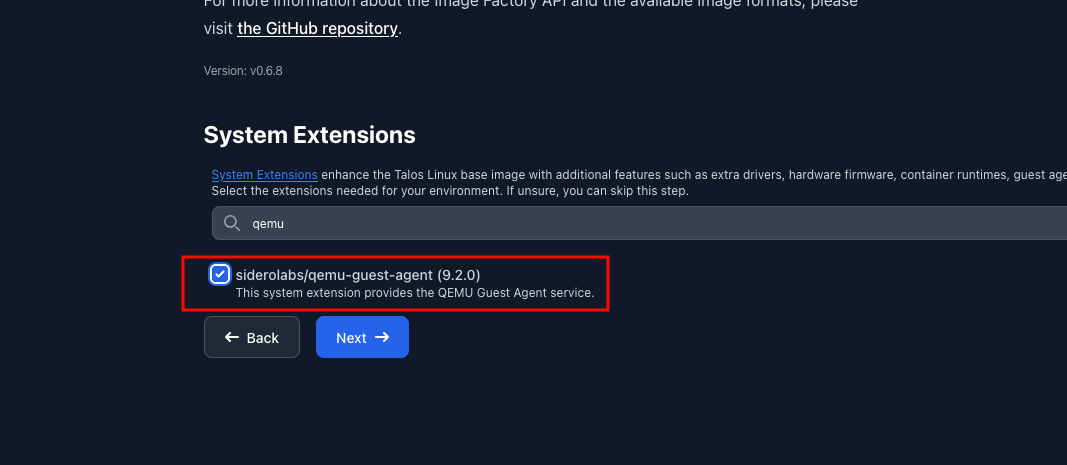
The simplest method to create this image, which already contains the extension, is to use Factory. This site allows you to fill out a form to create an image tailored to your needs (architecture, kernel args, Talos version, extensions).
You will be presented with a page asking you to check the various extensions you want to install. Simply check qemu-guest-agent and validate.
Depending on how you want to install your machine, you will have the choice between:
- Downloading the ISO image;
- Downloading the disk image (raw);
- Using a PXE script.
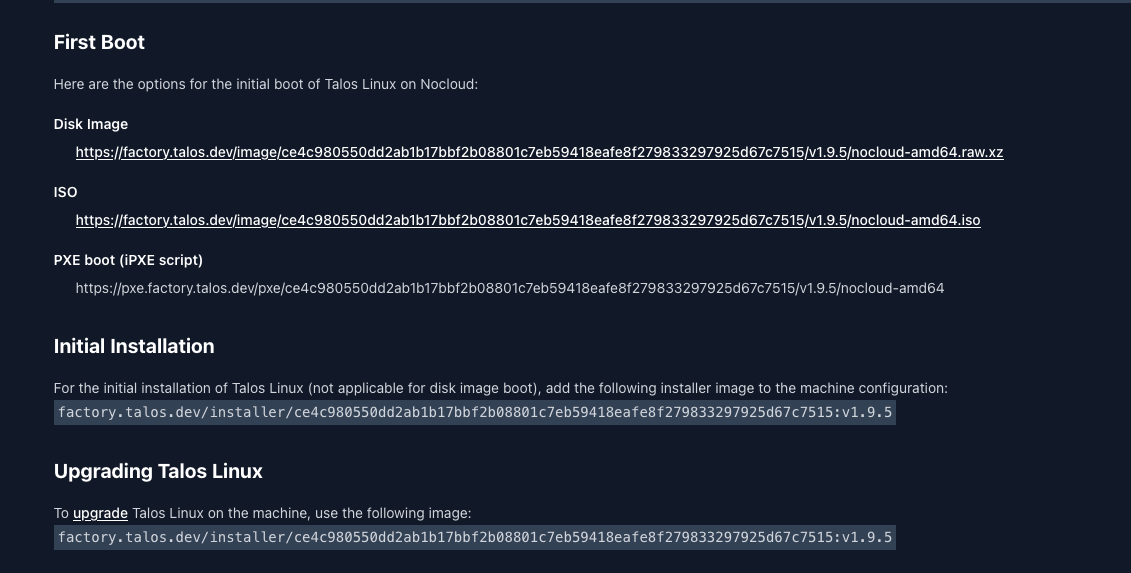
Your image request is associated with an ID (ce4c980550dd2ab1b17bbf2b08801c7eb59418eafe8f279833297925d67c7515 in my case) that you can use to retrieve the image at any time. It is also possible to script the image generation using the Factory API. When you finish filling out the form, you get a summary of your request “as code” in YAML:
customization:
    systemExtensions:
        officialExtensions:
            - siderolabs/qemu-guest-agent
$ yq eval -o=json customization.yaml > customization.json # Convert it to JSON
$ curl -s -X POST https://factory.talos.dev/schematics \
  -H "Content-Type: application/json" \
  -d @customization.json
{"id":"ce4c980550dd2ab1b17bbf2b08801c7eb59418eafe8f279833297925d67c7515"}
From there, you can easily integrate the image generation into a pipeline or automation script… Or continue using the Factory web interface, it’s up to you 😄.


Thus, I will import the image into Proxmox. Since my VM is already created, I just need to import the disk image onto a specific disk and add this disk in the boot order.
ssh root@<proxmoxIP>
schemadicid=ce4c980550dd2ab1b17bbf2b08801c7eb59418eafe8f279833297925d67c7515
wget https://factory.talos.dev/image/${schemadicid}/v1.9.5/nocloud-amd64.raw.xz
xz -d nocloud-amd64.raw.xz
qm disk import 301 ./nocloud-amd64.raw zfs --target-disk scsi0
qm disk resize 301 scsi0 +30G
qm set 301 --boot order='scsi0'
qm start 301
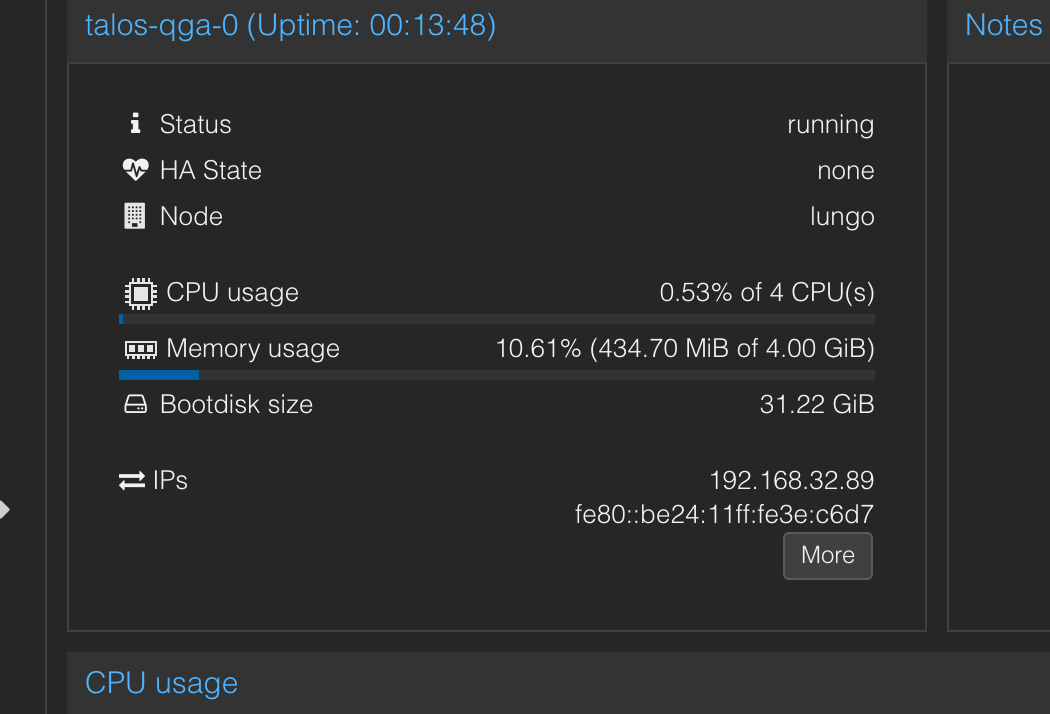
My machine is ready, and the IP address is correctly displayed in the Proxmox web interface.
$ talosctl get extensions -e 192.168.32.89 -n 192.168.32.89  --insecure
NODE   NAMESPACE   TYPE              ID   VERSION   NAME               VERSION
       runtime     ExtensionStatus   0    1         qemu-guest-agent   9.2.0
       runtime     ExtensionStatus   1    1         schematic          ce4c980550dd2ab1b17bbf2b08801c7eb59418eafe8f279833297925d67c7515
However, Talos is not yet installed (we’re still in maintenance mode). We can then generate the configuration and apply it directly to the node.
talosctl gen config test https://192.168.32.89:6443 # Use the default image ghcr.io/siderolabs/installer:v1.x.x
export TALOSCONFIG=./talosconfig
talosctl config endpoint 192.168.32.89
talosctl config node 192.168.32.89
talosctl apply -f controlplane.yaml
talosctl bootstrap
Since we did not use an OCI image containing an extension, the one present in our custom image is still here.
$ talosctl get extensions
NODE            NAMESPACE   TYPE              ID   VERSION   NAME               VERSION
192.168.32.89   runtime     ExtensionStatus   0    1         qemu-guest-agent   9.2.0
192.168.32.89   runtime     ExtensionStatus   1    1         schematic          ce4c980550dd2ab1b17bbf2b08801c7eb59418eafe8f279833297925d67c7515
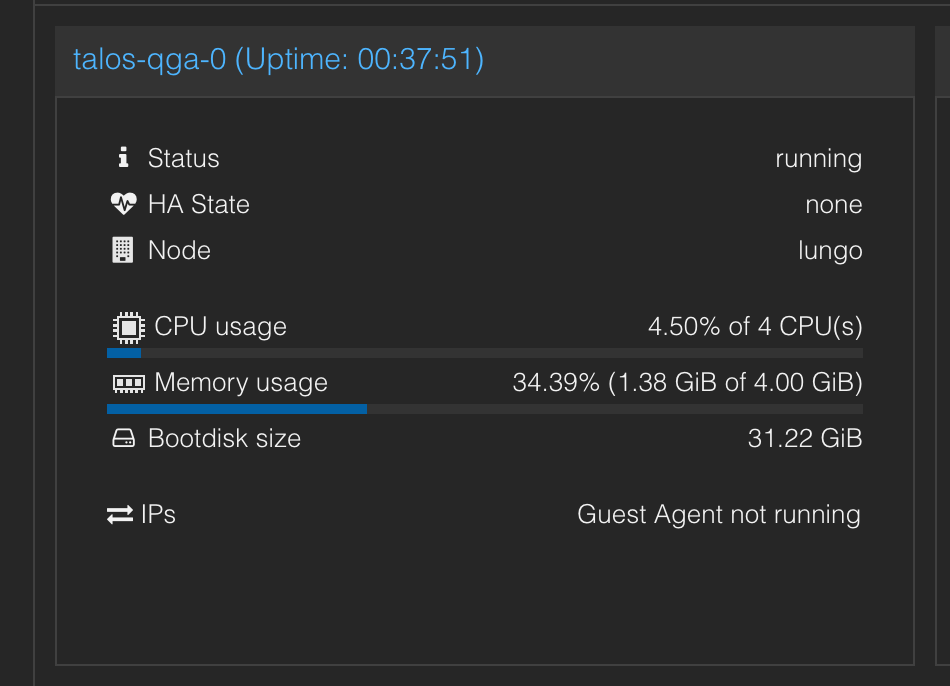
Now let’s test updating our node using a new OCI image generated by Factory but without the qemu-guest-agent extension, with the configuration customization: {} (an image generated on Factory without any modified parameters or extensions). I obtain the ID 376567988ad370138ad8b2698212367b8edcb69b5fd68c80be1f2ec7d603b4ba:
schematicid=376567988ad370138ad8b2698212367b8edcb69b5fd68c80be1f2ec7d603b4ba
talosctl upgrade -i factory.talos.dev/installer/${schematicid}:v1.9.5
Notice that the version of talos is specified in the tag, meaning that you’ll keep the same schematic ID for the next version. This is a good practice to avoid having to update the schematic ID each time you want to update Talos.
Once the update is complete, I can see that the qemu-guest-agent extension is no longer present on the node.
$ talosctl get extensions
NODE            NAMESPACE   TYPE              ID   VERSION   NAME        VERSION
192.168.32.89   runtime     ExtensionStatus   0    1         schematic   376567988ad370138ad8b2698212367b8edcb69b5fd68c80be1f2ec7d603b4ba
From the point of view of Proxmox, The agent is no longer present on the VM:
But concretely, what is an extension?
We have discussed extensions, but we haven’t really dived into what an extension is.
An extension is a privileged container that has its own filesystem present on the host. The container’s root is located in /usr/local/lib/containers/<extension>/, and its definition is in /usr/local/etc/containers/<extension>.yaml.
$ talosctl ls /usr/local/lib/containers/qemu-guest-agent
NODE            NAME
192.168.32.89   .
192.168.32.89   dev
192.168.32.89   etc
192.168.32.89   lib
192.168.32.89   proc
192.168.32.89   qemu-ga
192.168.32.89   run
192.168.32.89   sbin
192.168.32.89   sys
192.168.32.89   system
192.168.32.89   usr
192.168.32.89   var
$ talosctl ls /usr/local/etc/containers/
NODE            NAME
192.168.32.89   .
192.168.32.89   qemu-guest-agent.yaml
When Talos starts, it reads the files present in /usr/local/etc/containers/ and creates a container for each YAML file present.
Now let’s take a closer look at the definition YAML file:
# talosctl cat /usr/local/etc/containers/qemu-guest-agent.yaml
name: qemu-guest-agent
depends:
  - path: /system/run/machined/machine.sock
  - path: /dev/virtio-ports/org.qemu.guest_agent.0
container:
  entrypoint: ./qemu-ga
  mounts:
    # Shared libraries.
    - source: /lib
      destination: /lib
      type: bind
      options:
        - bind
        - ro
    - source: /usr/lib
      destination: /usr/lib
      type: bind
      options:
        - bind
        - ro
    # State files.
    - source: /system/run/qemu-guest-agent
      destination: /var/run
      type: bind
      options:
        - rshared
        - rbind
        - rw
    # Device files.
    - source: /dev
      destination: /dev
      type: bind
      options:
        - rshared
        - rbind
        - rw
    # `/sbin/init` talks to `machined`.
    - source: /system/run/machined/machine.sock
      destination: /system/run/machined/machine.sock
      type: bind
      options:
        - rshared
        - rbind
        - ro
    - source: /sbin/init
      destination: /sbin/shutdown
      type: bind
      options:
        - bind
        - ro
restart: always
It’s not more complex than filling out a docker-compose.yaml. We find the same concepts:
name: the name of the extension;depends: the dependencies of the extension (the files that must be present before it starts);- an entrypoint;
mounts: the host-to-container mount points;restart: the extension’s restart policy.
Info
the depends section is very interesting and quite powerful. You can specify files (as above), but also the presence of configuration, the status of a service… The possibilities are numerous, you can learn more here.
We’re starting to demystify the topic of extensions. However, there’s one small point to address: how to inject a configuration file into an extension?
Injecting Configuration into an Extension
In the case of the qemu-guest-agent extension, there is no configuration. But what about an extension like tailscale? This one allows you to connect your nodes to a Tailscale VPN network (for example, if you want to make the Talos API accessible without exposing the node).
In this case, I can use the ExtensionServiceConfig object to inject the configuration into the extension via environment variables or configuration files.
apiVersion: v1alpha1
kind: ExtensionServiceConfig
name: tailscale
environment:
  - TS_AUTHKEY=<your auth key>
Then apply this patch to the machine(s) in my cluster.
talosctl patch mc -p @tailscale-config.yaml
Other extensions may also require configuration files. Here’s an example with the nut-client extension, which allows managing UPS devices via the NUT (Network UPS Tools) protocol. In this case, you can inject a configuration file into the extension via the following patch:
apiVersion: v1alpha1
kind: ExtensionServiceConfig
name: nut-client # Name of the extension service.
# The config files for the extension service.
configFiles:
    - content: MONITOR ${upsmonHost} 1 remote username password # The content of the extension service config file.
      mountPath: /usr/local/etc/nut/upsmon.conf # The mount path of the extension service config file.
# The environment for the extension service.
environment:
    - NUT_UPS=upsname
Of course, the configuration files and environment variables must be adapted based on the extension you are using. So always check the extension’s documentation to know what needs to be injected.
We’ve covered a lot to understand what an extension is, but the best way to grasp these concepts is to create our own extension. Let’s go!
Creating an Extension
My need: Recently, I’ve been experimenting with a Chaos-Testing stack called Chaos-Mesh. Essentially, it’s a tool that introduces errors into your Kubernetes cluster to test the resilience of your applications. Chaos-Mesh can act from within the cluster or externally via an agent installed on each node. My goal is to install it on my Talos nodes.

Chaosd: How Does It Work?
Let’s first understand how Chaosd works in a normal context. When you install chaosd and run chaosd server, it listens on port 31767 for HTTP (and 31768 if HTTPS is configured). SSL certificates are directly generated by Chaos-Mesh and stored in a Kubernetes secret.
kubectl get secret chaos-mesh-chaosd-client-certs -n chaos-mesh \
        -o "jsonpath={.data['ca\.crt']}" | base64 -d > ca.crt
kubectl get secret chaos-mesh-chaosd-client-certs -n chaos-mesh \
        -o "jsonpath={.data['ca\.key']}" | base64 -d> ca.key
mkdir -p out
./bin/chaosctl pm generate --cacert=./ca.crt --cakey=./ca.key --path ./out
ls out
chaosd.crt chaosd.key
chaosd server --cert ./out/chaosd.crt --key ./out/chaosd.key
After this, Chaosd also creates the file chaosd.dat, a SQLite database that contains information about the tests run on the node.
In summary, we need to:
- Run Chaosd with the command
chaosd server, specifying the TLS certificates as arguments (if we want to use HTTPS); - Inject the TLS certificates into the container (via an
ExtensionServiceConfig); - Save the SQLite database in a persistent volume (via a mount).
The persistence part is a bit trickier than expected, because it directly uses the binary’s path chaosd. So we need to plan to run it directly in the volume (and since the volume is necessarily empty at the first start, this implies copying the binary into the volume).
Creating Our OCI Image
Creating a Talos extension is not exactly like creating a Dockerfile for a traditional application. Talos uses this OCI artifact to create the image’s filesystem in /var/lib/containers/ and retrieve the files containing metadata and container definitions. In practice, a .tar.gz archive would suffice (using OCI simplifies packaging and distribution of the extension).
Here’s the image architecture:
/manifest.yaml
/rootfs/usr/local/etc/containers/chaosd.yaml
/rootfs/usr/local/lib/containers/chaosd/
  ├── chaosd
  ├── lib64
  └── lib
What you need to remember is that the /rootfs/ path corresponds to Talos’s filesystem. You can modify Talos (in case you want to add a driver, kernel module, etc.) or create a container (as in our case).
Let’s start with the simplest part: creating the metadata file manifest.yaml. This file defines the extension’s name, version, etc.
version: v1alpha1
metadata:
  name: chaosd
  version: "VERSION"
  author: qjoly
  description: chaosd is a chaos engineering tool controlled by ChaosMesh
  compatibility:
    talos:
      version: ">= v1.8.0"
The version field is directly modified in my CI/CD pipeline that generates the OCI image. I’ll not go into detail about this part, but you can find the code here.
Now, let’s create the DockerFile. I’ll do a first stage to build the chaosd binary and a second stage that adheres to the format expected by Talos.
FROM golang:1.20.14-bullseye AS builder
RUN apt-get update && apt-get install -y wget
ENV CHAOSD_VERSION=v1.4.0
WORKDIR /
RUN wget https://github.com/chaos-mesh/chaosd/archive/refs/tags/$CHAOSD_VERSION.tar.gz \
    && mkdir /chaosd \
    && tar xfz $CHAOSD_VERSION.tar.gz -C /chaosd --strip-components=1
WORKDIR /chaosd
RUN make chaosd
RUN make chaos-tools
FROM scratch
COPY --from=builder /chaosd/bin/chaosd /rootfs/usr/local/lib/containers/chaosd/chaosd
COPY --from=builder /chaosd/bin/tools /rootfs/usr/local/lib/containers/chaosd/usr/bin
COPY --from=builder /bin/dd /rootfs/usr/local/lib/containers/chaosd/bin/dd
COPY --from=builder /lib /rootfs/usr/local/lib/containers/chaosd/lib
COPY --from=builder /lib64 /rootfs/usr/local/lib/containers/chaosd/lib64
COPY chaosd.yaml /rootfs/usr/local/etc/containers/chaosd.yaml
COPY manifest.yaml /
WORKDIR /rootfs/usr/local/lib/containers/chaosd/
I used the same base image (golang:1.20.14-bullseye) as in Chaosd’s pipelines.
Let’s analyze the Dockerfile:
- We build the
chaosdbinary and chaos-tools (executables that can be called bychaosd, e.g.,stress-ngormemStress). - We build the final image by copying the binary and dependencies into the correct directory.
- We copy the definition file
chaosd.yaml(not yet created, we’ll do it later) and the metadata filemanifest.yamlinto the correct directory.
Simple, right? I based it on a Scratch image to adhere to Talos’s minimalist philosophy, but I could have used an Alpine or Debian image without any issues (if I had other dependencies to install).
Notice that we don’t specify a CMD or ENTRYPOINT. That’s normal; this OCI image is not launched as a container (remember, Talos uses the content of this image in its filesystem). It’s up to us to define it in the chaosd.yaml definition file.
name: chaosd
depends:
  - network:
      - addresses
      - connectivity
container:
  entrypoint: /chaosd
  args:
    - server
  # In scratch, there is no PATH variable, we need it to allow the chaosd to find the tools
  environment:
    - PATH=/usr/local/sbin:/usr/local/bin:/usr/sbin:/usr/bin:/sbin:/bin
  security:
    # Temporary solution to create the SQLite database anywhere
    # We will fix it in the future
    writeableRootfs: true
  mounts:
  # Needed for chaos testing on disk
    - source: /dev
      destination: /dev
      type: bind
      options:
        - bind
        - rw
  # Where chaosd will store the SQLite database
    - source: /var/lib/chaosd
      destination: /var/lib/chaosd
      type: bind
      options:
        - bind
        - rw
restart: always
As with the DockerFile, let’s take the time to analyze this definition file:
- The container only starts if the network is available on the Talos machine.
- The container is launched with the command
chaosd server(the entrypoint is the chaosd binary followed by theserverargument). - It has permission to write to the root filesystem (this is a temporary solution; we’ll fix it later in the mount section).
docker build -t ghcr.io/qjoly/talos.chaosd.extension/app:latest .
docker push ghcr.io/qjoly/talos.chaosd.extension/app:latest
Now that we have our OCI artifact (and it’s available on a registry), there’s only one final step left to install it on a Talos machine.
Creating a Talos Image
Yes, usually we use factory.talos.dev to create a Talos image, but it’s not possible to use it to add our extension since it only references official extensions. So we’ll need to rely on imager, the project that Factory uses to create images. With it, we can create a Talos image with the extensions of our choice (whether official or not).
TALOS_VERSION=v1.9.4
ARCH=amd64
IMAGE_EXT=ghcr.io/qjoly/talos.chaosd.extension/app:latest
PROFILE=installer
docker run --rm -t -v /dev:/dev --privileged \
    -v "$PWD/_out:/out" "ghcr.io/siderolabs/imager:$TALOS_VERSION" \
    --arch "${ARCH}" --system-extension-image ${IMAGE_EXT} "${PROFILE}"
Tip
If you want to use a private registry (like GitHub Container Registry), you need to add the -e GITHUB_TOKEN=${{ secrets.GHCR_PAT }} option to the command. This token must have the read:packages scope.
For other registries, you can mount the Docker config file in the container using -v ~/.docker/config.json:/root/.docker/config.json:ro.
The installer profile is the one that allows creating an OCI image that we can use for Talos installation or updates. After this command, we get a tar archive containing the Talos image with our extension. If we wanted to create an ISO image, we would use the iso profile, or metal for a disk image (doc).
$ ls _out
installer-amd64.tar
$ docker load -i ./_out/installer-${ARCH}.tar
Loaded image: ghcr.io/siderolabs/installer:v1.9.4
$ docker tag ghcr.io/siderolabs/installer:v1.9.4  \
         ghcr.io/qjoly/talos.chaosd.extension/installer:${TALOS_VERSION}
$ docker push ghcr.io/qjoly/talos.chaosd.extension/installer:${TALOS_VERSION}
This image ghcr.io/qjoly/talos.chaosd.extension/installer:v1.9.4 is exactly what we need to install our extension.
Installing the Extension
I’ll take an official Talos image (here a v1.8.4, it’s a bit old but we’ll update it) to use as a test subject.
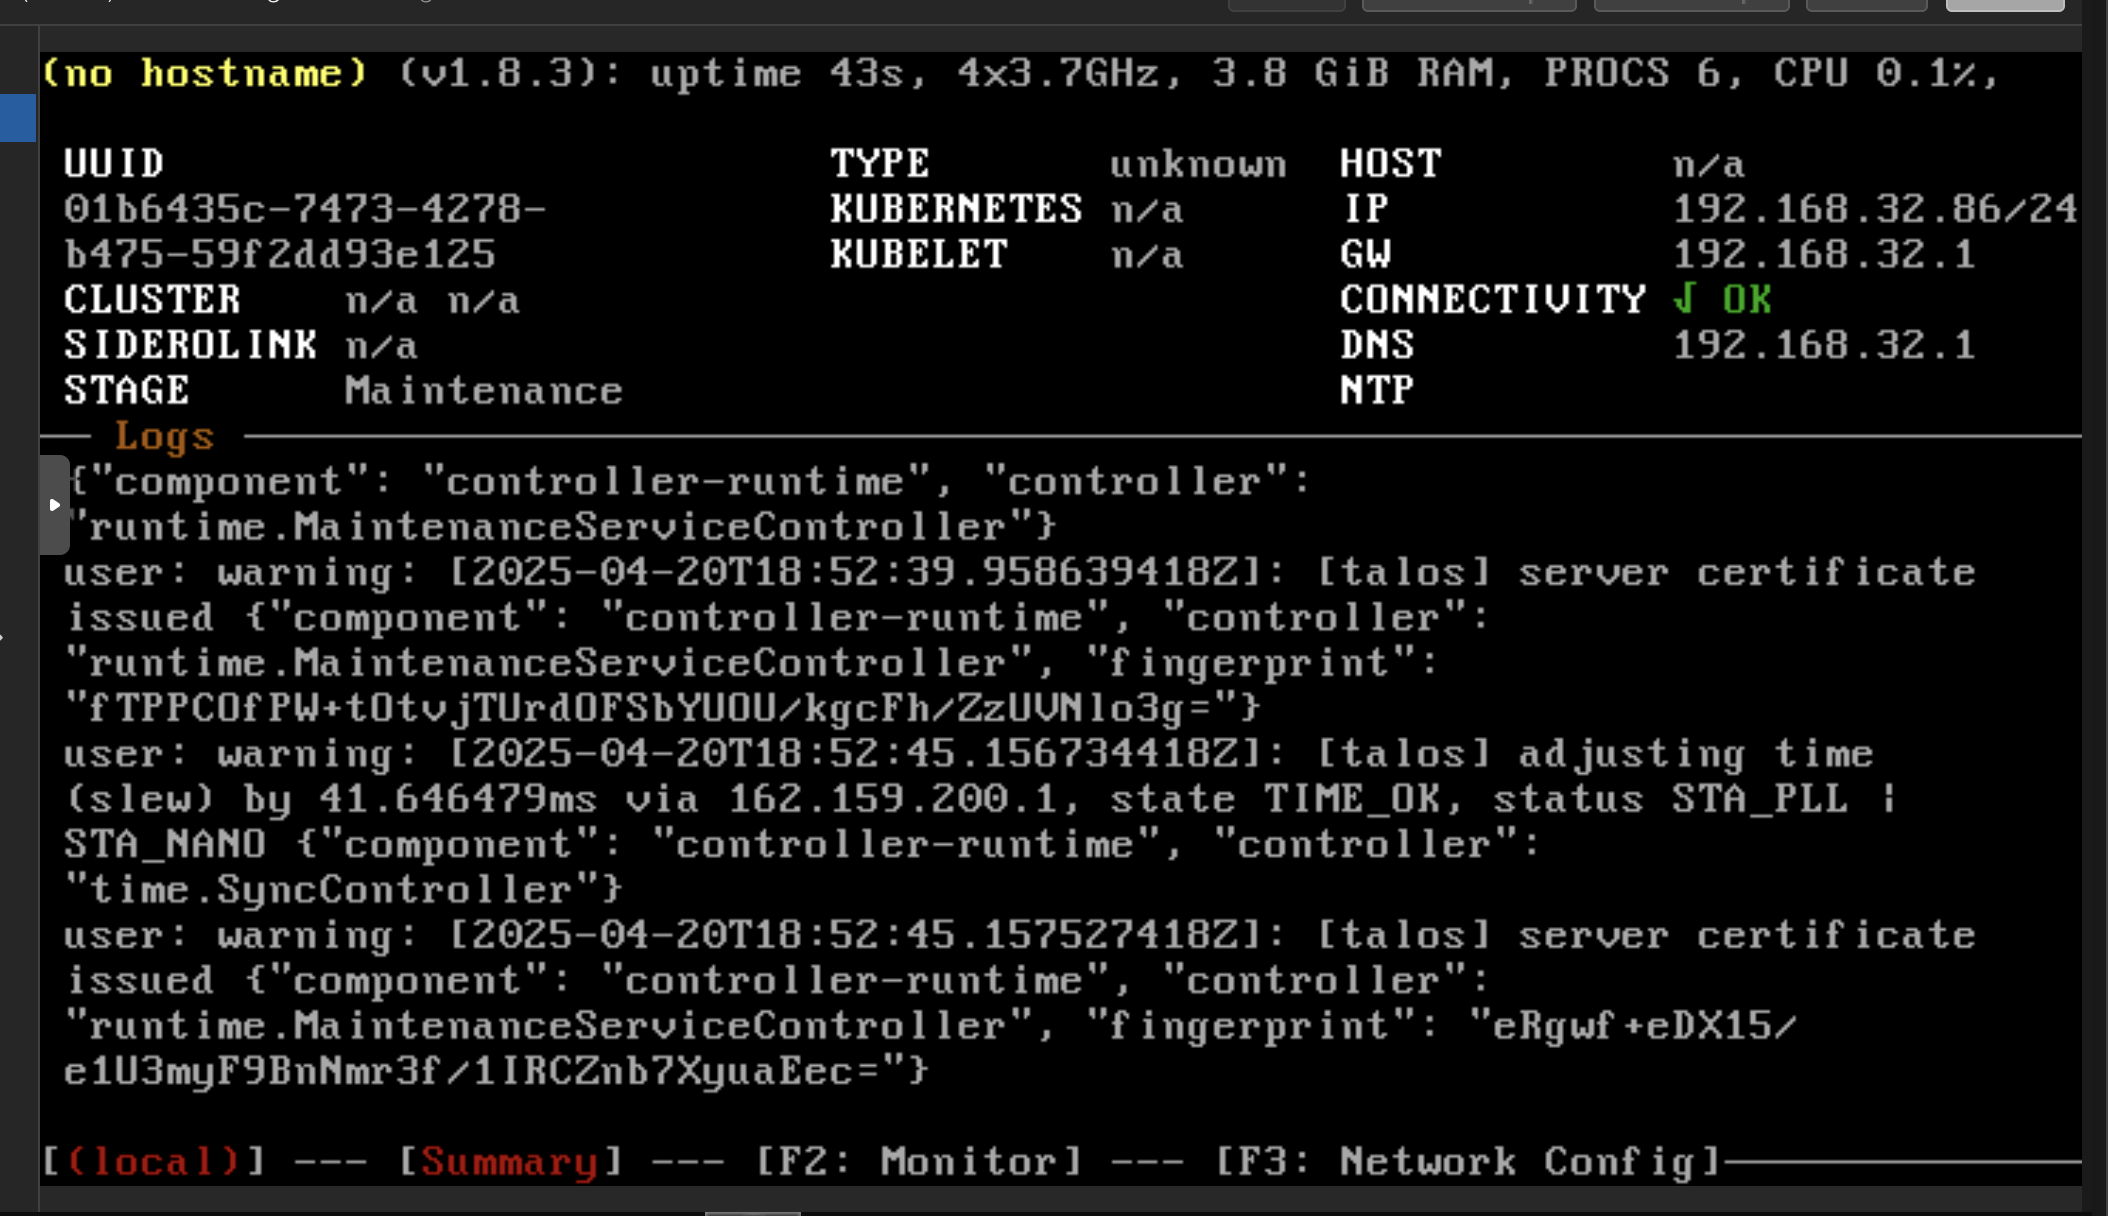
I’ll show you the installation in speedrun mode:
talosctl gen secrets
talosctl gen config coffee-talos https://192.168.32.86:6443 \
         --install-image ghcr.io/qjoly/talos.chaosd.extension/installer:v1.9.4
talosctl apply -f controlplane.yaml -e 192.168.32.86 -n 192.168.32.86 --insecure
Note
If you have an already installed machine, you can directly update it via:
talosctl upgrade -i ghcr.io/qjoly/talos.chaosd.extension/installer:v1.9.4
Once the installation is complete, we can verify that the extension is present on the node via talosctl services or talosctl logs.
$ talosctl  -e 192.168.32.86 -n 192.168.32.86 --talosconfig talosconfig services
NODE            SERVICE      STATE     HEALTH   LAST CHANGE    LAST EVENT
192.168.32.86   apid         Running   OK       2h16m25s ago   Health check successful
192.168.32.86   auditd       Running   OK       2h16m38s ago   Health check successful
192.168.32.86   containerd   Running   OK       2h16m38s ago   Health check successful
192.168.32.86   cri          Running   OK       2h16m25s ago   Health check successful
192.168.32.86   dashboard    Running   ?        2h16m27s ago   Process Process(["/sbin/dashboard"]) started with PID 2068
192.168.32.86   etcd         Running   OK       2h16m20s ago   Health check successful
192.168.32.86   ext-chaosd   Running   ?        2h16m26s ago   Started task ext-chaosd (PID 2199) for container ext-chaosd
192.168.32.86   kubelet      Running   OK       2h16m23s ago   Health check successful
192.168.32.86   machined     Running   OK       2h16m38s ago   Health check successful
192.168.32.86   syslogd      Running   OK       2h16m37s ago   Health check successful
192.168.32.86   trustd       Running   OK       2h16m24s ago   Health check successful
192.168.32.86   udevd        Running   OK       2h16m28s ago   Health check successful

$ talosctl  -e 192.168.32.86 -n 192.168.32.86 --talosconfig talosconfig logs ext-chaosd
192.168.32.86: Chaosd Server Version: version.Info{GitVersion:"v0.0.0-master+$Format:%h$", GitCommit:"$Format:%H$", BuildDate:"2025-04-20T16:54:36Z", GoVersion:"go1.20.14", Compiler:"gc", Platform:"linux/amd64"}
192.168.32.86: [GIN-debug] POST   /api/attack/process       --> github.com/chaos-mesh/chaosd/pkg/server/httpserver.(*HttpServer).createProcessAttack-fm (4 handlers)
192.168.32.86: [GIN-debug] POST   /api/attack/stress        --> github.com/chaos-mesh/chaosd/pkg/server/httpserver.(*HttpServer).createStressAttack-fm (4 handlers)
192.168.32.86: [GIN-debug] POST   /api/attack/network       --> github.com/chaos-mesh/chaosd/pkg/server/httpserver.(*HttpServer).createNetworkAttack-fm (4 handlers)
192.168.32.86: [GIN-debug] POST   /api/attack/disk          --> github.com/chaos-mesh/chaosd/pkg/server/httpserver.(*HttpServer).createDiskAttack-fm (4 handlers)
192.168.32.86: [GIN-debug] POST   /api/attack/clock         --> github.com/chaos-mesh/chaosd/pkg/server/httpserver.(*HttpServer).createClockAttack-fm (4 handlers)
192.168.32.86: [GIN-debug] POST   /api/attack/jvm           --> github.com/chaos-mesh/chaosd/pkg/server/httpserver.(*HttpServer).createJVMAttack-fm (4 handlers)
192.168.32.86: [GIN-debug] POST   /api/attack/kafka         --> github.com/chaos-mesh/chaosd/pkg/server/httpserver.(*HttpServer).createKafkaAttack-fm (4 handlers)
192.168.32.86: [GIN-debug] POST   /api/attack/vm            --> github.com/chaos-mesh/chaosd/pkg/server/httpserver.(*HttpServer).createVMAttack-fm (4 handlers)
192.168.32.86: [GIN-debug] POST   /api/attack/redis         --> github.com/chaos-mesh/chaosd/pkg/server/httpserver.(*HttpServer).createRedisAttack-fm (4 handlers)
192.168.32.86: [GIN-debug] POST   /api/attack/user_defined  --> github.com/chaos-mesh/chaosd/pkg/server/httpserver.(*HttpServer).createUserDefinedAttack-fm (4 handlers)
192.168.32.86: [GIN-debug] DELETE /api/attack/:uid          --> github.com/chaos-mesh/chaosd/pkg/server/httpserver.(*HttpServer).recoverAttack-fm (4 handlers)
192.168.32.86: [GIN-debug] GET    /api/experiments/         --> github.com/chaos-mesh/chaosd/pkg/server/httpserver.(*HttpServer).listExperiments-fm (4 handlers)
192.168.32.86: [GIN-debug] GET    /api/experiments/:uid/runs --> github.com/chaos-mesh/chaosd/pkg/server/httpserver.(*HttpServer).listExperimentRuns-fm (4 handlers)
192.168.32.86: [GIN-debug] Listening and serving HTTP on 0.0.0.0:31767
The extension is functional and can be used directly from Chaos-Mesh (no port exposure configuration is needed; the extension uses the host’s ports).
🎉 Tada, we have our extension!
But I think one step of our checklist isn’t respected!
Remember, chaosd will create a SQLite database to store test information. This database must be saved in a mount on the node.
Managing Persistence
Our main concern is that chaosd will create this chaosd.dat file in the same directory as the binary. We have configured the mount point /var/lib/chaosd, but at the container’s start, the binary isn’t present in it. So we need to copy the binary into the volume before launching it.
Usually, this is when you create a bash entrypoint that copies the binary into the volume and launches chaosd. But this requires copying the binaries for bash, cp, mkdir, which is unfortunate.
Example of what it could have looked like:
#!/bin/bash
mkdir -p /var/lib/chaosd
cp /chaosd /var/lib/chaosd
/chaosd server
But, as mentioned above, it’s not necessarily the most optimal. So I’ll use a little hack by developing a Go script that does this work for me. The advantage is that we’ll only have one binary to copy into the final image.
package main

import (
	"fmt"
	"os"
	"os/exec"
)

func main() {
	sourcePath := "/chaosd"
	destPath := "/var/lib/chaosd/chaosd"

	input, err := os.ReadFile(sourcePath)
	if err != nil {
		fmt.Printf("Error while reading %s: %v\n", sourcePath, err)
		os.Exit(1)
	}

	err = os.WriteFile(destPath, input, 0755)
	if err != nil {
		fmt.Printf("Error while writing %s: %v\n", destPath, err)
		os.Exit(1)
	}

	cmd := exec.Command(destPath, "server")

	cmd.Stdout = os.Stdout
	cmd.Stderr = os.Stderr

	err = cmd.Run()
	if err != nil {
		fmt.Printf("Error while executing chaosd: %v\n", err)
		os.Exit(1)
	}
}
If I had known that one day I would say a Go script is simpler than a bash script…
We’ll need to modify the DockerFile to compile this script:
FROM golang:1.20.14-bullseye AS builder
RUN apt-get update && apt-get install -y wget
ENV CHAOSD_VERSION=v1.4.0
WORKDIR /
RUN wget https://github.com/chaos-mesh/chaosd/archive/refs/tags/$CHAOSD_VERSION.tar.gz \
    && mkdir /chaosd \
    && tar xfz $CHAOSD_VERSION.tar.gz -C /chaosd --strip-components=1
WORKDIR /chaosd
RUN make chaosd
RUN make chaos-tools
+WORKDIR /entrypoint
+COPY ./src/entrypoint.go /entrypoint/entrypoint.go
+RUN CGO_ENABLED=1 GOOS="" GOARCH="" go build -ldflags '-s -w' entrypoint.go
FROM scratch
COPY --from=builder /chaosd/bin/chaosd /rootfs/usr/local/lib/containers/chaosd/chaosd
COPY --from=builder /chaosd/bin/tools /rootfs/usr/local/lib/containers/chaosd/usr/bin
COPY --from=builder /bin/dd /rootfs/usr/local/lib/containers/chaosd/bin/dd
COPY --from=builder /lib /rootfs/usr/local/lib/containers/chaosd/lib
COPY --from=builder /lib64 /rootfs/usr/local/lib/containers/chaosd/lib64
+COPY --from=builder /entrypoint/entrypoint /rootfs/usr/local/lib/containers/chaosd/entrypoint
COPY chaosd.yaml /rootfs/usr/local/etc/containers/chaosd.yaml
COPY manifest.yaml /
WORKDIR /rootfs/usr/local/lib/containers/chaosd/
And in the chaosd.yaml, we’ll modify the entrypoint to point to the binary of the same name (in bonus, we can remove the writeableRootfs option since we don’t need it anymore).
name: chaosd
depends:
  - network:
      - addresses
      - connectivity
  - configuration: true
container:
-  entrypoint: /chaosd
-  args:
-    - server
+  entrypoint: /entrypoint
  security:
-    writeableRootfs: true
+    writeableRootfs: false
# ...
We can now rebuild the OCI image via imager and update the Talos image via talosctl upgrade -i ghcr.io/qjoly/talos.chaosd.extension/installer:v1.9.4.
We can verify that the database is present in the volume:
$ talosctl -e 192.168.32.86 -n 192.168.32.86 --talosconfig talosconfig ls /usr/local/lib/containers/chaosd/var/lib/chaosd
NODE            NAME
192.168.32.86   .
Ah, missed?
At first, I was surprised not to see the chaosd and chaosd.dat files, but in reality, we need to check the directory content on the Talos side (not the container side).
talosctl -e 192.168.32.86 -n 192.168.32.86 --talosconfig talosconfig ls /var/lib/chaosd
NODE            NAME
192.168.32.86   .
192.168.32.86   chaosd
192.168.32.86   chaosd.dat
Perfect! No more risk of losing the database during an upgrade 🤩!
Now there’s one last point to address: I want to configure HTTPS on Chaosd’s API. To do this, I’ll need to send the TLS certificates into the container. How do we do this?
Injecting Configuration Files
To recap, we can pass information to the extension via configuration files or environment variables. I can create a configuration file chaosd-config.yaml that injects the TLS certificates into the container.
I’ll modify my Go script handling the entrypoint. Now, if the environment variables CHAOSD_CERT and CHAOSD_KEY are present, I’ll add the --cert and --key arguments to the chaosd command.
package main

import (
	"fmt"
	"os"
	"os/exec"
)

func main() {
	sourcePath := "/chaosd"
	destPath := "/var/lib/chaosd/chaosd"

	input, err := os.ReadFile(sourcePath)
	if err != nil {
		fmt.Printf("Error while reading %s: %v\n", sourcePath, err)
		os.Exit(1)
	}

	err = os.WriteFile(destPath, input, 0755)
	if err != nil {
		fmt.Printf("Error while writing %s: %v\n", destPath, err)
		os.Exit(1)
	}

	var cmd *exec.Cmd
	if os.Getenv("CHAOSD_CERT") != "" && os.Getenv("CHAOSD_KEY") != "" {
		cmd = exec.Command(destPath, "server",
			"--cert", os.Getenv("CHAOSD_CERT"),
			"--key", os.Getenv("CHAOSD_KEY"))
	} else {
		cmd = exec.Command(destPath, "server")
	}

	cmd.Stdout = os.Stdout
	cmd.Stderr = os.Stderr

	err = cmd.Run()
	if err != nil {
		fmt.Printf("Error while executing chaosd: %v\n", err)
		os.Exit(1)
	}
}
You know the drill: rebuild the OCI image and update the Talos image…
As it stands, it hasn’t changed much since these variables aren’t injected into the container, meaning we still support HTTP mode. To fix this, let’s create the chaosd-config.yaml patch that injects the environment variables into the container along with the TLS certificates.
apiVersion: v1alpha1
kind: ExtensionServiceConfig
name: chaosd
configFiles:
    - content: |
        -----BEGIN RSA PRIVATE KEY-----
        MIIEowIBAAKCAQEApiYthtiAkBMDcwLzhsLb2/EWE5MicLoB2J+RAea4KcS/mr1z
        CnwtIQYhFESrWWgPjSV0PcVkcwkG/CTsejjrkbeS396xUy+8PHw7qMBkzd7LZV8M
        pL/QTIZRou4tdtTtTU6zYV+88elwvREUEoIe8CpGSolQz47VKshFo/w7jW5s+XD8
        1SPKDkdqwPgcIbthMHXjRT1kyO2ZfCYIbHyP7kdVp2FBCiSOdmSsA/A6fJRo6ThK
        18GAs53DJUKHkTuLz48+ROBXrjOdRqH18oMtFT1fxE3OgkzwZGFRRWJ4fZGppszP
        IZ+UGuR/05TuunC7EeJOpPOsmL6536/r3mb4HwIDAQABAoIBAClMYBCejAZD052o
        5CNhGAkpedVPw0XF1mOj9gVE9g3by8yIvqmiiA0nWt2Q3A6TIRpybtxTzk4RtlzC
        SM1wjI1h1e4zilwlB2L5dlLRz7ykXmZKI/hnfT0oPe6DyWU6M+n9X/UaOPrgjZdR
        QW4ATfRgbaxlSWLuG+pQcY77SUoz+/b4bvftH5gfT2yrXwqWLCuZZ0jQWIGjgzWL
        rZhQ+QAhmUHO8zNofRKoKyCqahkayDoQ6wn6qkEoGirig8p8cRxrrAcIjlzj30z4
        ijnR6JpzQcXtNR/zq/RzXk4Y+uS1/cwtEuLO2QNRXurEWC5kg2+A//fEPRVnXhDO
        145qlAECgYEAzSfQsqPBViYq6ToILJQAE74JIubGVTHInsNKen+RvkRL7ozXrX6V
        wPw5P1iH4f2/dpOpKVd1vudPC5NHxJX0TVQm9TviyWLs7rGKhVCYumEfQHTfrNZ4
        G5rR4rzvB5J+sSFz9GayJr8O7HZdxlCj7vWgasWTPcM6GhtPtKbjWwECgYEAz1OV
        krJvoS2e+vlk3HHVeNsYMKJ8cjgRQl3aV5UfmeuxhQjezK4KsYSFqhJBO/7lhVoZ
        N+WZu2ObgxDqeFmo75QRX5dMPEUEjK/vgTDLw/IBlH7PzOq1/+Bbn2piI4qp1A8f
        upQtlExdUcxdXLuyTeLLwHhQO6PBu6Sd8Gp98x8CgYEAjAWSwXpW6K+gNhKvpY1W
        CCN6JOIRl/Akl4d+++C53nzKvoROaFGvcEo14HBSPgJsfUgG+vqAmM1S+/mH0Drw
        xR6cgGBhR0ZHpBp1CsyZkQvcwqeCSnsO+vhOLEz7b9Wits64T6UQDrX0P5wCIOrF
        GMF4vacf+dWXgF4HpqsJHgECgYBVhAx17dPNj5u7uZK4uttqdjSMGvlpw2abEUs2
        RPQ78NPQI9CCbGdMwXTAqbbuoDzbvEYaoEHA4V0LurZ73b+o0lI4M5fmZDF0Nj17
        9DyYHgI41fWweD+Jw2kHYEIKlu9l4LcdpnEGclkrnDgGQAVTyvBv+zBc6TbHxya+
        O66n0QKBgHhVA659qlG0dc6Phm1cesK3idBCXPR+u+g/SPCPT7XNKV1OrESdekJU
        sB6bypmwgHO+E1Vq7hA4zSmI3ek1DRpkay9S1IvM3ar5TmeroetCRKINPJlfFaZZ
        MVMZu/6v4DolA7FRZ5LjZwUKh9fZka51apoCodZO9b8MHwcEPjpV
        -----END RSA PRIVATE KEY-----
      mountPath: /chaosd.key
    - content: |
        -----BEGIN CERTIFICATE-----
        MIIDJDCCAgygAwIBAgIIRMyfZzD2UmswDQYJKoZIhvcNAQELBQAwFDESMBAGA1UE
        AxMJY2hhb3NkLWNhMB4XDTI1MDQyMDA5NDE0N1oXDTMwMDQxOTEwMDExMFowIDEe
        MBwGA1UEAxMVY2hhb3NkLmNoYW9zLW1lc2gub3JnMIIBIjANBgkqhkiG9w0BAQEF
        AAOCAQ8AMIIBCgKCAQEApiYthtiAkBMDcwLzhsLb2/EWE5MicLoB2J+RAea4KcS/
        mr1zCnwtIQYhFESrWWgPjSV0PcVkcwkG/CTsejjrkbeS396xUy+8PHw7qMBkzd7L
        ZV8MpL/QTIZRou4tdtTtTU6zYV+88elwvREUEoIe8CpGSolQz47VKshFo/w7jW5s
        +XD81SPKDkdqwPgcIbthMHXjRT1kyO2ZfCYIbHyP7kdVp2FBCiSOdmSsA/A6fJRo
        6ThK18GAs53DJUKHkTuLz48+ROBXrjOdRqH18oMtFT1fxE3OgkzwZGFRRWJ4fZGp
        pszPIZ+UGuR/05TuunC7EeJOpPOsmL6536/r3mb4HwIDAQABo24wbDAOBgNVHQ8B
        Af8EBAMCBaAwDAYDVR0TAQH/BAIwADAfBgNVHSMEGDAWgBQm3C1nO5HX/xOS/6nT
        xMo9sOjSzDArBgNVHREEJDAighVjaGFvc2QuY2hhb3MtbWVzaC5vcmeCCWxvY2Fs
        aG9zdDANBgkqhkiG9w0BAQsFAAOCAQEAb+pWowwbmiwjFiPzwSd7HCTnsE0D3U95
        UavZuk077GvoCHDUB3zlzjZ6pooPBVhF7zN1pd5PhrqLaicBuNd/Kx8LJyUARck3
        v7akyFLkq+pKi3Cagb45G6g+H62nbSdNqQ7dzZo171d3X9dV+bcM9ahQUpOjpet0
        nC2bttvQ9++QDBSIZBjkGdAx0buGYnrcmFy29DM/U2Y5mQ2/XRNxhUCVrh4R1Vnf
        ooQM82sZ/L/lenPLTiHk+HhZ+a0s0VP2JEiLlRxiPDJ676aT5na0DDU5aRfn1Ehf
        +jlFx62ATCnqQRPwsx9T5a4jgvaGiHhvdz5H3qk1PAUjohcYc+Aofg==
        -----END CERTIFICATE-----
      mountPath: /chaosd.crt
environment:
  - CHAOSD_CERT=/chaosd.crt
  - CHAOSD_KEY=/chaosd.key
To verify that the files are present in the container, run the following command:
$ talosctl -e 192.168.32.86 -n 192.168.32.86 ls /usr/local/lib/containers/chaosd | grep chaosd
192.168.32.86   chaosd
192.168.32.86   chaosd.crt
192.168.32.86   chaosd.key
All that’s left is to restart the ext-chaosd service to apply the changes.
$ talosctl -e 192.168.32.86 -n 192.168.32.86 --talosconfig ./talosconfig services ext-chaosd restart
$ talosctl -e 192.168.32.86 -n 192.168.32.86 --talosconfig ./talosconfig logs ext-chaosd
192.168.32.86: [GIN-debug] Listening and serving HTTPS on 0.0.0.0:31768
Our extension is now complete and functional. Some points are missing to support more features in chaosd, but keep in mind that this is just a proof of concept (and an excuse to talk about Talos extensions).
If you want to see the complete code, you can find it here.
Conclusion
I already know this topic won’t resonate with many people. First, because it targets Talos users (if you’re not one, what are you waiting for?), but also because official extensions already cover many use cases.
Nevertheless, during some Talos presentations, I’ve seen people remain skeptical because “If a feature is missing in Talos, I’m completely stuck”. This article is a complementary response to those individuals.
Talos is designed to be extensible, and you have the freedom to add your own features.