SPIFFE and mTLS with cert-manager

In 2024, I wrote an article about Istio, a service mesh that manages communication between microservices. In that article, we explored a bit how mTLS works with sidecars (link to the chapter). It was a practical article, but we didn’t go very deep into the details. Today, we will dive deeper into this topic by exploring SPIFFE, which is the reference framework for workload identity management to secure communications.
SPIFFE (Secure Production Identity Framework for Everyone) is an open-source standard that defines an identity format based on X.509 certificates for workloads in distributed environments. It’s through this standard that applications can obtain identity-linked certificates and use them to validate the identities of other applications.
Unlike Kerberos, SPIFFE is better suited for microservice architectures where the same machine has multiple identities depending on the service it runs (especially in a container context where each container must have its own identity), whereas Kerberos is (even though I have no experience with it) more suited to monolithic architectures where the machine has a single identity.
This framework is used in mesh services like Istio, Linkerd, Consul Connect, DAPR, and even Cilium. In a mesh, this functionality is hidden in proxies (often Envoy) that are deployed as sidecars, which means that applications are not aware of this mechanism.
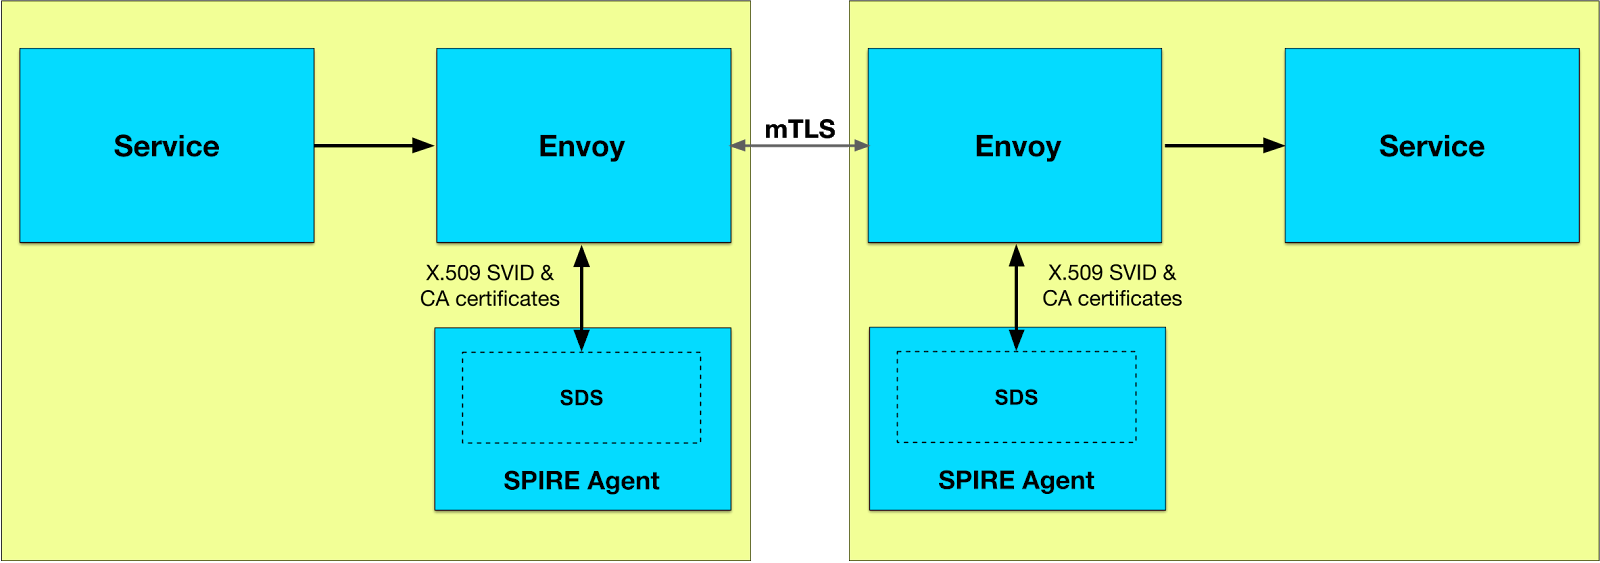
In the context of Istio: when an Envoy sidecar communicates with a new service, it requests Istiod for a certificate to authenticate exchanges with Citadel (the service managing these identities). Thus, due to the nature of mTLS, both the sender AND the recipient can authenticate each other.
Reviewing how a service mesh works would be somewhat repetitive, so we’ll focus instead on SPIFFE and how to implement it in our applications in a Kubernetes context. But before we begin, I should warn you that I wouldn’t necessarily recommend this article for production use. Indeed, we’re going to implement SPIFFE in a very basic way, without the advanced features found in solutions like SPIRE, a production-ready implementation that integrates all the necessary components for SPIFFE with all its features (whereas what we’re going to do is limited solely to mTLS and workload identity). Also, our implementation will require adapting our application code (otherwise, we should use proxies like Envoy).
So, here’s what we are not going to do (and what might even be incompatible with our setup):
- Federation to authorize external identities to access our services.
- Managing an external datastore to the cluster.
- Nested instances (e.g., a global SPIFFE instance that provides certificates for sub-instances).
The reason for this is that we’re going to use cert-manager, a Kubernetes controller that manages X.509 certificates, typically used to generate SSL certificates for an ingress controller. As soon as I discovered that it was possible to use it for SPIFFE, I wanted to make it the focus of the article. It’s very well documented, easy to set up, and perfectly integrated with Kubernetes.
Installing Cert-manager
Cert-manager is a Kubernetes controller that manages X.509 certificates. It allows you to create, renew, and revoke certificates automatically. Very useful for generating TLS certificates via an annotation in an Ingress, for example.
If you’re already familiar with cert-manager, you should know that we’re going to customize its operation a bit: it won’t have the “Approver” enabled. This is a bold requirement in the cert-manager documentation for implementing SPIFFE.
But… what does that imply?
Concretely, when we request a certificate via cert-manager, it will approve it automatically, as we can see in the CertificateRequest as soon as we create a Certificate object.
  conditions:
  - lastTransitionTime: "2025-06-06T21:41:23Z"
    message: Certificate request has been approved by cert-manager.io
    reason: cert-manager.io
    status: "True"
    type: Approved # <--- HERE
For years, I’ve always been content to ignore this part (it works, why bother?), but actually, it’s quite an interesting feature. Let me give you a summary of what I discovered.
In practice, I don’t think people tweak the Approver much; it’s useful in a cluster where each team has its own tenant and you want to prevent them from creating certificates haphazardly. By modifying this component, you can create CertificateRequestPolicy resources that validate certificate requests only if they meet certain rules. For example, you can verify that the certificate’s requested domain name matches the cluster’s domain (e.g., I want this cluster to be able to generate certificates for *.prod-01.une-tasse-de.cafe and not for *.prod-02.une-tasse-de.cafe, with each cluster having a different rule). This is a simple example, but you can control most certificate fields (thus avoiding configuration errors and rate-limiting when too many failed requests are sent to the ACME server).

Want to know more? Check it out here.
Well, maybe you don’t care about SPIFFE, but perhaps you’ve learned something about cert-manager. Let’s get back on track and install our cert-manager by disabling automatic certificate approval.
helm repo add jetstack https://charts.jetstack.io --force-update
helm upgrade -i cert-manager jetstack/cert-manager \
  --namespace cert-manager --create-namespace \
  --set disableAutoApproval=true \
  --set crds.enabled=true
The purpose of installing this Helm chart with these parameters is to:
- Install cert-manager in the
cert-managernamespace - Disable automatic certificate approval (as mentioned earlier)
Info
If you’re already using cert-manager for your HTTPS and don’t want to change its standard functionality, you can also specify that certain certificates from specific Issuers/ClusterIssuers should be approved automatically, for example:
--set approveSignerNames[0]="issuers.cert-manager.io/cloudflare*" \
--set approveSignerNames[1]="clusterissuers.cert-manager.io/letsencrypt-staging"
But I’ll let you discover this on your own. In my dev cluster, I don’t use ingress, so I’ll simply disable automatic approval for all certificates.
Now, let’s create a ClusterIssuer that will allow us to generate self-signed certificates (if you don’t already have a self-signed ClusterIssuer). Once done, we’ll be able to create a root certificate (CA) that will be used to create certificates for our workloads.
apiVersion: cert-manager.io/v1
kind: ClusterIssuer
metadata:
  name: selfsigned-issuer
spec:
  selfSigned: {}
---
apiVersion: cert-manager.io/v1
kind: Certificate
metadata:
  name: trust-domain-root-ca
  namespace: cert-manager
spec:
  isCA: true
  commonName: trust-domain-root-ca
  secretName: root-secret
  privateKey:
    algorithm: ECDSA
    size: 256
  issuerRef:
    name: selfsigned-issuer
    kind: ClusterIssuer
    group: cert-manager.io
But before continuing, let’s note that we created a certificate… without automatic approval being enabled. We’ll need to manually approve the root CA certificate.
$ kubectl get certificate -n cert-manager
NAME                   READY   SECRET        AGE
trust-domain-root-ca   False   root-secret   11m
Well, we’re in trouble here.
The simplest option is to use the cert-manager CLI to approve it manually:
$ brew install cmctl # nix-shell -p cmctl
$ cmctl approve trust-domain-root-ca-1 -n cert-manager
Approved CertificateRequest 'cert-manager/trust-domain-root-ca-1'
After that, our certificate should be ready:
$ kubectl get certificate -n cert-manager
NAME                   READY   SECRET        AGE
trust-domain-root-ca   True    root-secret   22m
Now that we have our CA for SPIFFE, we just need to use it in an issuer that will be useful for generating SPIFFE certificates for our workloads. So we’ll create a ClusterIssuer that will use this root CA to sign SPIFFE certificates.
apiVersion: cert-manager.io/v1
kind: ClusterIssuer
metadata:
  name: trust-domain-root
spec:
  ca:
    secretName: root-secret # Present in the cert-manager namespace
Trust-Manager
Now that we have our root CA, we can create SPIFFE certificates for our workloads (each will have its public and private key, as well as a CA to validate the certificates of others).
Before we can deliver SPIFFE certificates, we need to find a method to propagate this root CA. That’s why we’re going to use the trust-manager operator. It allows us to create Bundles (a new Custom Resource) that will contain the trust certificates (CAs) which can be used by workloads to verify the certificates they receive.
helm repo add jetstack https://charts.jetstack.io --force-update
helm upgrade trust-manager jetstack/trust-manager \
  --install \
  --namespace cert-manager \
  --wait
During its installation, it will create its own certificate with a SelfSigned Issuer (not a ClusterIssuer); we won’t use it, but the installation may fail if we don’t approve it.
cmctl approve -n cert-manager trust-manager-1
Yes, this article isn’t very GitOps-friendly… :(
Let’s move past this unfortunate detail: now we’ll create a Bundle! And list our root CA in it.
apiVersion: trust.cert-manager.io/v1alpha1
kind: Bundle
metadata:
  name: coffee-bundle
  namespace: cert-manager
spec:
  sources:
  - secret:
      name: "root-secret"
      key: "ca.crt"
  target:
    configMap:
      key: "ca.crt"
The effect of this Bundle is to create a ConfigMap that will contain the root CA certificate we created earlier. This ConfigMap will then be used by workloads to verify the identities of requests they receive.
kubectl get cm -A | grep coffee
cert-manager                    coffee-bundle                                          1      3m8s
default                         coffee-bundle                                          1      3m8s
kube-node-lease                 coffee-bundle                                          1      3m8s
kube-public                     coffee-bundle                                          1      3m8s
kube-system                     coffee-bundle                                          1      3m8s
Info
Yes, I was a bit heavy-handed here and targeted all namespaces, but we could have restricted the Bundle to a specific namespace using namespaceSelector:
    namespaceSelector:
      matchLabels:
        spiffee: "enabled"
The use of trust-manager is entirely optional; we could have simply created these ConfigMaps manually, or used Reflector (another operator for duplicating a resource across multiple namespaces). The advantage of trust-manager is that it accepts secrets as sources to create ConfigMaps (as our CA is necessarily generated in a secret).
CSI Driver SPIFFE
Now that we have our root CA and our Bundle, we can move on to the core topic: providing Kubernetes pods with certificates corresponding to their SPIFFE identity.
If we compare with Istio, there’s a component called Citadel that’s responsible for managing identities and certificates for the proxies. In our case, we don’t have Citadel (and even less so Envoy), but we have an equivalent component that will allow us to mount SPIFFE certificates in Kubernetes Pods: the Cert-manager SPIFFE CSI Driver. This is a CSI (Container Storage Interface) that allows mounting SPIFFE identities in Pods. It will create volumes that, once the pod is scheduled, will automatically generate certificates (via a CertificateRequest) for each Pod that needs them. It will also store these certificates in a volume that will be mounted in the Pod.
It’s precisely for this component that we had to disable automatic certificate approval during the cert-manager installation because the SPIFFE CSI Driver will create SPIFFE certificates for each Pod that needs them, and we don’t want them to be approved automatically without verification. The documentation is very clear on this point.

Thus, for any SPIFFE certificate request, we’ll need to use the approver built into the CSI-Driver (which is not the same as the one enabled in cert-manager). The approver ensures that requests meet the following criteria:
- acceptable key usages (Key Encipherment, Digital Signature, Client Auth, Server Auth);
- a requested duration that matches the imposed duration (default 1 hour);
- no SAN or other identifiable attribute, except for a single URI SAN;
- a URI SAN corresponding to the SPIFFE identity of the ServiceAccount that created the CertificateRequest;
- a SPIFFE ID Trust Domain matching the one configured at startup.
This approver is only used for SPIFFE certificate requests and is in no way related to classic certificate requests (HTTPS, etc.).
The SPIFFE CSI Driver allows automatically mounting unique SPIFFE certificates in each Kubernetes Pod (generated and renewed individually for each Pod before their expiration), thus ensuring transparent and secure identity management.
app:
  trustDomain: spiffe.une-tasse-de.cafe
  issuer:
    name: trust-domain-root
    kind: ClusterIssuer
    group: cert-manager.io
  driver:
    volumes:
      - name: root-cas
        configMap:
          name: coffee-bundle
    volumeMounts:
      - name: root-cas
        mountPath: /var/run/secrets/cert-manager-csi-driver-spiffe
    sourceCABundle: /var/run/secrets/cert-manager-csi-driver-spiffe/ca.crt
Here, we create the trust-domain spiffe.une-tasse-de.cafe and specify the issuer that will be used to sign SPIFFE certificates (the one that uses our root CA). We also specify that the driver will mount the ConfigMap created by trust-manager.
You can then install the chart with:
helm upgrade cert-manager-csi-driver-spiffe jetstack/cert-manager-csi-driver-spiffe \
  --install \
  --namespace cert-manager \
  -f values.yaml
The SPIFFE CSI Driver will use this CA to sign the SPIFFE certificates it creates for each Pod that needs them. Let’s test this right away:
apiVersion: v1
kind: ServiceAccount
metadata:
  name: ubuntu-spiffe
  namespace: default
---
apiVersion: rbac.authorization.k8s.io/v1
kind: Role
metadata:
  name: create-certificaterequests
  namespace: default
rules:
- apiGroups: ["cert-manager.io"]
  resources: ["certificaterequests"]
  verbs: ["create"]
---
apiVersion: rbac.authorization.k8s.io/v1
kind: RoleBinding
metadata:
  name: ubuntu-spiffe
  namespace: default
roleRef:
  apiGroup: rbac.authorization.k8s.io
  kind: Role
  name: create-certificaterequests
subjects:
- kind: ServiceAccount
  name: ubuntu-spiffe
  namespace: default
---
apiVersion: apps/v1
kind: Deployment
metadata:
  name: ubuntu-spiffe
  namespace: default
  labels:
    app: ubuntu-spiffe
spec:
  replicas: 1
  selector:
    matchLabels:
      app: ubuntu-spiffe
  template:
    metadata:
      labels:
        app: ubuntu-spiffe
    spec:
      serviceAccountName: ubuntu-spiffe
      containers:
        - name: ubuntu-spiffe
          image: ubuntu
          imagePullPolicy: IfNotPresent
          command: [ "sleep", "1000000" ]
          volumeMounts:
          - mountPath: "/var/run/secrets/spiffe.io"
            name: spiffe
      securityContext:
        runAsUser: 1000
        runAsGroup: 1000
      volumes:
        - name: spiffe
          csi:
            driver: spiffe.csi.cert-manager.io
            readOnly: true
            volumeAttributes:
              spiffe.csi.cert-manager.io/fs-group: "1000"
Note that we defined a ServiceAccount and a RoleBinding to authorize the Pod to create CertificateRequest resources. This step is essential because the SPIFFE CSI Driver generates a SPIFFE certificate for each Pod according to its needs, and it requires these rights to function correctly. Moreover, this ServiceAccount will serve as the SPIFFE identity (SVID) for the Pod.
Pods with the same ServiceAccount will have the same SVID; this is how identities are mapped to one or more pods.
$ kubectl get certificaterequests.cert-manager.io
NAME                                   APPROVED   DENIED   READY   ISSUER              REQUESTER                                     AGE
8730086b-1bd2-4b52-a3cf-db451070d2a2   True                True    trust-domain-root   system:serviceaccount:default:ubuntu-spiffe   6m2s
The certificate request has been approved and the certificate is ready!
We should now have SPIFFE certificates in the Pod in the /var/run/secrets/spiffe.io directory:
$ kubectl exec -n default $(kubectl get pod -n default -l app=ubuntu-spiffe -o jsonpath='{.items[0].metadata.name}') -- cat /var/run/secrets/spiffe.io/tls.crt | openssl x509 -text | grep URI
URI:spiffe://spiffe.une-tasse-de.cafe/ns/default/sa/ubuntu-spiffe
What this means is that the pod has its own SPIFFE identity, which is unique and specific to this SA. We can see that it’s based on the trustDomain we specified when installing the SPIFFE CSI Driver, as well as the namespace and name of the ServiceAccount used by the Pod. (spiffe://${trustDomain}/ns/${namespace}/sa/${serviceAccountName})
Creating an application that uses SPIFFE
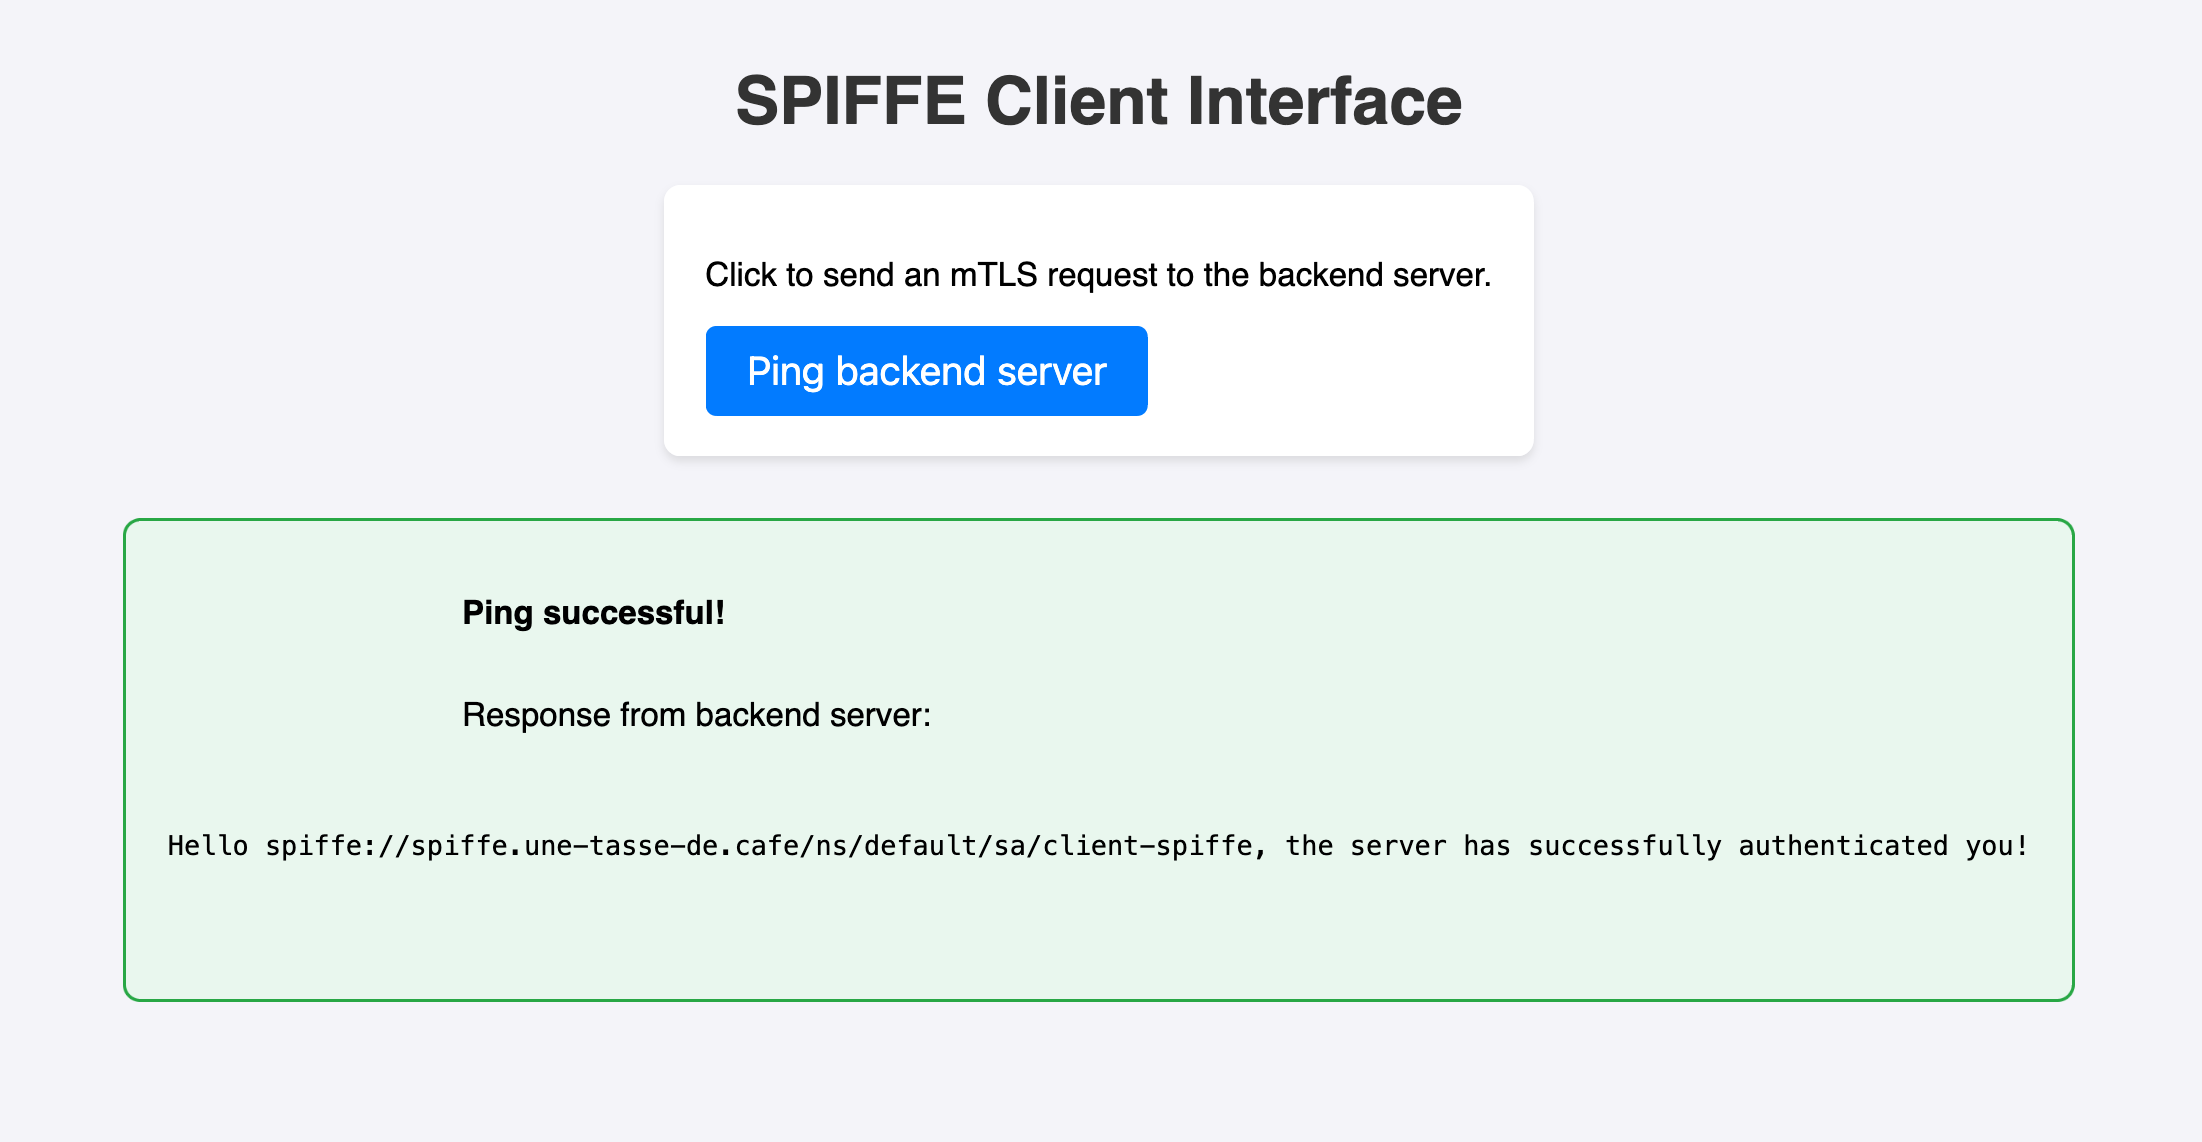
Let’s design a simple application that will use these SPIFFE certificates to communicate via mTLS. We’ll create 2 pods, a client and a server. This client will make a simple HTTPS request, and the server will just respond with a message.
As a reminder, the purpose of our setup is to do mTLS in order to validate the identity of the other party (that’s why we configured the SPIFFE CSI-Driver to use the ConfigMaps created by the trust-manager).
Here’s an excerpt from the server code that checks the client’s identity through its SPIFFE certificate:
	if r.TLS == nil || len(r.TLS.PeerCertificates) == 0 {
		http.Error(w, "Client certificate required", http.StatusUnauthorized)
		return
	}

	peerCert := r.TLS.PeerCertificates[0]
	id, err := x509svid.IDFromCert(peerCert)
	if err != nil {
		log.Printf("Error extracting client's SPIFFE ID: %v", err)
		http.Error(w, "Invalid SPIFFE identity", http.StatusUnauthorized)
		return
	}

	log.Printf("Request received from client with SPIFFE identity: %s", id.String())

	if id.String() != "spiffe://spiffe.une-tasse-de.cafe/ns/default/sa/client-spiffe" {
		http.Error(w, "Unauthorized", http.StatusForbidden)
		return
	}
Here, as soon as a client connects to the server, we first check that it has a TLS certificate, then we extract its SPIFFE ID and verify that it matches the one we expect. If not, we return a 403 error.
This authentication is based on the client’s SPIFFE ID (SVID), which is unique and specific to pods with the client-spiffe ServiceAccount in the default namespace.
For the client, we’ll make an HTTPS request to the server using its certificate. The client will also verify that the server’s certificate is valid and corresponds to the expected SPIFFE identity.
func initializeSpiffeClient() (*http.Client, error) {
	log.Println("Loading TLS certificates...")
	clientSVID, err := tls.LoadX509KeyPair(svidSocketPath+"/tls.crt", svidSocketPath+"/tls.key")
	if err != nil {
		return nil, fmt.Errorf("unable to load client SVID: %w", err)
	}

	caBundleBytes, err := os.ReadFile(svidSocketPath + "/ca.crt")
	if err != nil {
		return nil, fmt.Errorf("unable to load CA bundle: %w", err)
	}

	trustDomainCAs := x509.NewCertPool()
	if !trustDomainCAs.AppendCertsFromPEM(caBundleBytes) {
		return nil, errors.New("failed to add CAs to the pool")
	}

  expectedServerSpiffeID := "spiffe://spiffe.une-tasse-de.cafe/ns/default/sa/server-spiffe"
	tlsConfig := &tls.Config{
		Certificates:       []tls.Certificate{clientSVID},
		InsecureSkipVerify: true,
		VerifyPeerCertificate: func(rawCerts [][]byte, verifiedChains [][]*x509.Certificate) error {
			if len(rawCerts) == 0 {
				return errors.New("server certificate not presented")
			}
			peerCert, err := x509.ParseCertificate(rawCerts[0])
			if err != nil {
				return fmt.Errorf("unable to parse server certificate: %w", err)
			}
			verifyOpts := x509.VerifyOptions{Roots: trustDomainCAs}
			if _, err := peerCert.Verify(verifyOpts); err != nil {
				return fmt.Errorf("invalid server certificate chain: %w", err)
			}
			id, err := x509svid.IDFromCert(peerCert)
			if err != nil {
				return fmt.Errorf("unable to extract SPIFFE ID: %w", err)
			}
			if id.String() != expectedServerSpiffeID {
				return fmt.Errorf("unexpected server SPIFFE ID: expected %q, got %q", expectedServerSpiffeID, id.String())
			}
			return nil
		},
	}

	client := &http.Client{
		Transport: &http.Transport{TLSClientConfig: tlsConfig},
		Timeout:   10 * time.Second,
	}

	return client, nil
}
In the same way as for the server, we load the client’s SPIFFE certificate and the CA Bundle into the client’s TLS configuration in order to verify that the server’s certificate is valid and matches the expected SPIFFE identity.
But as time passes, we’ll notice that the client can no longer connect to the server:
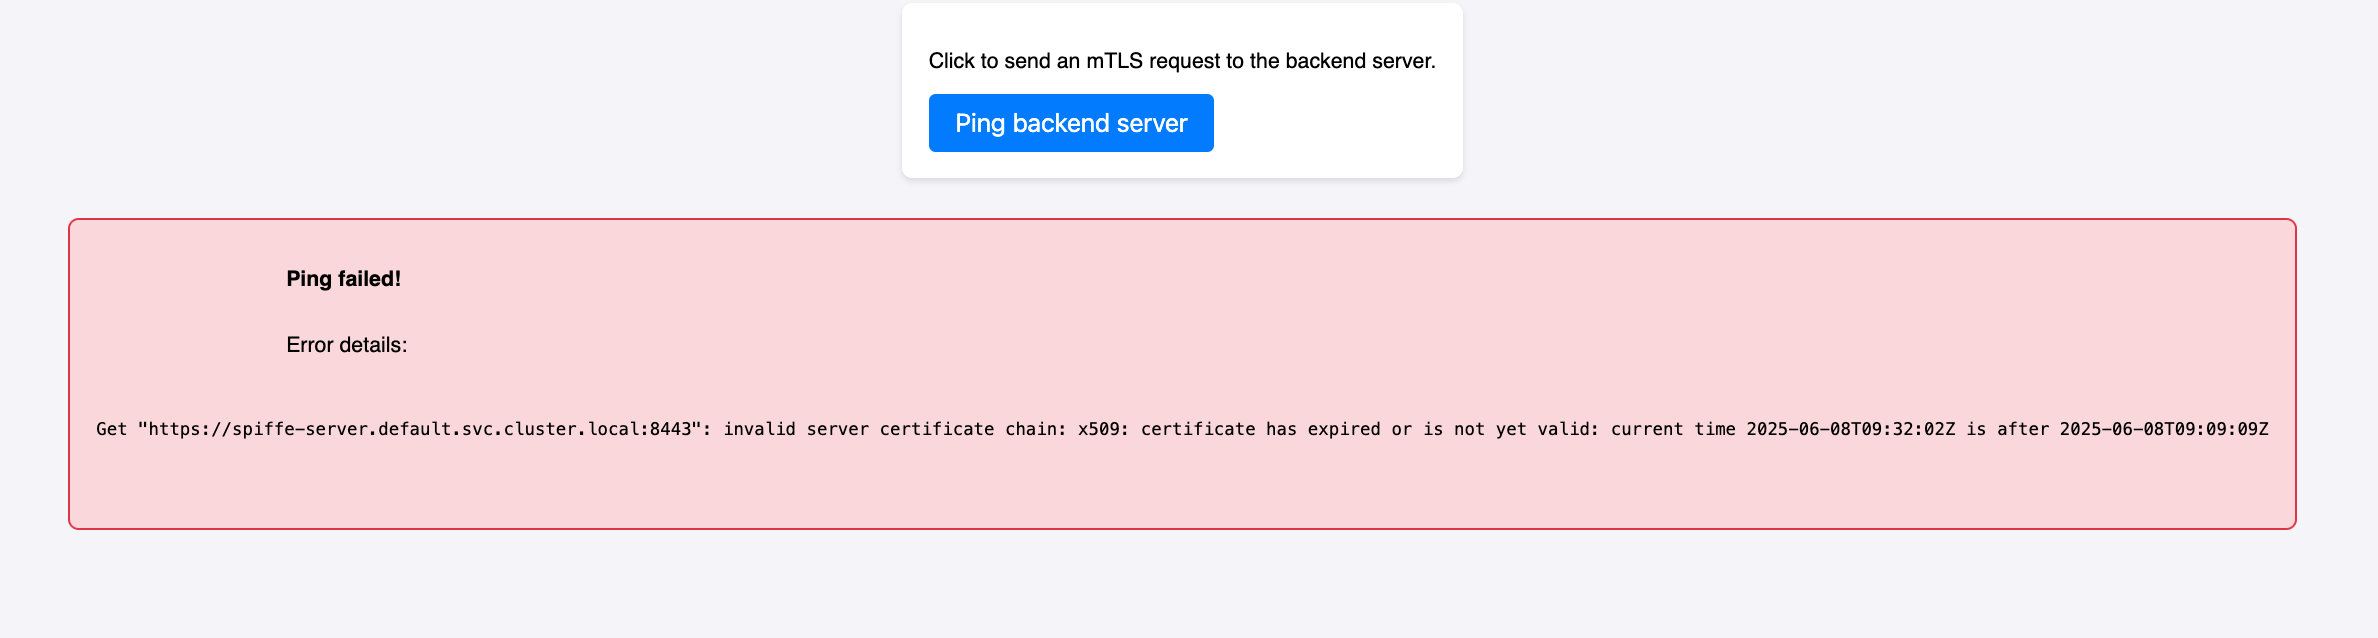
Get "https://spiffe-server.default.svc.cluster.local:8443": invalid server certificate chain: x509: certificate has expired or is not yet valid: current time 2025-06-08T09:32:02Z is after 2025-06-08T09:09:09Z
However, if we look at the server certificate, we can see that it’s valid on the server side:
$ cat /var/run/secrets/spiffe.io/tls.crt | openssl x509 -text
...
        Validity
            Not Before: Jun  8 09:24:27 2025 GMT
            Not After : Jun  8 10:24:27 2025 GMT
...
So, to recap:
- The client has a valid SPIFFE certificate
- The server has a valid SPIFFE certificate
- But when the client tries to connect to the server, it gets an expired certificate error.
I won’t keep you in suspense any longer: the server loads its SPIFFE certificate into memory at startup, but it’s never updated. So, if the SPIFFE certificate is renewed, the server won’t know about it and will continue to use the old, expired certificate.
To solve this problem, the server needs to reload its SPIFFE certificate regularly. It’s not very complex, but it’s an important point to consider when implementing this framework in an application (I imagine this step is done automatically if you use the official libraries).
A quick-win solution would be to do a rollout of the server pod, which would force it to regenerate a valid SPIFFE certificate, but I’m not sure anyone wants to do that every time the SPIFFE certificate expires. 😅
No choice, we need to integrate this certificate reloading logic into our application.
func (cm *CertificateManager) StartAutoReload(interval time.Duration) {
	go func() {
		ticker := time.NewTicker(interval)
		defer ticker.Stop()

		for range ticker.C {
			if err := cm.LoadCertificates(); err != nil {
				log.Printf("Error reloading certificates: %v", err)
			}
		}
	}()
	log.Printf("Certificate auto-reload started with interval of %s", interval)
}
func (cm *CertificateManager) GetCertificate(*tls.ClientHelloInfo) (*tls.Certificate, error) {
	cm.mu.RLock()
	defer cm.mu.RUnlock()

	return &cm.serverCert, nil
}
	tlsConfig := &tls.Config{
		GetCertificate: certManager.GetCertificate, // Using GetCertificate allows reloading the certificate on each new connection
		ClientAuth:     tls.RequireAndVerifyClientCert,
		ClientCAs:      certManager.GetClientCAs(),
		MinVersion:     tls.VersionTLS12,
	}

  certManager.StartAutoReload(certReloadInterval) // starts the certificate reloading routine
Once implemented, we can see that the server reloads its SPIFFE certificate every minute (yes, I went a bit overboard; we could set it to 20 minutes to have a bit more time before the certificate expires).
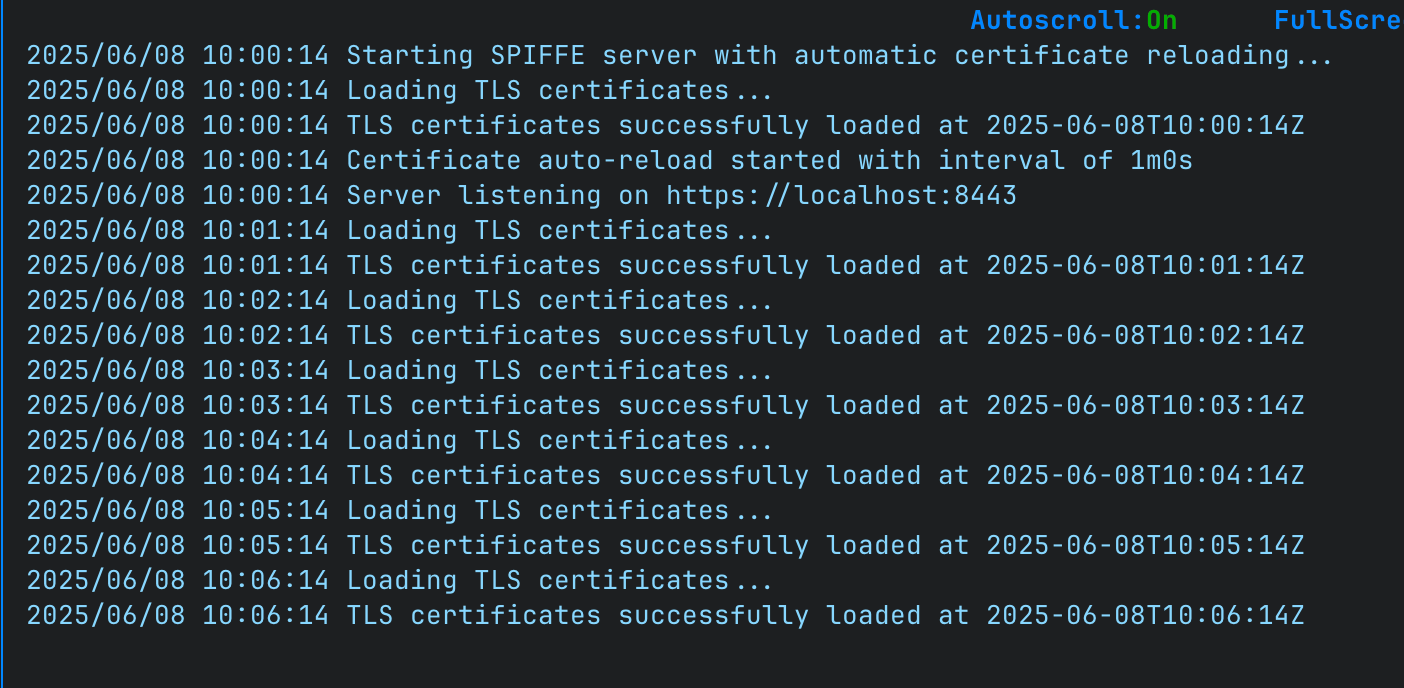
Let’s wait an hour to see if the certificate reloads properly…
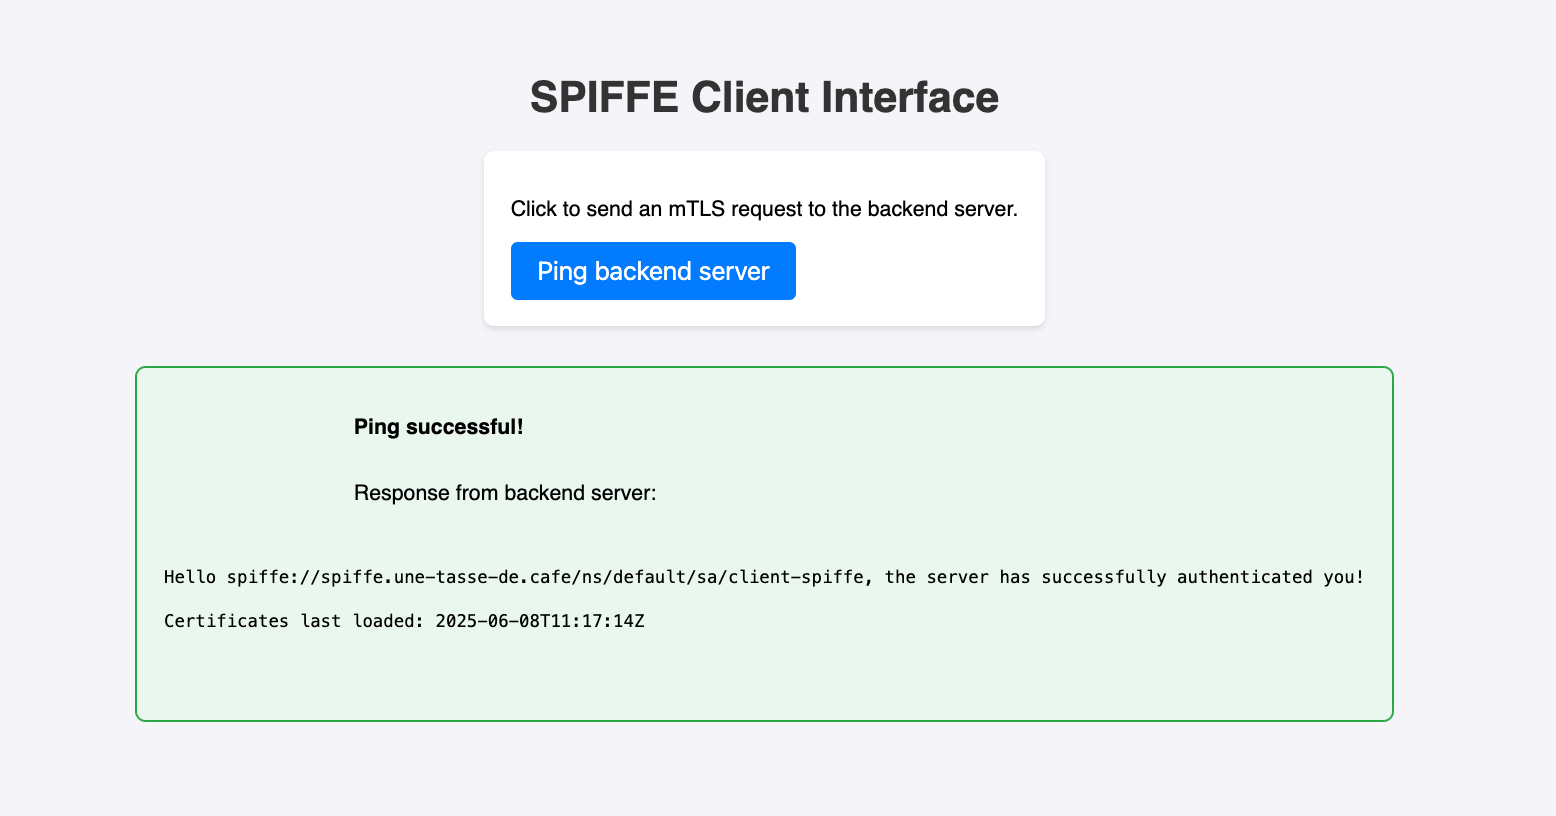
Perfect! The client can connect to the server again and receive a response without us having to do anything.
Well, mission accomplished 🤩!
If you want to get the complete application code, it’s available on GitHub.
Conclusion
We’ve only scratched the surface of the possibilities offered by SPIFFE, but successfully implementing it solely with cert-manager and a few associated operators is already more fun and interesting than relying on all-in-one solutions.
For production use, a simpler alternative to maintain could be to use Cilium’s features (if you’re already using it as a CNI). Cilium allows integrating SPIFFE in a completely transparent way for applications by orchestrating a SPIRE server (see documentation). This does involve storing root certificates in a PVC, which is not yet ideal (hopefully, management via CustomResource will be possible in the future). Although this feature is still in beta, it relies on a real SPIRE server and thus offers a more robust solution than our approach here.
In summary, experimenting with SPIFFE in this way is very instructive, and doing it directly with cert-manager is rather appealing! If I get the chance to push this POC further, I’d like to integrate Envoy proxies to reproduce Istio’s functionality and delegate SPIFFE certificate management to sidecars.
Thank you for reading this article and happy coffee drinking! ☕️