Omni and Kubevirt

At first, I didn’t really want to write an article about Omni. I thought I wouldn’t have much to say about it and that “it just works”… I didn’t expect to fall so much in love with this solution.
First, let’s recap my context: I host a twitch live show every Monday evening (9 PM) on Twitch (sorry english-speaking friends, it’s in French). During these live sessions, we do POCs and explore Infra/DevOps projects. Very often, we revolve around the Kubernetes ecosystem, but not exclusively.
Initially, it was a big hassle to have a ready-to-use Kubernetes cluster before each show. I didn’t want to use my personal clusters, as the risk of leaking credentials was too high. So, I started using Pulumi to deploy clusters on Openstack in 20 minutes with the help of kubespray, which required some preparation beforehand:
- Run
pulumi up20 minutes before the live session; - Retrieve the kubeconfig and send it to Joel (my partner).
- Set up an SSH port-forward (since we didn’t expose the API-Server directly).
It wasn’t ideal, but it worked pretty well.
The second version of this setup was to switch to Talos (which I particularly like). It “only” required creating code to deploy a Talos image on Openstack, and then we just had to send the Talos configuration to the nodes (Thanks to Mickael and his repository that helped us a lot).
Advantages:
- Talos <3 (yes, just being on Talos is an advantage, it’s my article, I say what I want).
- Faster (about 10 minutes).
- More flexible (Talos configuration is easier to manage than Kubespray’s).
Disadvantages:
- Uploading an image to Openstack is still a bit tricky*.
*The complexity comes from having to upload the image and let Openstack process it (and it’s often at this stage that it fails). Having to restart the job several times before it works was common.
Thus, this second version was much better, but we still needed this micro-logistics to have individual access to the cluster (sending the kubeconfig, port-forwarding on the admin machine, etc.). It may seem trivial, but when you do this every week (sometimes finishing the setup live), it’s tedious (and even more so when we have a guest).
And then, Sidero open-sources Omni, and everything changes!
Plus, the license allows its use in a non-production context. Feel free to use it for learning purposes in your lab.
What is Omni?
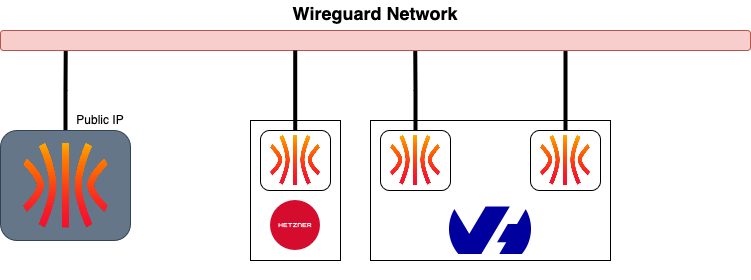
Omni is the application that allows the parents of Talos to make a living (since it is the only paid project in the Talos ecosystem). It allows you to manage Talos machines on any platform (AWS, Azure, GCP, Openstack, Baremetal, etc.). Concretely, it exposes a Wireguard VPN on which the Talos machines authenticate. Within this network, Omni can control the clients as you would with talosctl.
Thus, to create a Kubernetes cluster, I can simply:
- Create an ISO (raw image, PXE script…) on Omni;
- Create a machine with this same image;
- Control it from Omni.
I don’t know if the above steps convey the ease of use it brings: I don’t need to know where my machines are or expose the Talos APIs to control them.
And if I want to use standard talosctl, I can do it through Omni, which acts as a proxy. It redirects my request through its VPN network while ensuring I authenticate via Omni’s web interface.
No more dealing with talosconfig. Now, they only contain Omni’s URL and your email, thanks to OIDC (with each talosctl command, my browser opens to authenticate me on Omni).
context: omni-turingpi
contexts:
    omni-turingpi:
        endpoints:
            - https://omni.home.une-tasse-de.cafe
        auth:
            siderov1:
                identity: quentinj@une-pause-cafe.fr
        cluster: turingpi
On the infrastructure side, it’s incredible, but what about the user side? Well, it’s still just as incredible! On the Kubernetes API-Server, Omni again acts also as a proxy.
Similar to the above, here’s a kubeconfig to access a Kubernetes cluster:
apiVersion: v1
kind: Config
clusters:
  - cluster:
      server: https://omni.home.une-tasse-de.cafe:8100/
    name: omni-turingpi
contexts:
  - context:
      cluster: omni-turingpi
      namespace: default
      user: omni-turingpi-quentinj@une-pause-cafe.fr
    name: omni-turingpi
current-context: omni-turingpi
users:
- name: omni-turingpi-quentinj@une-pause-cafe.fr
  user:
    exec:
      apiVersion: client.authentication.k8s.io/v1beta1
      args:
        - oidc-login
        - get-token
        - --oidc-issuer-url=https://omni.home.une-tasse-de.cafe/oidc
        - --oidc-client-id=native
        - --oidc-extra-scope=cluster:turingpi
      command: kubectl
      env: null
      provideClusterInfo: false
Side note: The fact that Omni acts as a proxy allows you to instantly revoke a user’s access to a cluster (if we relied on OIDC connected to the API-Server natively, the user would still have access until the token expired).
But that’s the “base” of Omni; we can go further and create cluster templates.
Templates
The term “template” is a bit misleading (but that’s what it’s called in the documentation, so I’ll stick with it). In fact, they are “blueprints” that allow you to create Kubernetes clusters from a configuration sent to Omni.
In essence, I request a cluster of n nodes, taking as parameters specific machines or machineClasses. As soon as a Talos machine is added to Omni, it automatically obtains labels that can come from:
- Machine specifications (CPU, RAM, etc.);
- The cloud provider (AWS, GCP, etc.);
- Manually (by adding labels manually).
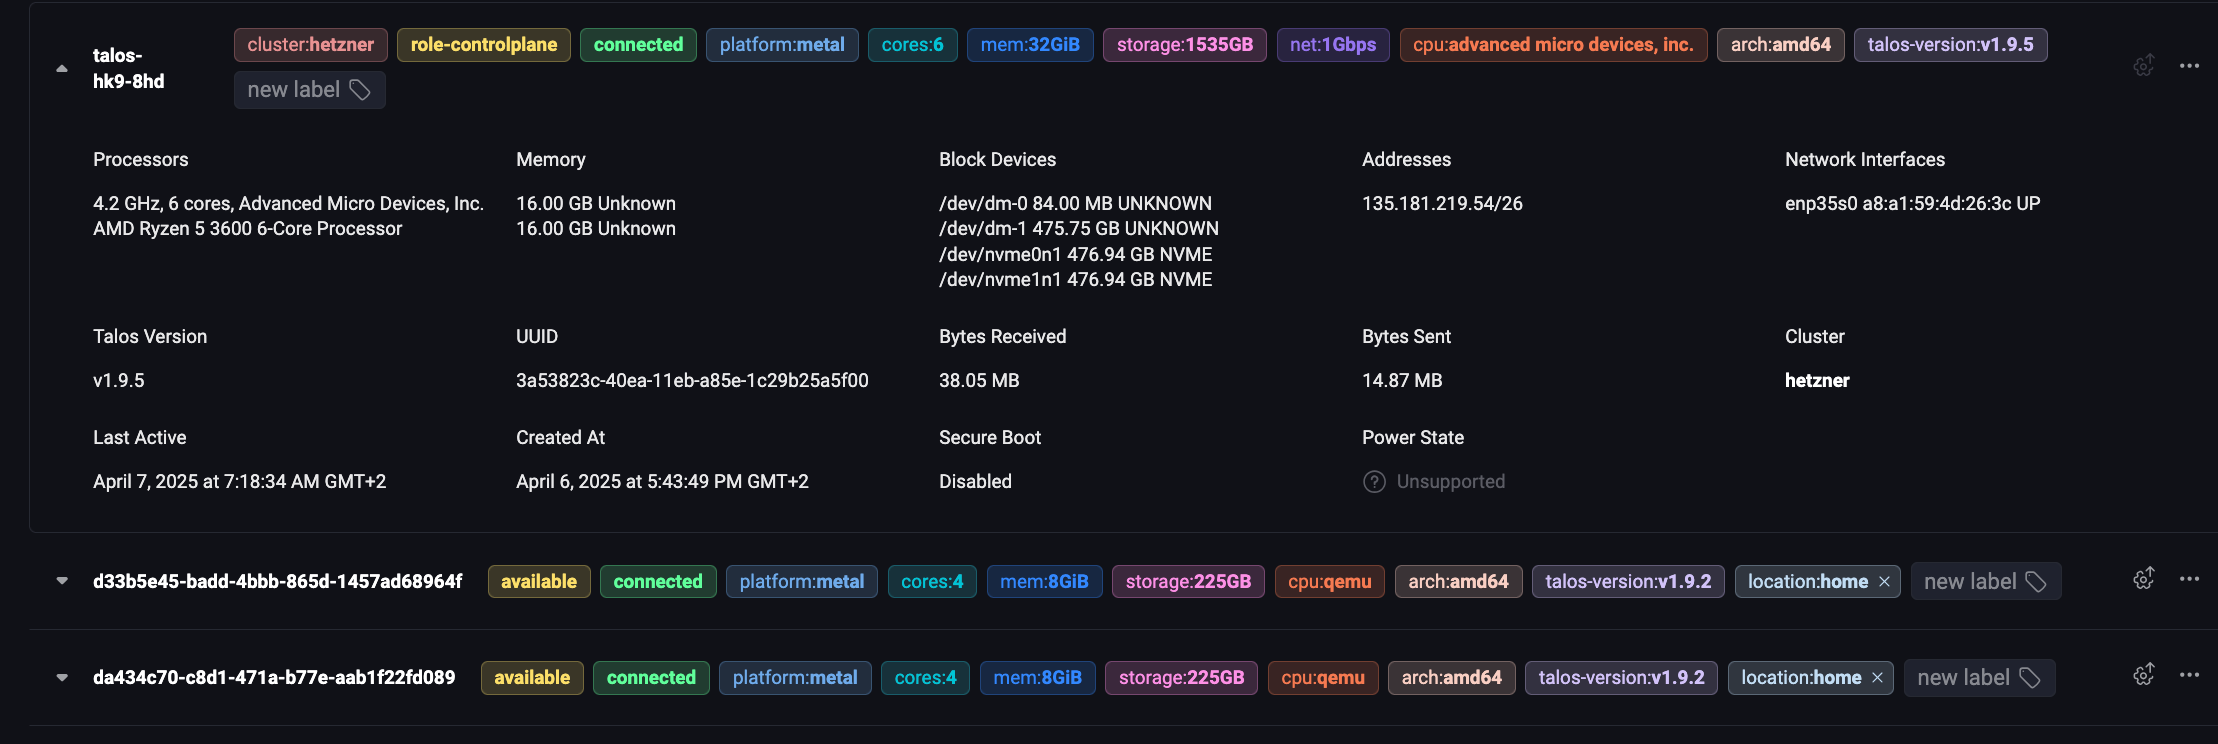
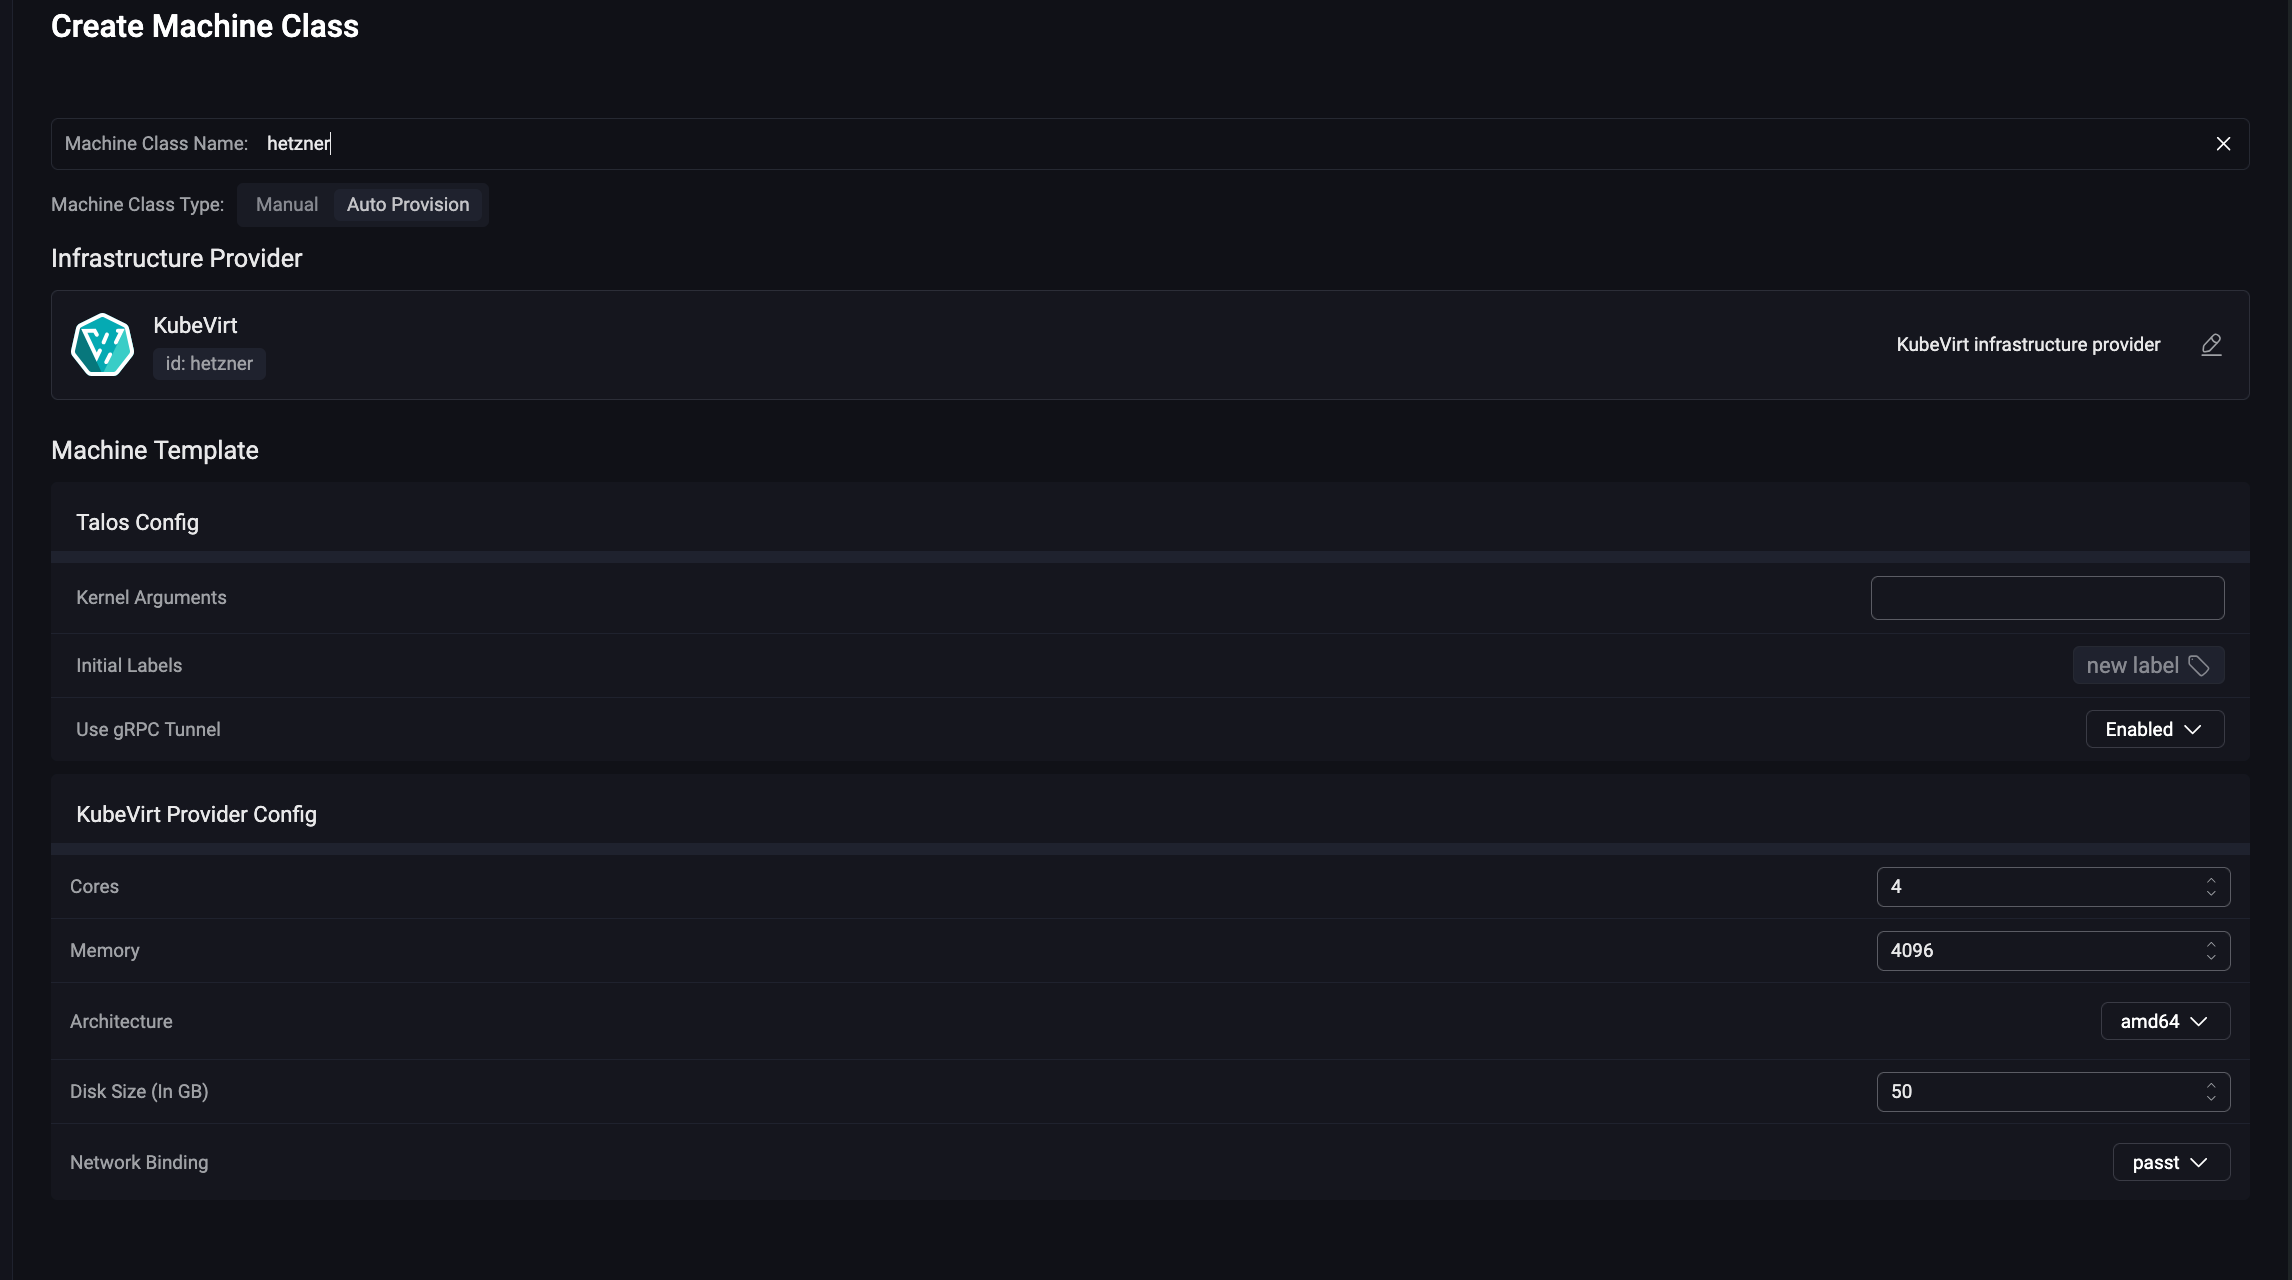
With a machineClass, I can create groups of machines based on the labels present, and I can use these groups in the creation of my clusters. Thus, I don’t even have to select the machines; Omni does it for me.
We can then create a template like this:
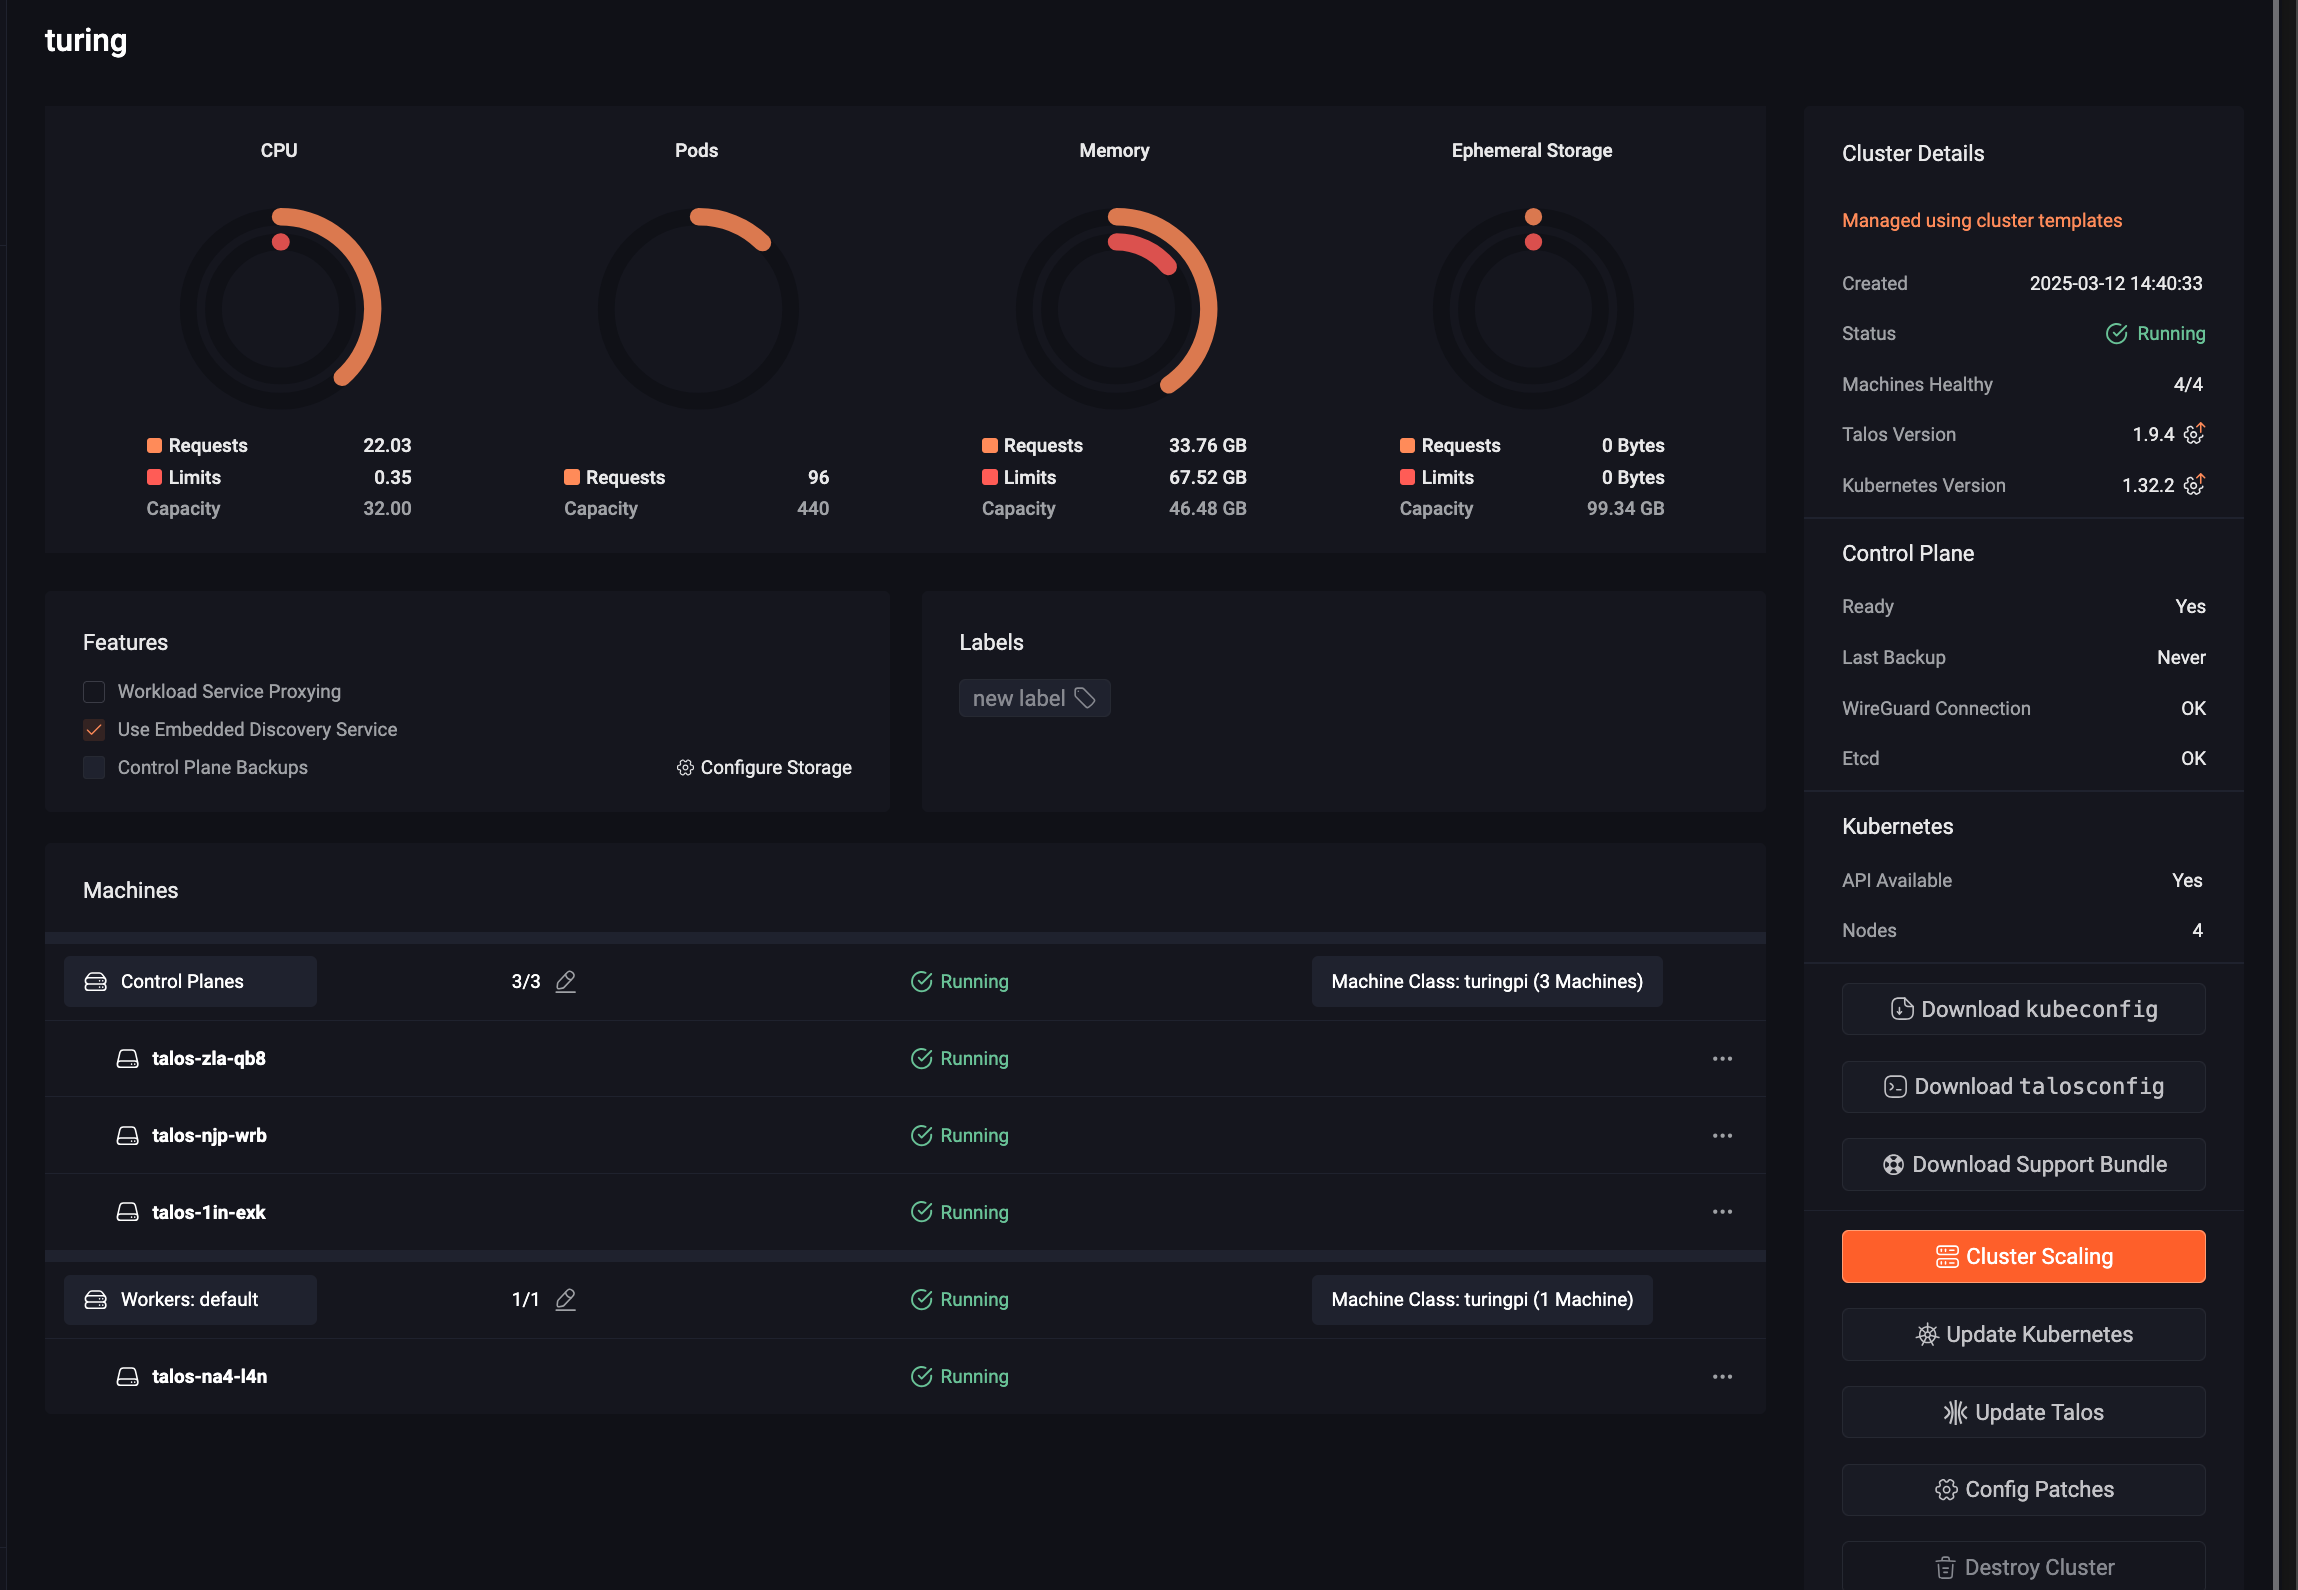
kind: Cluster
name: turing
kubernetes:
  version: v1.32.2
talos:
  version: v1.9.4
features:
  enableWorkloadProxy: false
  diskEncryption: false
  useEmbeddedDiscoveryService: true
patches:
  - name: spegel
    file: patches/spegel.yaml
  - name: enable-workload
    file: patches/workload-on-cp.yml
  - name: no-cni # we will install cilium in extraManifests
    file: patches/cni.yml
  - name: disable-kubeproxy
    file: patches/disable-kubeproxy.yml
  - name: manifests
    file: patches/extraManifests.yml
---
kind: ControlPlane
labels:
  type: control-plane
machineClass:
  name: turingpi
  size: 3
---
kind: Workers
name: workers
labels:
  type: worker
machineClass:
  name: turingpi
  size: 1
To apply it, I just need to use the CLI (yes, Omni has a CLI):
omnictl cluster template sync -f template.yaml
Thanks to templates, I can modify the Talos configuration or inject Kubernetes manifests (like Cilium, ArgoCD…). The alternative would have been to paste these manifests into Omni’s web interface (but that’s frankly not practical).
Workload Proxy
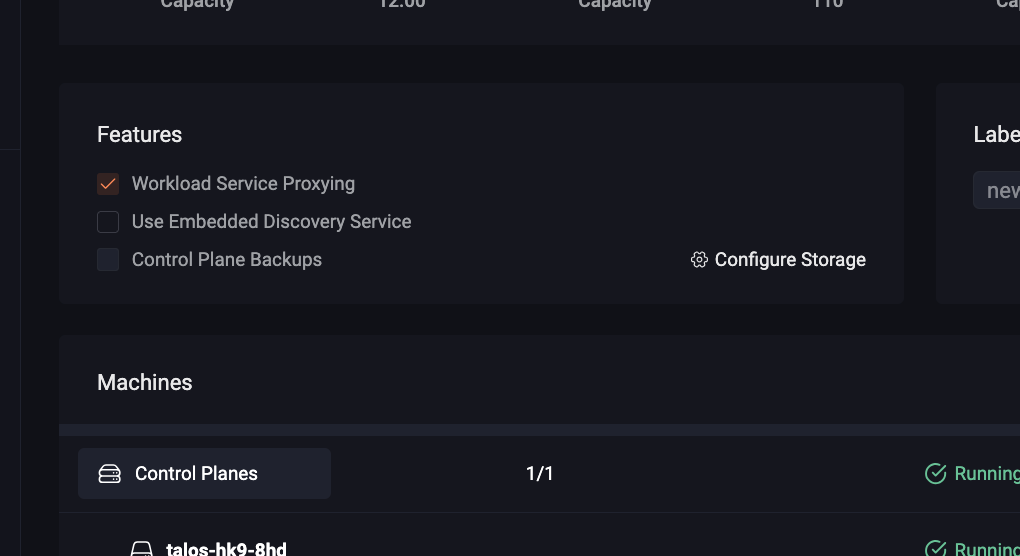
Another feature (which I use little but is very interesting) is the “workload proxy.” It is a proxy that allows exposing Kubernetes services on Omni’s web interface, which is ideal for exposing an application that would only be accessible to people identified by Omni.
In short, if I want to make an application available to my colleagues, I don’t have to worry about:
- Creating a LoadBalancer (dependent on the infrastructure);
- Creating an Ingress + Managing the SSL certificate.
Moreover, if the application does not handle authentication, I have to manage it myself (basic-auth? OAuth2 Proxy? Authentik agent?).
Or expose it through a VPN like Tailscale or Cloudflare tunnel.
With Omni and the workload proxy, you just need to create a Kubernetes service with a specific annotation, and Omni takes care of everything (provided the feature is enabled in your cluster configuration).
To enable the workload proxy, you need to add the enableWorkloadProxy feature to your cluster configuration or check the box in Omni’s web interface.
features:
  enableWorkloadProxy: true
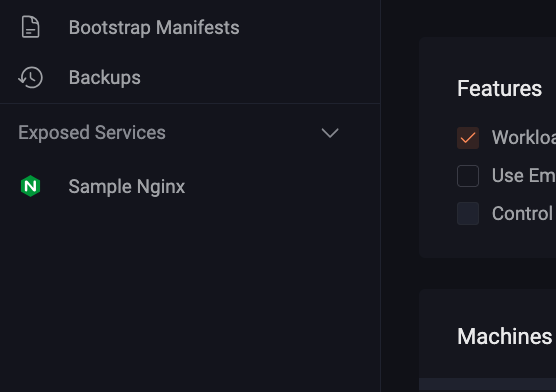
Here is an Nginx application that will be exposed on Omni’s web interface:
apiVersion: apps/v1
kind: Deployment
metadata:
  name: workload-proxy-example-nginx
  namespace: default
spec:
  selector:
    matchLabels:
      app: workload-proxy-example-nginx
  template:
    metadata:
      labels:
        app: workload-proxy-example-nginx
    spec:
      containers:
        - name: workload-proxy-example-nginx
          image: nginx:stable-alpine-slim
---
apiVersion: v1
kind: Service
metadata:
  name: workload-proxy-example-nginx
  namespace: default
  annotations:
    omni-kube-service-exposer.sidero.dev/port: "50080"
    omni-kube-service-exposer.sidero.dev/label: Sample Nginx
    omni-kube-service-exposer.sidero.dev/icon: H4sICB0B1mQAA25naW54LXN2Z3JlcG8tY29tLnN2ZwBdU8ly2zAMvfcrWPZKwiTANWM5015yyiHdDr1kNLZsa0axvKix8/cFJbvNdCRCEvEAPDxQ8/vLSydem+Op7XeVtGCkaHbLftXuNpX8Pax1kveL+UetxY9919erZiWG/k58+/kgvjb7Xonz+Qyn182RP2DZvyjx0OyaYz30x38o8dhemqP43vfdSWi9+DDnCHFuV8O2ksmY/UWKbdNutsPfz9e2OX/pL5U0wghCvqVgqrtTJbfDsL+bzUrhM0F/3MzQGDPjlHIxH9qhaxbrtmueh7d987zbtLvLfDZtz/f1sBWrSj5aD9klhVswwdfWgLNJXR+GL6sgRwSP6QmRd53yELzCCMmRShCjqyFmLOsWwCiIKS01GJOUA0qZHQUby5ZXlsAGjkv8wmuK00A+gDfxoD1DSREQOm0teBdVgOA4wqdY1i0i+AiG4lOGbFEhg7icZWJIgCMz+It1DA/hYDQXScxVjyyohpCprBt7SswylJze49htVNxQjk6xDuSXTAs12OQgUGLWMRenLj4pTsNb11SSde/uPhmbA2U5e6c3qxBiEdhTOhhO77CIwxvJ55p7NVlN1owX+xkOJhUb3M1OTuShAZpQIoK72mtcSF5bwExLoxECjsqzssgIzdMLB2IdiPViApHbsTwhH1KNkIgFHO2tTOB54pjfXu3k4QLechmK9lCGzfm9s0XbQtmWfqa4NB0Oo1lzVtUsx6wjKxtYBcKSMkJOyGzJBbYxBM0aBypZfdBRJyDCz0zNRjXZKw0D/J75KFApFvPVTt73kv/6b0Lr9bqMp/wziz8W9M/pAwQAAA==
spec:
  selector:
    app: workload-proxy-example-nginx
  ports:
    - name: http
      port: 80
      targetPort: 80
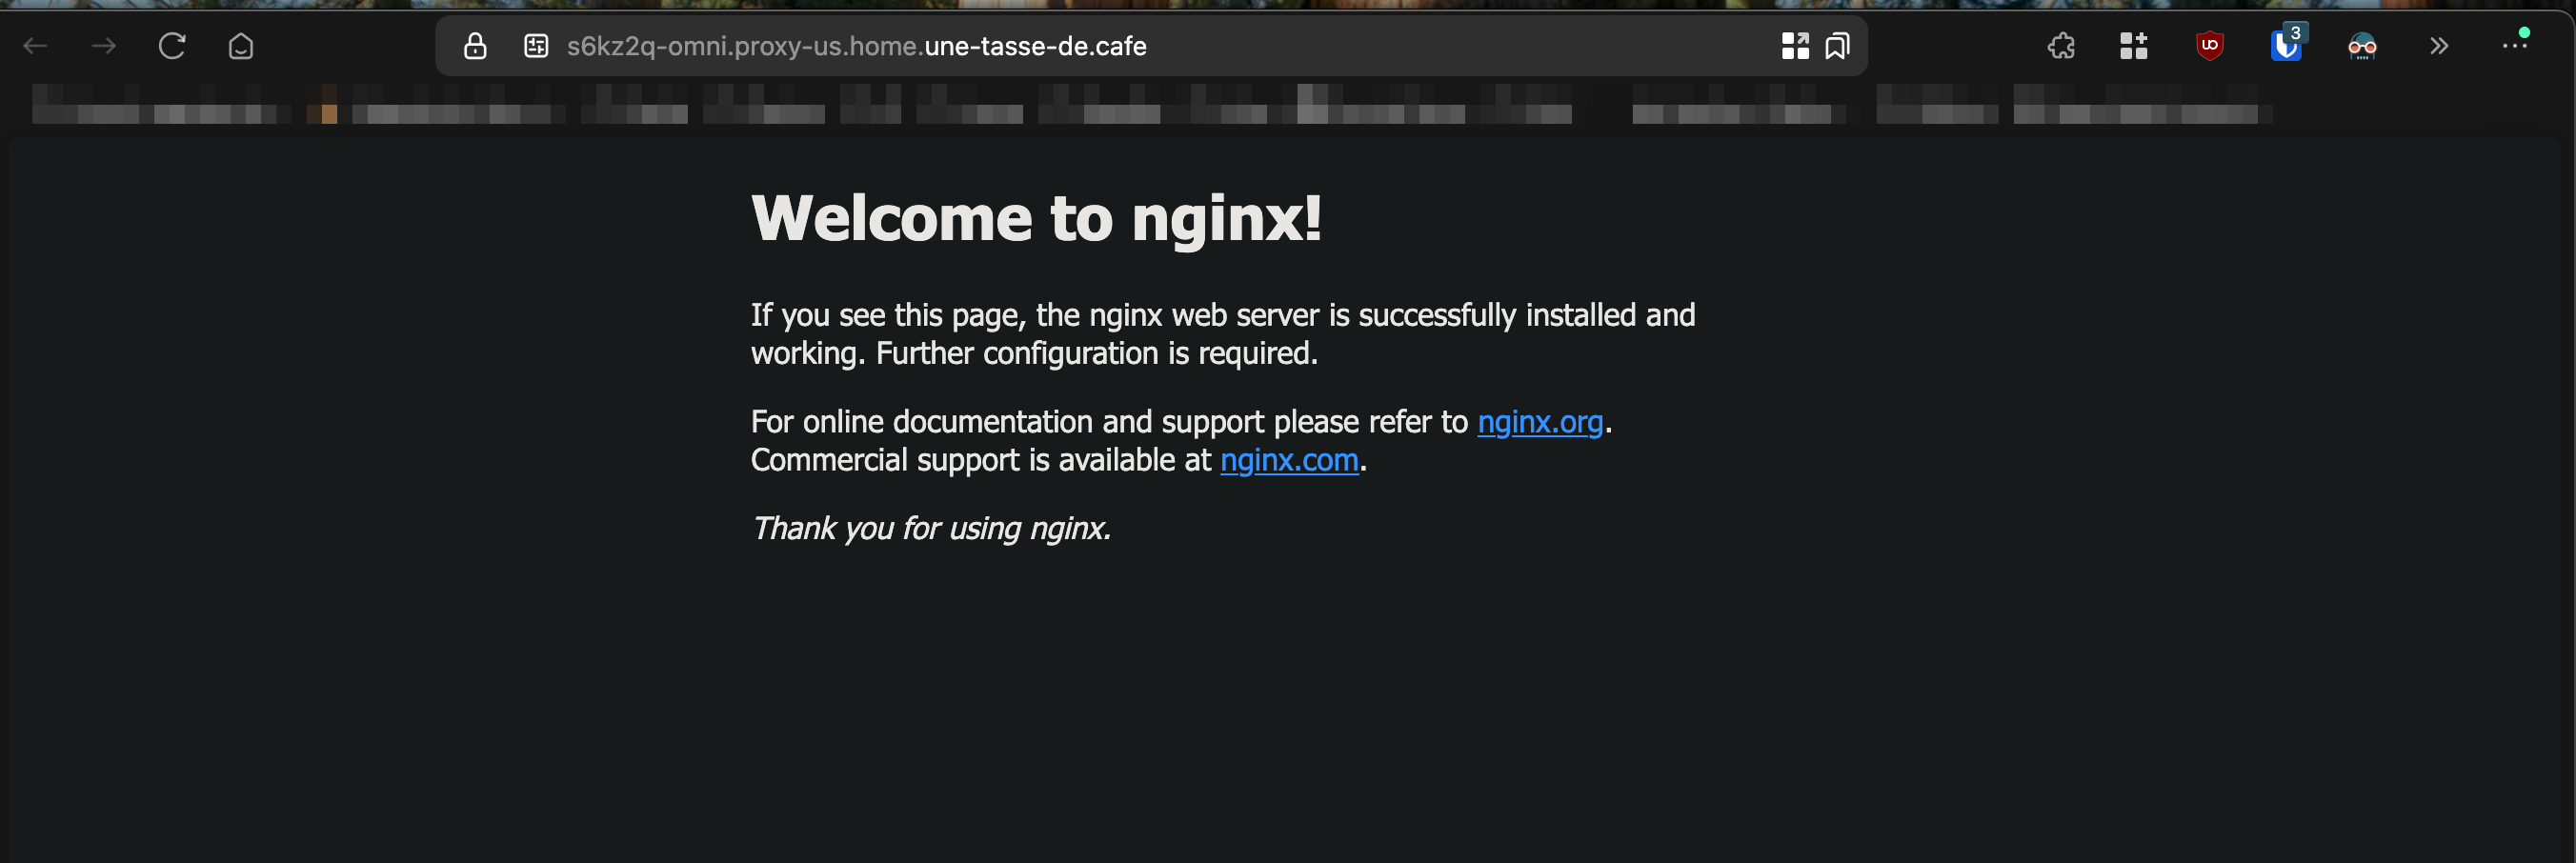
How does it work?
Once again, it’s thanks to Omni’s communication mode: its internal Wireguard network. As soon as the proxy is enabled, Omni deploys a DaemonSet on the Kubernetes cluster in HostNetwork mode (which allows it to expose on the host machine with its network interfaces) but only through the Wireguard network (security first).
Omni then creates a Kubernetes manifest that is applied by Talos, which can be found here. This is also where you can see it uses Omni’s Wireguard network range --bind-cidrs="fdae:41e4:649b:9303::/64".
Limitations of Omni
From what we’ve seen, Omni is a very practical and versatile tool, but you may have noticed a major limitation. Indeed, the deployment of our machines is still manual (or via an automation tool like Terraform).
The alternative to Omni’s deployment part would be to use ClusterAPI (which only competes with the cluster creation part, other features like OIDC, workload proxy, etc., are unique to Omni).
ClusterAPI is a project that allows deploying Kubernetes clusters on most cloud platforms (with providers, like Terraform) from a management Kubernetes cluster that creates the machines, creates the cluster, and stores the configuration in secrets. If you’re interested, I have an article about it here with Talos and Proxmox.
Returning to Omni, it is not yet capable of controlling a cloud infrastructure… for now!
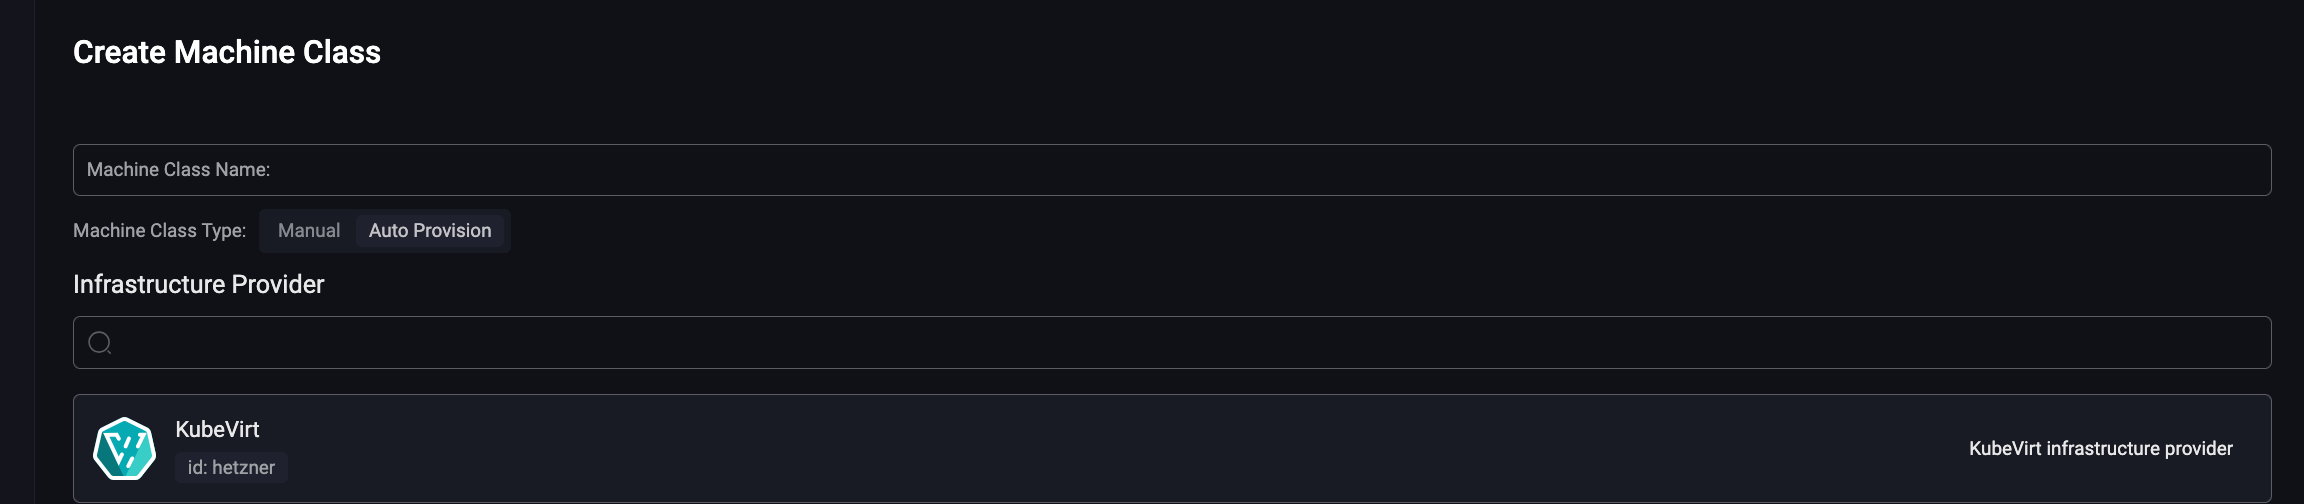
Infrastructure Providers
In Omni’s documentation, we find this page detailing Omni’s project to create providers that control machines on cloud or on-premise infrastructures on the fly.
In principle, Omni will have a machineClass corresponding to the target infrastructure, and as soon as a machine is requested (e.g., by creating a cluster), a program interfaced with Omni will automatically create this machine.
For now, there are only two:
It’s with the second one that I had fun. Let me show you!
Create a Kubevirt Provider
Let’s detail together how to add this Kubevirt provider to automatically create clusters!
I will deliberately remain very vague about Kubevirt (I don’t really master this solution, so I might say nonsense). I will therefore focus on Omni and the creation of virtual machines.
First, what do we need?
- A Kubernetes cluster capable of hosting VMs;
- Omni (obviously).
This first Kubernetes cluster will, OF COURSE, itself be present in Omni (it’s not mandatory, but I like Omni :P).
Install Kubevirt
I already have a ready-to-use cluster; it’s a Baremetal machine hosted at Hetzner (don’t retain this information: it’s useless). I then install Kubevirt in the simplest way proposed by the documentation:
export VERSION=$(curl -s https://storage.googleapis.com/kubevirt-prow/release/kubevirt/kubevirt/stable.txt)
echo $VERSION
kubectl create -f "https://github.com/kubevirt/kubevirt/releases/download/${VERSION}/kubevirt-operator.yaml"
kubectl create -f "https://github.com/kubevirt/kubevirt/releases/download/${VERSION}/kubevirt-cr.yaml"
Then, I will need CDI (Containerized Data Importer), which will allow me to create VMs from external sources. Still, like a good student, I will follow the documentation:
export TAG=$(curl -s -w %{redirect_url} https://github.com/kubevirt/containerized-data-importer/releases/latest)
export VERSION=$(echo ${TAG##*/})
kubectl create -f https://github.com/kubevirt/containerized-data-importer/releases/download/$VERSION/cdi-operator.yaml
kubectl create -f https://github.com/kubevirt/containerized-data-importer/releases/download/$VERSION/cdi-cr.yaml
Kubevirt and CDI seem OK ! But where do we store these VMs?
LocalPathProvisioner
Now, we need to configure a CSI to store the disks of the virtual machines!
I will make it (very) simple and configure Rancher’s LocalPathProvisioner, but ideally, shared storage should be used to allow migrating VMs between nodes (which is not the case with LocalPathProvisioner that uses the host disk).
However, LocalPathProvisioner storage requires a small patch in the configuration of our Talos node (still the one that will host the VMs):
machine:
  kubelet:
    extraMounts:
      - destination: /var/local-path-provisioner
        type: bind
        source: /var/local-path-provisioner
        options:
          - bind
          - rshared
          - rw
Thus, we can install LocalPathProvisioner as indicated in Talos’s documentation.
# kustomization.yaml
apiVersion: kustomize.config.k8s.io/v1beta1
kind: Kustomization
resources:
- github.com/rancher/local-path-provisioner/deploy?ref=v0.0.26
patches:
- patch: |-
    kind: ConfigMap
    apiVersion: v1
    metadata:
      name: local-path-config
      namespace: local-path-storage
    data:
      config.json: |-
        {
                "nodePathMap":[
                {
                        "node":"DEFAULT_PATH_FOR_NON_LISTED_NODES",
                        "paths":["/var/local-path-provisioner"]
                }
                ]
        }
- patch: |-
    apiVersion: storage.k8s.io/v1
    kind: StorageClass
    metadata:
      name: local-path
      annotations:
        storageclass.kubernetes.io/is-default-class: "true"
- patch: |-
    apiVersion: v1
    kind: Namespace
    metadata:
      name: local-path-storage
      labels:
        pod-security.kubernetes.io/enforce: privileged
Kubevirt, check. CDI, check. LocalPathProvisioner, check.
Create the Omni ServiceAccount
We’re getting closer to the goal: the Kubevirt provider. Now, we need an Omni serviceAccount to make it available, and we can do it via the WebUI or CLI:
omnictl serviceaccount create --role=InfraProvider --use-user-role=false infra-provider:hetzner
Note: The hetzner at the end is the name of the cluster as it will be referenced in Omni; if we want multiple clusters, we need to create multiple serviceAccounts.
OMNI_ENDPOINT=https://omni.home.une-tasse-de.cafe:443
OMNI_SERVICE_ACCOUNT_KEY=this-is-a-random-key
We can keep it handy; we’ll need it later.
Last step, a kubeconfig for the provider to create VMs on the Kubernetes cluster.
Create a KubeConfig
A little disclaimer, this part is not based on any documentation, so it’s possible I might forget permissions or steps.
Seeing that the provider needed a kubeconfig, I naturally used my administrator kubeconfig at first. But clearly, that’s not very clean!
So I’ll try to show you the example by creating a serviceAccount with minimal permissions to create VMs.
I’ll start by creating the serviceAccount and the secret that will contain its authentication token:
name=kubevirt-omni
kubectl create ns $name
kubectl create sa $name

kubectl apply -f - <<EOF
apiVersion: v1
kind: Secret
type: kubernetes.io/service-account-token
metadata:
  name: $name
  annotations:
    kubernetes.io/service-account.name: $name
EOF
Now, we can create the kubeconfig using the secret we just created:
server=https://135.181.219.54:6443
ca=$(kubectl get secret/$name -o jsonpath='{.data.ca\.crt}')
token=$(kubectl get secret/$name -o jsonpath='{.data.token}' | base64 --decode)
namespace=$(kubectl get secret/$name -o jsonpath='{.data.namespace}' | base64 --decode)

echo "
apiVersion: v1
kind: Config
clusters:
- name: default-cluster
  cluster:
    certificate-authority-data: ${ca}
    server: ${server}
contexts:
- name: default-context
  context:
    cluster: default-cluster
    namespace: default
    user: default-user
current-context: default-context
users:
- name: default-user
  user:
    token: ${token}
" > sa.kubeconfig
Except that in its current state, we can’t go very far since it has no rights in the cluster. So we’ll give it the permissions it needs, creating VMs and Datavolumes (for disk creation with Talos).
apiVersion: rbac.authorization.k8s.io/v1
kind: ClusterRole
metadata:
  name: kubevirt-omni
rules:
  - apiGroups:
      - cdi.kubevirt.io
    resources:
      - datavolumes
    verbs:
      - get
      - list
      - watch
      - create
      - update
      - delete
  - apiGroups:
      - kubevirt.io
    resources:
      - virtualmachines
    verbs:
      - get
      - list
      - watch
      - create
      - update
      - delete
---
apiVersion: rbac.authorization.k8s.io/v1
kind: ClusterRoleBinding
metadata:
  name: kubevirt-omni
subjects:
  - kind: ServiceAccount
    name: admin-sa-token
    namespace: default
roleRef:
  kind: ClusterRole
  name: kubevirt-omni
  apiGroup: rbac.authorization.k8s.io
That’s it, we’re finally there! We can launch the provider for the first time:
docker run --platform=linux/amd64 --name omni-kubevirt -it -v ./sa.kubeconfig:/kubeconfig ghcr.io/siderolabs/omni-infra-provider-kubevirt --kubeconfig-file /kubeconfig --omni-api-endpoint $OMNI_ENDPOINT --omni-service-account-key $OMNI_SERVICE_ACCOUNT_KEY --id hetzner -n $namespace
… and finally, we add the MachineClass in Omni.
Shall we create this cluster?
Drum roll…
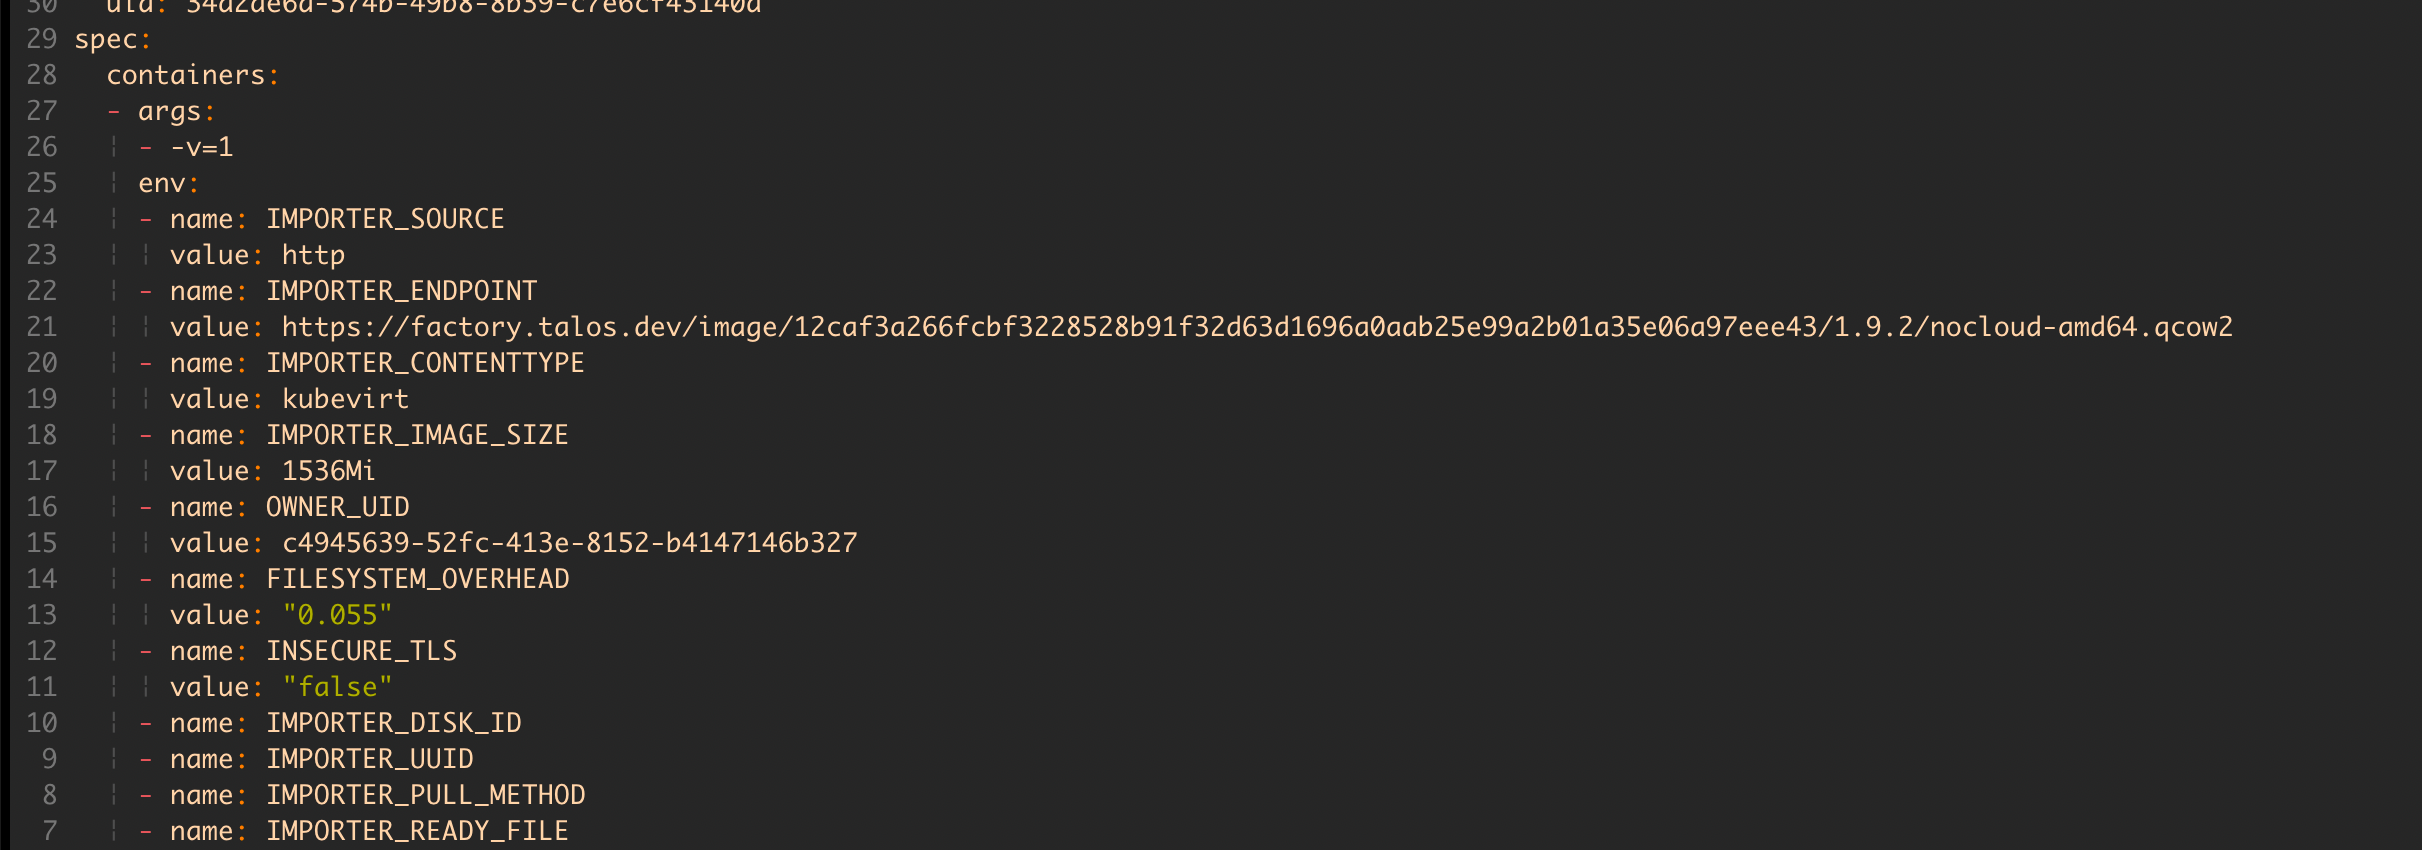
A lot happens in a few seconds! For example, a “cdi-importer” pod downloads the Talos image onto a PVC. This pod uses Factory (Talos’s site for creating custom images), so we’re on familiar ground.
But most importantly, we have VMs!!!
$ kubectl get vm
NAME                                      AGE    STATUS    READY
talos-in-kubevirt-control-planes-mbk7g8   4m3s   Running   True
talos-in-kubevirt-workers-fhzmxd          4m2s   Running   True
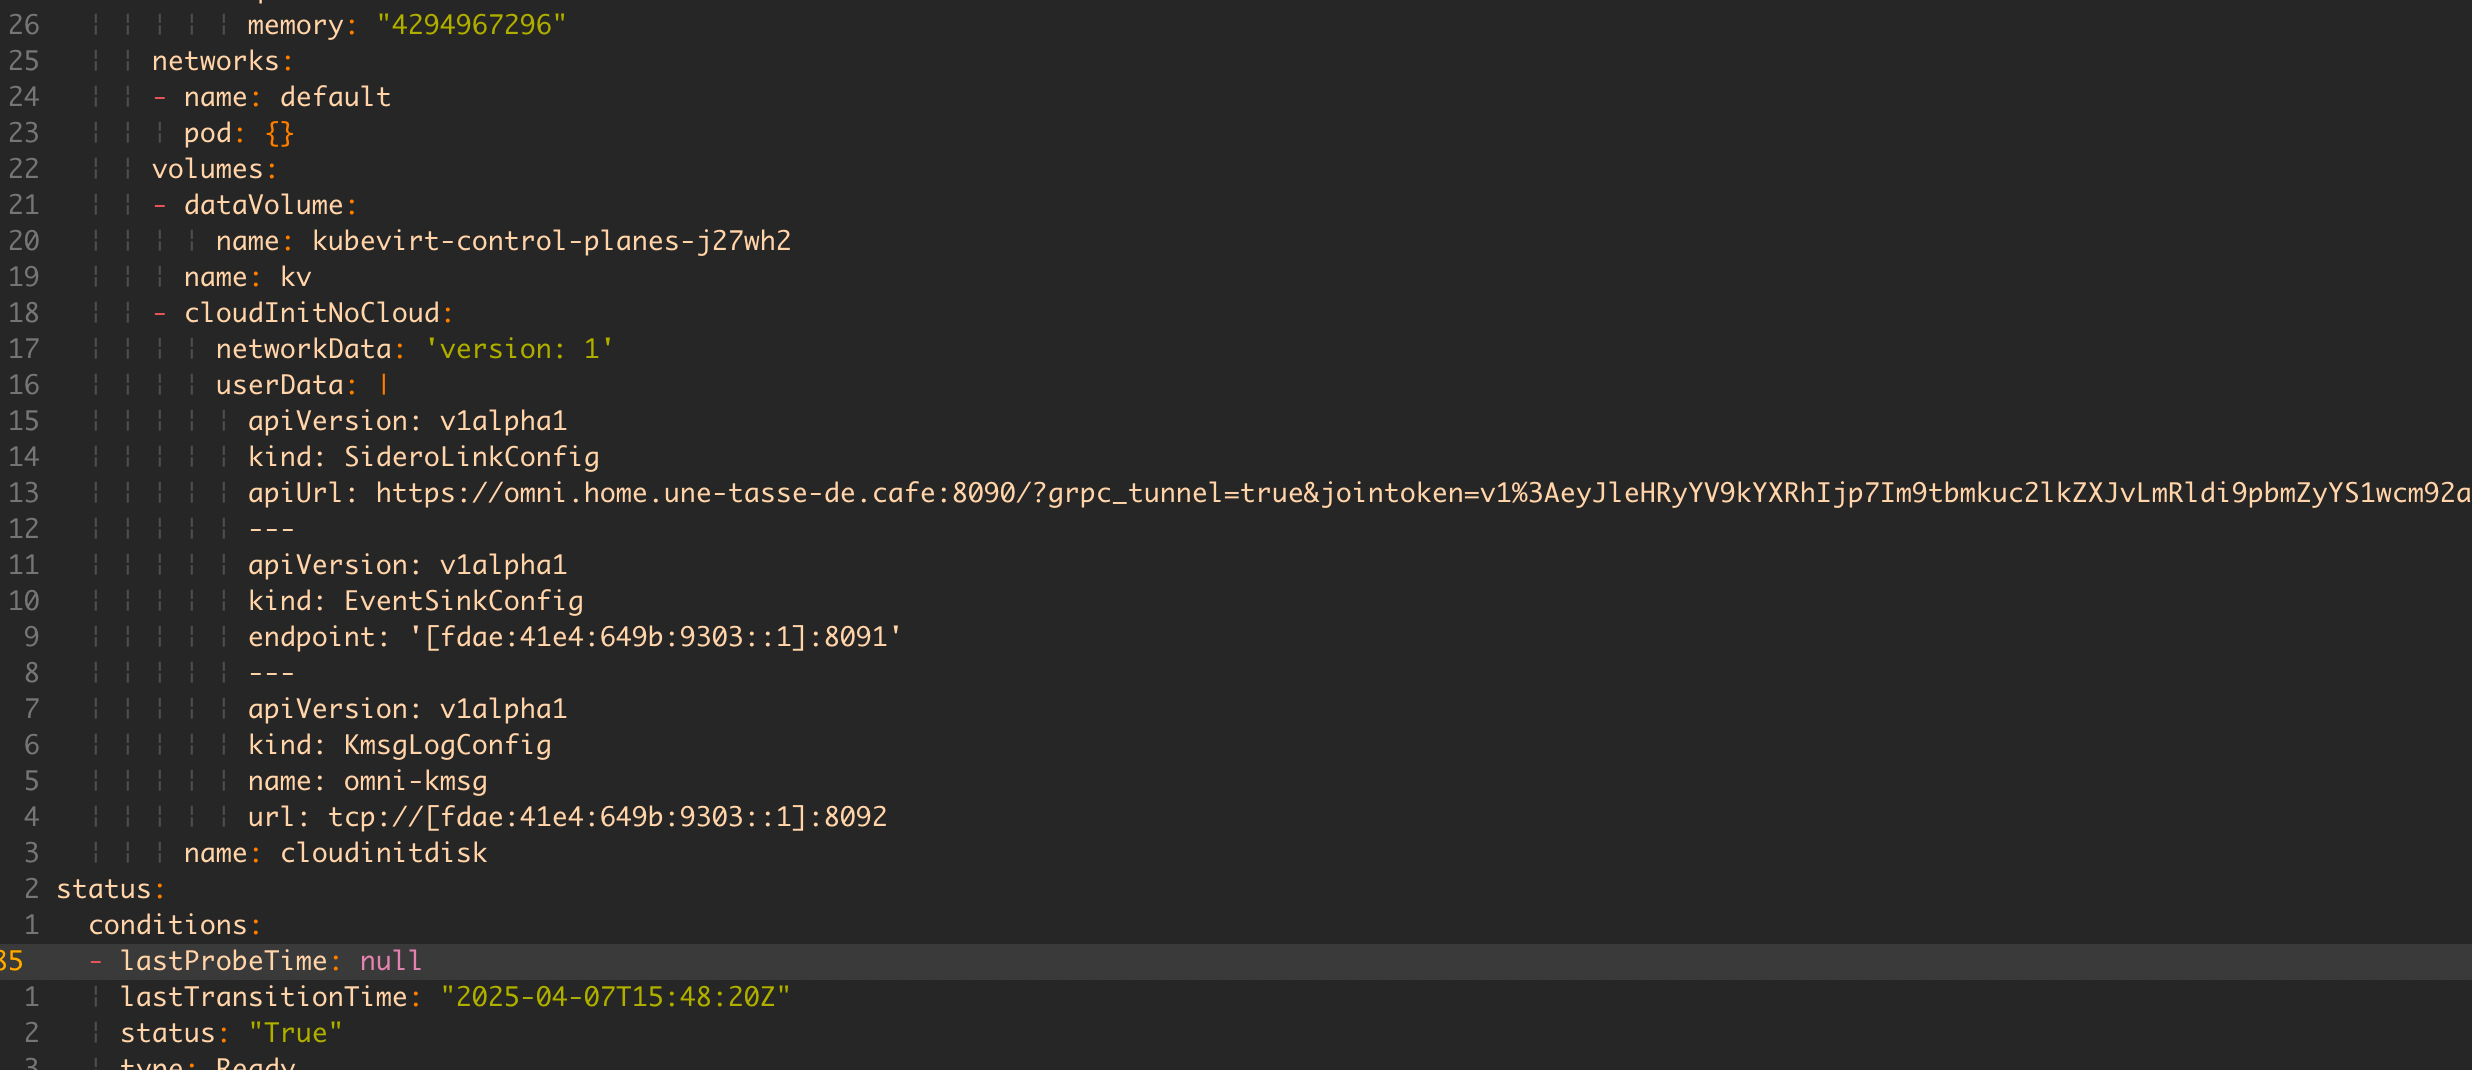
Interestingly, if we look at the manifest of one of the VMs, we notice it’s configured with CloudInit containing Omni’s API URL and an authentication token.
Well then… Omni isn’t very happy :/

$ talosctl -n talos-in-kubevirt-control-planes-mbk7g8 dmesg
fdae:41e4:649b:9303:260b:ed52:8620:177b: user: warning: [2025-04-07T17:27:07.689754559Z]: [talos] diagnostic still active {"component": "controller-runtime", "controller": "runtime.DiagnosticsLoggerController", "id": "address-overlap", "message": "host and Kubernetes pod/service CIDR addresses overlap", "details": ["host routed addresses: [\"10.244.0.55/24\"]", "Kubernetes pod CIDRs: [\"10.244.0.0/16\"]", "Kubernetes service CIDRs: [\"10.96.0.0/12\"]"], "url": "https://talos.dev/diagnostic/address-overlap"}
We have a small IP address conflict between the host cluster’s network and the VMs trying to use the same address ranges for their cluster. Logically, it doesn’t work!
So we’ll create a small Talos patch to change the VM cluster’s range:
# netcidr.yaml
cluster:
  network:
    dnsDomain: cluster.local
    podSubnets:
      - 10.1.0.0/16
    serviceSubnets:
      - 10.2.0.0/16
We could apply it from Omni’s web interface, but it’s the perfect opportunity to create a cluster template!
Create a Cluster Template
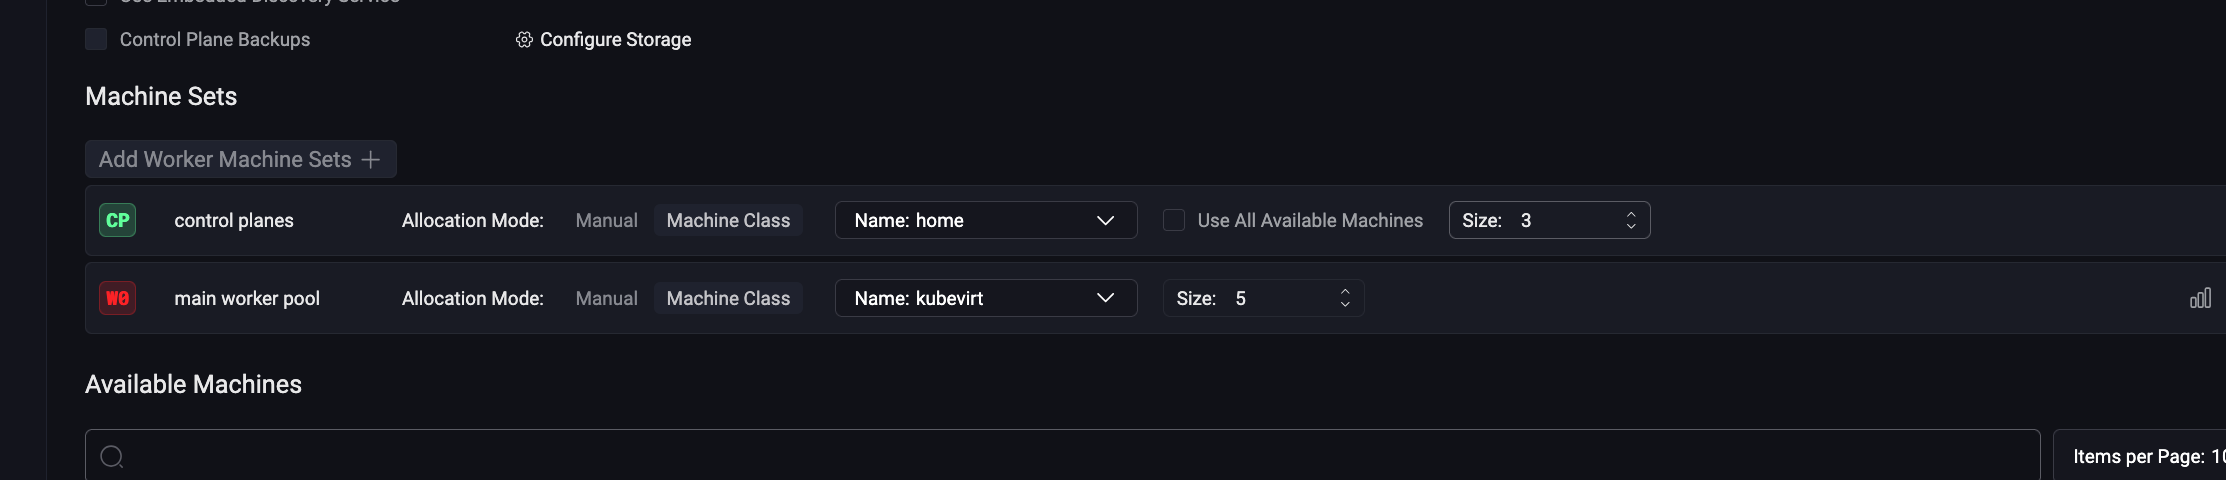
As explained above, a template is a YAML file that describes the cluster we want to create. We can use it as a base to create our virtualized cluster. The template is divided into three parts:
- The cluster itself;
- The control plane; (here, only one)
- The workers.
kind: Cluster
name: talos-with-kubevirt
labels:
  template: true
kubernetes:
  version: v1.32.2
talos:
  version: v1.9.5
patches:
  - name: cidr-overlap
    file: netcidr.yaml
---
kind: ControlPlane
labels:
  type: control-plane
machineClass:
  name: hetzner
  size: 1
---
kind: Workers
labels:
  type: workers
machineClass:
  name: hetzner
  size: 1
We apply it:
$ omnictl cluster template sync -f template.yaml
* creating Clusters.omni.sidero.dev(talos-with-kubevirt)
* creating ConfigPatches.omni.sidero.dev(200-talos-with-kubevirt-cidr-overlap)
* creating MachineSets.omni.sidero.dev(talos-with-kubevirt-workers)
* creating MachineSets.omni.sidero.dev(talos-with-kubevirt-control-planes)```
And we have a ready-to-use Kubernetes cluster! I can then retrieve the kubeconfig and use it like a regular (Omni) cluster.
$ omnictl kubeconfig --cluster talos-with-kubevirt
Conclusion
Today, I use my self-hosted Omni almost daily on my personal clusters (OVH, TuringPI, Proxmox VMs, etc.). The ability to quickly create Kubernetes clusters without worrying about machine creation is truly a game-changer (whether for live sessions or my projects).
In short, if Omni interests you, go check out what Sidero is doing; there’s really a lot to explore! I’m really looking forward to seeing the next providers (Proxmox or Openstack?) and how Omni evolves over time.
Plus, Omni in SaaS costs only $10/month for the Hobby version. Go for it!