Istio from A to Y

When you start working with Kubernetes, you quickly realize that managing communications between services is not so simple. As soon as traffic passes through an ingress, the only thing you can do to observe what is happening is to check the pod logs, which is neither practical nor efficient.
This is why service meshes were created. They allow you to manage communications between services, secure and monitor exchanges, and control traffic. The goal of this page is to introduce you to Istio, an open-source service mesh.
Let’s discover Istio together, how to install it, and how to use it with a good cup of coffee ☕.
But before we start, let’s first explain what a service mesh is.
What is a service mesh?
A service mesh is an infrastructure layer that allows you to manage communications between the services of an application.
In short: the service mesh integrates into the infrastructure of an application composed of several sub-applications (microservices, for example) to add functionalities.
In a previous article, I presented Consul which can be used as a service mesh with a sidecar based on Envoy.

In the example above, each program needs to access another, the UI to authentication and the backend, the backend to storage and the queuing service, and finally: the consumers to the queuing service.
With this scheme, a few questions arise:
- How to allow/deny exchanges between two services?
- How to secure exchanges between services?
- What about observability?
For example, if we want the UI to access the backend but not the storage, how do we do it? Or if we want the backend to access the storage but not the UI?
One possibility is to use NetworkPolicies if our CNI is capable, but this does not allow managing layer 7 interactions (HTTP, gRPC, etc.) except with Cilium. Specifically, I cannot limit access to a specific route (/api, /endpoint/v3/ping) or by request type (GET, POST, etc).
This is where a service mesh like Istio (or Consul) comes into play.
How does a service mesh manage exchanges between services?
A service mesh uses proxies to intercept requests between services. They act as intermediaries by adding a layer of control over communications.
It’s a bit like a WAF (Web Application Firewall) for web applications. Each application will have its own “router” that will redirect incoming AND outgoing requests to the proxy of the destination service.
Thus, here is our diagram with a service mesh:

Each time the application tries to communicate with another service, the proxy intercepts the request and redirects it to the proxy of the destination service.
Why use a service mesh?
When you only have 2-3 applications, a service mesh may seem unnecessary. But as soon as you start having multiple services, multiple teams, multiple clusters, a service mesh quickly becomes practical.
You can allow different services to communicate with each other in a secure and controlled manner by trusting the identity of the services and not IP addresses or DNS names (which can be easily spoofed).
And what about Istio?
Istio can be used as a service mesh in a Kubernetes cluster. Indeed, it meets the needs mentioned above: securing exchanges, controlling traffic, and monitoring exchanges.
It is a completely open-source project that joined the CNCF (Cloud Native Computing Foundation) on September 30, 2022, and became an incubated project on July 12, 2023.
We will have the opportunity to talk more about Istio’s architecture, its components, and its features later in this article.
My lab environment
For this lab, I used a Kubernetes cluster with 3 nodes (1 master, 2 workers) installed with Talos and Flannel as the CNI (usually, I prefer Cilium, but I had incompatibilities with a certain Istio feature that I will talk about later).
Here is the configuration used for my cluster with talhelper. Feel free to check out my article on Talos for more information on its installation.
Talhelper Configuration
---
clusterName: istio-cluster
talosVersion: v1.7.4
kubernetesVersion: v1.29.1
endpoint: https://192.168.128.27:6443
allowSchedulingOnMasters: true
cniConfig:
  name: flannel
patches:
  - |-
    - op: add
      path: /cluster/discovery/enabled
      value: false
    - op: replace
      path: /machine/network/kubespan
      value:
        enabled: false
    - op: add
      path: /machine/kubelet/extraArgs
      value:
        rotate-server-certificates: true
    - op: add
      path: /machine/files
      value:
      - content: |
          [metrics]
            address = "0.0.0.0:11234"
        path: /var/cri/conf.d/metrics.toml
        op: create
nodes:
  - hostname: controlplane
    ipAddress: 192.168.128.27
    controlPlane: true
    arch: amd64
    installDisk: /dev/sda
  - hostname: worker-1
    ipAddress: 192.168.128.28
    controlPlane: false
    arch: amd64
    installDisk: /dev/sda
  - hostname: worker-2
    ipAddress: 192.168.128.30
    controlPlane: false
    arch: amd64
    installDisk: /dev/sda
controlPlane:
  schematic:
    customization:
      systemExtensions:
        officialExtensions:
         - siderolabs/qemu-guest-agent
         - siderolabs/iscsi-tools
worker:
  schematic:
    customization:
      systemExtensions:
        officialExtensions:
         - siderolabs/qemu-guest-agent
         - siderolabs/iscsi-tools
We will also need a metrics-server for Istio’s HPAs (Horizontal Pod Autoscaler) to function correctly. For this, I have deployed the following manifests to respectively deploy the metrics-server and the certificates-approver for the kubelet.
kubectl apply -f https://raw.githubusercontent.com/alex1989hu/kubelet-serving-cert-approver/main/deploy/standalone-install.yaml
kubectl apply -f https://github.com/kubernetes-sigs/metrics-server/releases/latest/download/components.yaml
As always, be cautious of manifests applied directly from the Internet and make sure to read them before applying.
Installing Istioctl
Istioctl is the command-line tool for managing Istio. It allows you to deploy, verify the status of components, inject sidecars by manifest, and more.
The simplest way to install Istioctl is to use the script provided by Istio (which will download the latest version) or to directly retrieve the binary from the Istio release page.
curl -L https://istio.io/downloadIstio | sh -
Tip
It is possible to specify the version to install by using the ISTIO_VERSION environment variable and the target architecture with TARGET_ARCH.
curl -L https://istio.io/downloadIstio | ISTIO_VERSION=1.22.0 TARGET_ARCH=x86_64 sh -
Of course, try to avoid downloading scripts and running them without reading them. Another solution is to download the binary itself.
A NixOS package is also available to install Istioctl.
nix-env -iA nixpkgs.istioctl # via nixpkgs
nix-env -iA nixos.istioctl # via nixos
We now have everything needed to install Istio on our Kubernetes cluster.
Istio Profiles
Before installing Istio on our cluster, it’s important to choose a profile. A profile is a pre-defined Istio configuration that will determine the components to install, the default configurations, and the enabled features.
There are several Istio profiles, each with its own characteristics:
$ istioctl profile list
Istio configuration profiles:
    ambient
    default
    demo
    empty
    minimal
    openshift
    openshift-ambient
    preview
    remote
    stable
To view the configuration of a profile, you can use the command istioctl profile dump <profile>.
For example, the configuration of the default profile is visible with the following command:
istioctl profile dump default
Here is its value :
apiVersion: install.istio.io/v1alpha1
kind: IstioOperator
spec:
  components:
    base:
      enabled: true
    egressGateways:
    - enabled: false
      name: istio-egressgateway
    ingressGateways:
    - enabled: true
      name: istio-ingressgateway
    pilot:
      enabled: true
  hub: docker.io/istio
  profile: default
  tag: 1.22.1
  values:
    defaultRevision: ""
    gateways:
      istio-egressgateway: {}
      istio-ingressgateway: {}
    global:
      configValidation: true
      istioNamespace: istio-system
To compare two profiles, you can use the command istioctl profile diff <profile1> <profile2>.
To compare the default and demo profiles, you can use the following command:
istioctl profile diff default demo
This will display the differences between the two profiles:
 apiVersion: install.istio.io/v1alpha1
 kind: IstioOperator
 metadata:
   creationTimestamp: null
   namespace: istio-system
 spec:
   components:
     base:
       enabled: true
     egressGateways:
-    - enabled: false
+    - enabled: true
       name: istio-egressgateway
     ingressGateways:
     - enabled: true
       name: istio-ingressgateway
     pilot:
       enabled: true
   hub: docker.io/istio
   profile: default
   tag: 1.22.1
   values:
     defaultRevision: ""
     gateways:
       istio-egressgateway: {}
       istio-ingressgateway: {}
     global:
       configValidation: true
       istioNamespace: istio-system
+    profile: demo
It is possible to customize a profile by reusing an existing one with the command istioctl profile dump <profile> > myprofile.yaml and modifying the myprofile.yaml file to add or remove components.
In this lab, we will primarily use the demo profile, which is a complete profile with all stable Istio features enabled.
Installing Istio
To install Istio on our Kubernetes cluster, we will use the istioctl install command followed by a profile or a configuration file.
- To use a profile :
istioctl install --set profile=demo
- To use a configuration file :
istioctl install -f myprofile.yaml
The chosen profile will generate the necessary manifests to install Istio and configure it according to the profile specifications (it is also possible to use Helm, but this method does not seem to be the most recommended).
Is that all?
Well, yes. Istio will then be installed on the Kubernetes cluster by creating a istio-system namespace and deploying the necessary components.
But, it is not yet effective and no proxy has been injected into the pods. For this, we need to enable automatic Istio injection in the desired namespace. We’ll talk about this a little later.
Our test application: Bookinfo
We will use the “Bookinfo” test application provided by Istio. It is an application composed of several microservices that will be a good example to test this service mesh.
$ kubectl apply -n default -f https://raw.githubusercontent.com/istio/istio/release-1.22/samples/bookinfo/platform/kube/bookinfo.yaml
The Bookinfo application is now deployed on our Kubernetes cluster. We can check what has been deployed with the command kubectl get-all -n default (krew plugin).
$ kubectl get-all -n default
NAME                                                                        NAMESPACE  AGE
serviceaccount/bookinfo-details                                             default    4m15s
serviceaccount/bookinfo-productpage                                         default    4m9s
serviceaccount/bookinfo-ratings                                             default    4m14s
serviceaccount/bookinfo-reviews                                             default    4m12s
service/details                                                             default    4m15s
service/kubernetes                                                          default    15h
service/productpage                                                         default    4m10s
service/ratings                                                             default    4m14s
service/reviews                                                             default    4m13s
deployment.apps/details-v1                                                  default    4m14s
deployment.apps/productpage-v1                                              default    4m8s
deployment.apps/ratings-v1                                                  default    4m13s
deployment.apps/reviews-v1                                                  default    4m11s
deployment.apps/reviews-v2                                                  default    4m11s
deployment.apps/reviews-v3                                                  default    4m11s
Let’s now try to access the Bookinfo application. To do this, we will use a port-forward to access it from our local machine.
kubectl port-forward svc/productpage 9080:9080 -n default
Next, open a browser and access the URL http://localhost:9080/productpage.
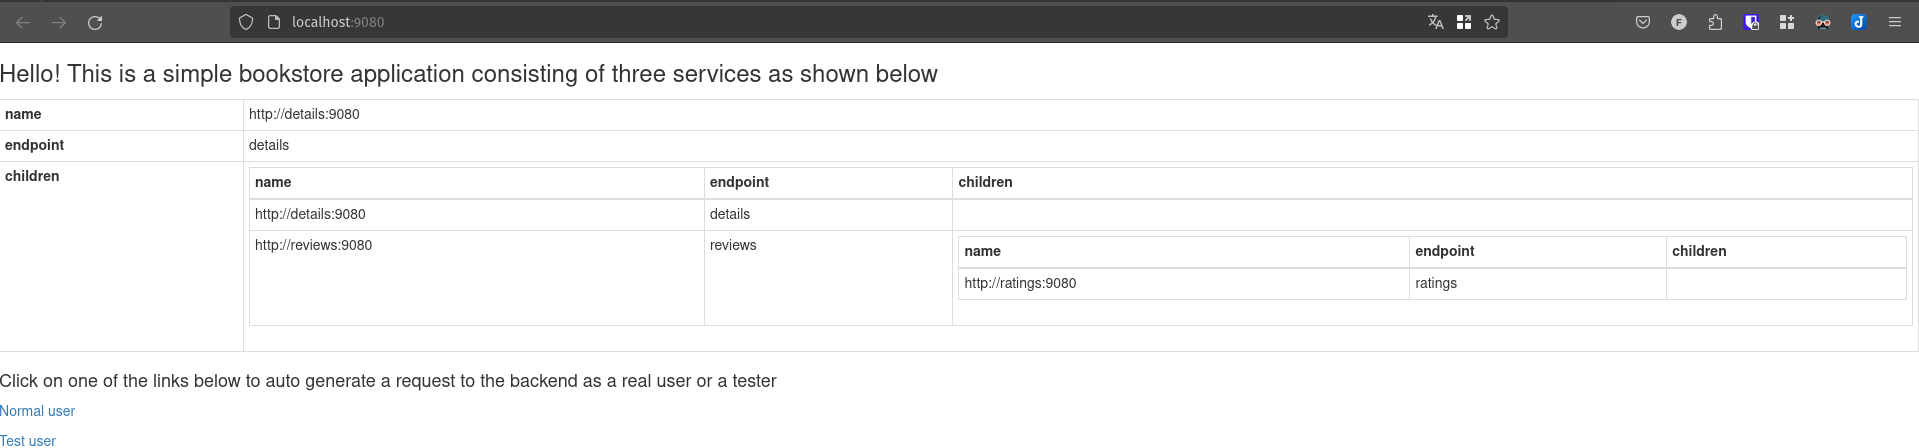
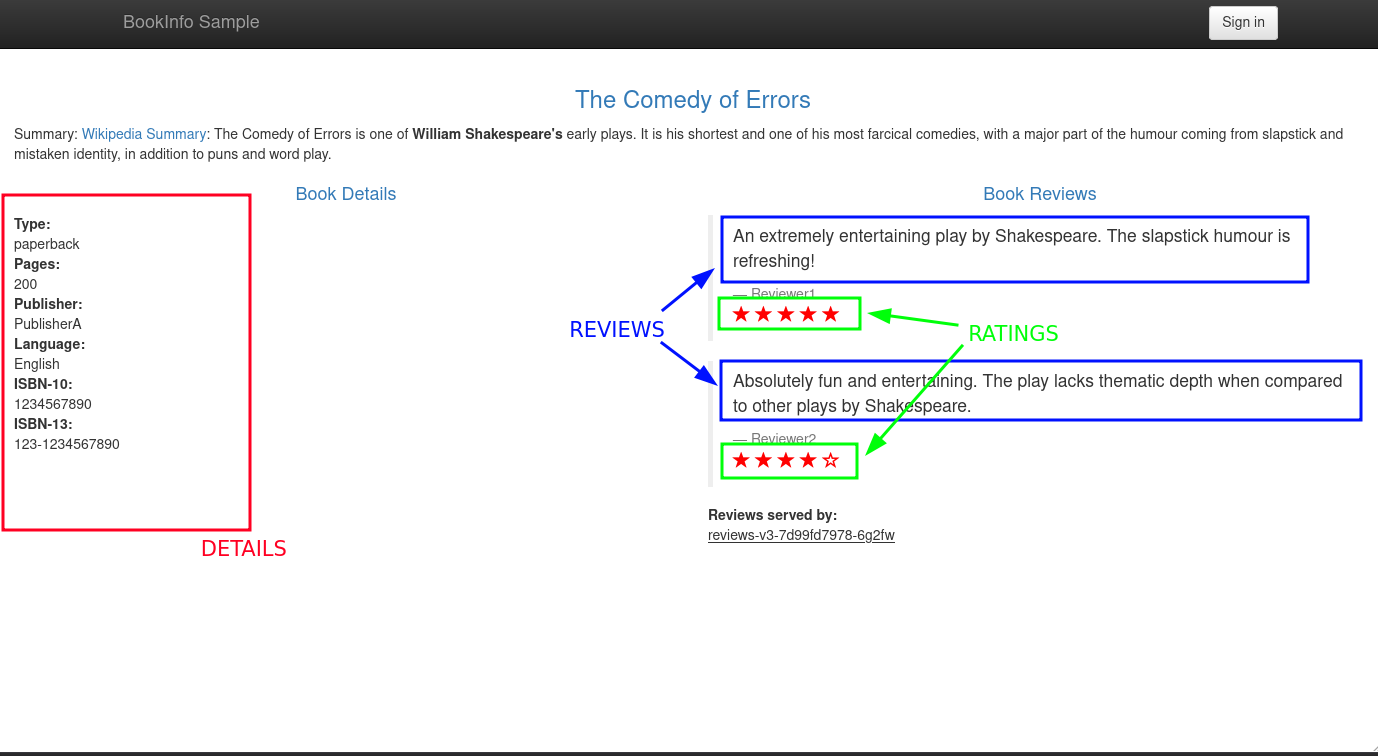
By clicking the “Normal user” button, a page similar to this one should appear:

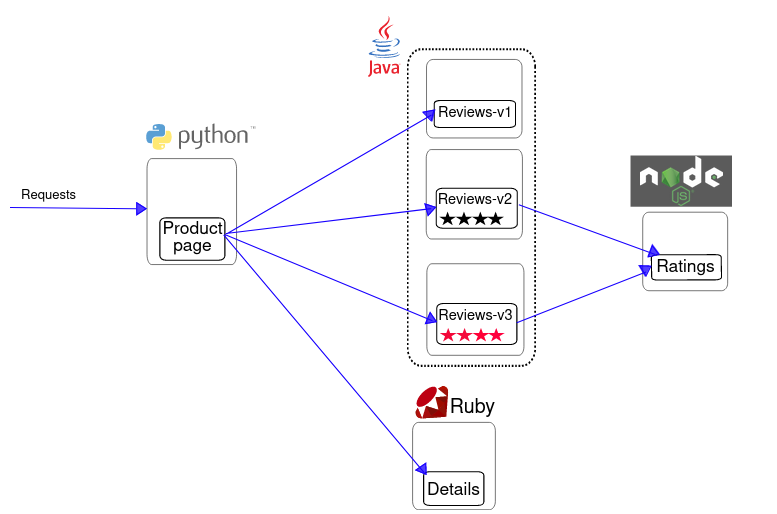
But, concretely, what does the Bookinfo application do? In what case is each microservice used?
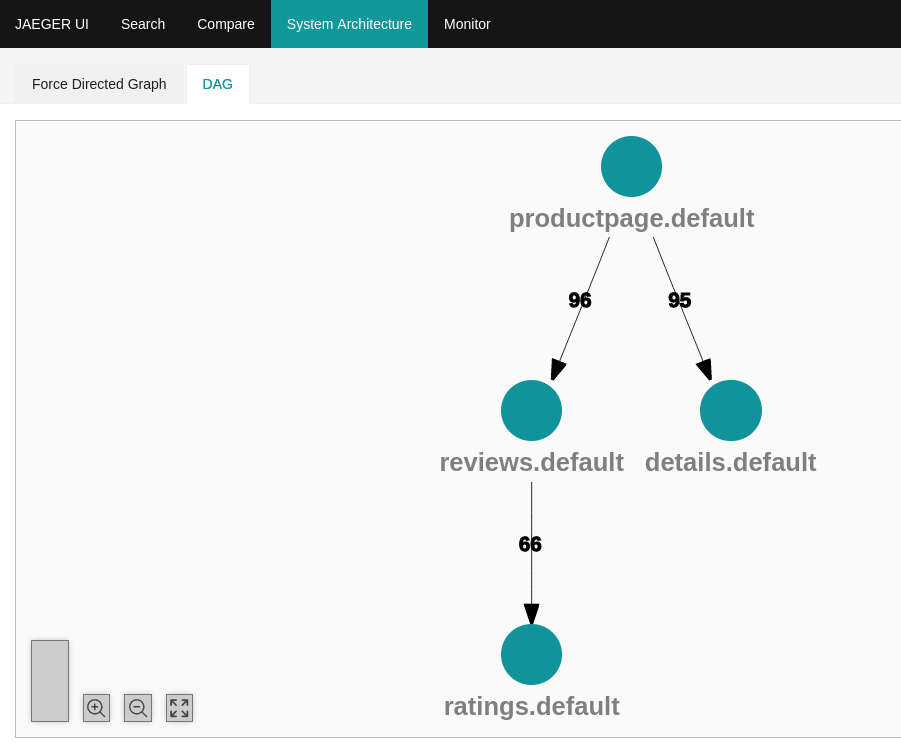
We have 4 microservices in the Bookinfo application:
- productpage : the application’s frontend service. It calls the details and reviews services to display the page content.
- details : the service that contains the book details. It does not call any other service.
- reviews : the service that contains the book reviews. It calls the ratings service to get the ratings.
- ratings : the service that contains the review ratings. It does not call any other service.
By refreshing the page several times, we can see that the “Reviews” change depending on the version of the “reviews” service used. In fact, there are 3 versions:
- Version 1 : no ratings.

- Version 2 : ratings with black stars.

- Version 3 : ratings with red stars.

So, how is the distribution of “reviews” versions managed? It is done through the Kubernetes service (with a ClusterIP type service) which will redirect requests in “round-robin” mode to the pods of the “reviews” service.
Now, we will enable the injection of Istio sidecars. This can be done in 3 ways:
- By injecting a label into the pod created by the deployment:
kubectl patch deployment -n default productpage-v1 -p '{"spec": {"template": {"metadata": {"labels": {"sidecar.istio.io/inject": "true"}}}}}'
- By patching the manifest before deploying it (with
istioctl kube-inject, which will add the sidecars to the manifest):
wget https://raw.githubusercontent.com/istio/istio/release-1.22/samples/bookinfo/platform/kube/bookinfo.yaml
istioctl kube-inject -f bookinfo.yaml | kubectl apply -n default -f -
- By enabling automatic injection in the namespace and redeploying the pods:
kubectl label namespace default istio-injection=enabled
kubectl rollout restart deployment -n default details-v1 productpage-v1 ratings-v1 reviews-v1 reviews-v2 reviews-v3
Regardless of the option chosen, Istio sidecars will be injected into the pods of the Bookinfo application. You can verify that the sidecars have been injected with the command kubectl get pods -n default.
$ kubectl get pods
NAME                              READY   STATUS    RESTARTS   AGE
details-v1-64b7b7dd99-ctqd4       2/2     Running   0          118s
productpage-v1-6bc7f5c4c6-tsxdt   2/2     Running   0          114s
ratings-v1-c54575675-cq8bv        2/2     Running   0          118s
reviews-v1-76bf7c9d86-zbvts       2/2     Running   0          117s
reviews-v2-bb7869c75-n7rb5        2/2     Running   0          116s
reviews-v3-5f978f677b-2bqw5       2/2     Running   0          116s
Each pod now has an Istio sidecar ⛵ that will intercept incoming and outgoing requests.
To get more information about this, it is possible to use the istioctl analyze and istioctl proxy-status commands, which will respectively check if the Istio configuration is correct and if the proxies are active.
$ istioctl analyze
✔ No validation issues found when analyzing namespace: default.
$ istioctl proxy-status
NAME                                                   CLUSTER        CDS        LDS        EDS        RDS          ECDS         ISTIOD                      VERSION
details-v1-7b6fb77db6-bwv5b.default                    Kubernetes     SYNCED     SYNCED     SYNCED     SYNCED       NOT SENT     istiod-8596844f7d-z5rgl     1.21.0
istio-egressgateway-b569895b5-ppk8f.istio-system       Kubernetes     SYNCED     SYNCED     SYNCED     NOT SENT     NOT SENT     istiod-8596844f7d-z5rgl     1.21.0
istio-ingressgateway-694c4b4d85-78f95.istio-system     Kubernetes     SYNCED     SYNCED     SYNCED     NOT SENT     NOT SENT     istiod-8596844f7d-z5rgl     1.21.0
productpage-v1-68dfd95669-qr69h.default                Kubernetes     SYNCED     SYNCED     SYNCED     SYNCED       NOT SENT     istiod-8596844f7d-z5rgl     1.21.0
ratings-v1-6b47557bbb-cr6k9.default                    Kubernetes     SYNCED     SYNCED     SYNCED     SYNCED       NOT SENT     istiod-8596844f7d-z5rgl     1.21.0
reviews-v1-dd46dd5f-dkkkb.default                      Kubernetes     SYNCED     SYNCED     SYNCED     SYNCED       NOT SENT     istiod-8596844f7d-z5rgl     1.21.0
reviews-v2-5b65c4bdb-76pd4.default                     Kubernetes     SYNCED     SYNCED     SYNCED     SYNCED       NOT SENT     istiod-8596844f7d-z5rgl     1.21.0
reviews-v3-685dd59d69-tmzlf.default                    Kubernetes     SYNCED     SYNCED     SYNCED     SYNCED       NOT SENT     istiod-8596844f7d-z5rgl     1.21.0
Do not pay attention to the istio-egressgateway and istio-ingressgateway pods, they are not related to the Bookinfo application.
But before we go further, let’s arm ourselves with some tools to facilitate our work with Istio.
Our Observability Suite
Istio is quite unforgiving for those who refuse to equip themselves sufficiently. So, we’re going to discover some tools that will help us understand what’s happening in our cluster.
Kiali
This tool is essential for visualizing the exchanges between pods and it directly interfaces with Istio to retrieve proxy data. It will be our primary tool for verifying the proper functioning of our applications.
It is capable of:
- Visualizing services and the exchanges between them.
- Verifying/Modifying our Istio configuration.
- Having metrics on services.
It’s a real Swiss Army knife for Istio.
To install Kiali, we can use the manifest present in the Istio repository. After deploying it, we can access the Kiali web interface using a port-forward.
kubectl apply -f https://raw.githubusercontent.com/istio/istio/master/samples/addons/kiali.yaml
istioctl dashboard kiali
Note : istioctl dashboard kiali permet simplement de faire un port-forward vers le service Kiali, vous pouvez aussi utiliser kubectl port-forward svc/kiali 20001:20001 -n istio-system.
Tip
Note that the manifest only deploys a demo version of Kiali (without authentication), for production use, I recommend consulting the official documentation to configure Kiali in a more sustainable and tailored way to your needs.
Let’s generate some traffic to see what Kiali can show us.
kubectl port-forward -n default svc/productpage 9080:9080 >/dev/null &
watch -n 1 curl -s http://localhost:9080/productpage -I
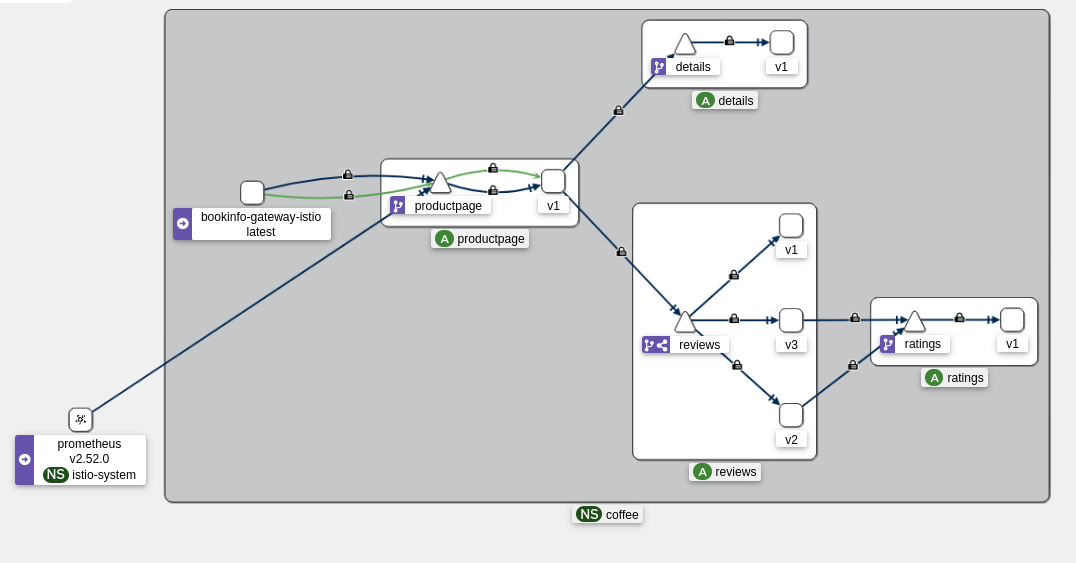
In the “Traffic Graph” section, we can see the exchanges between services (the “ratings” service is missing, but that’s normal).
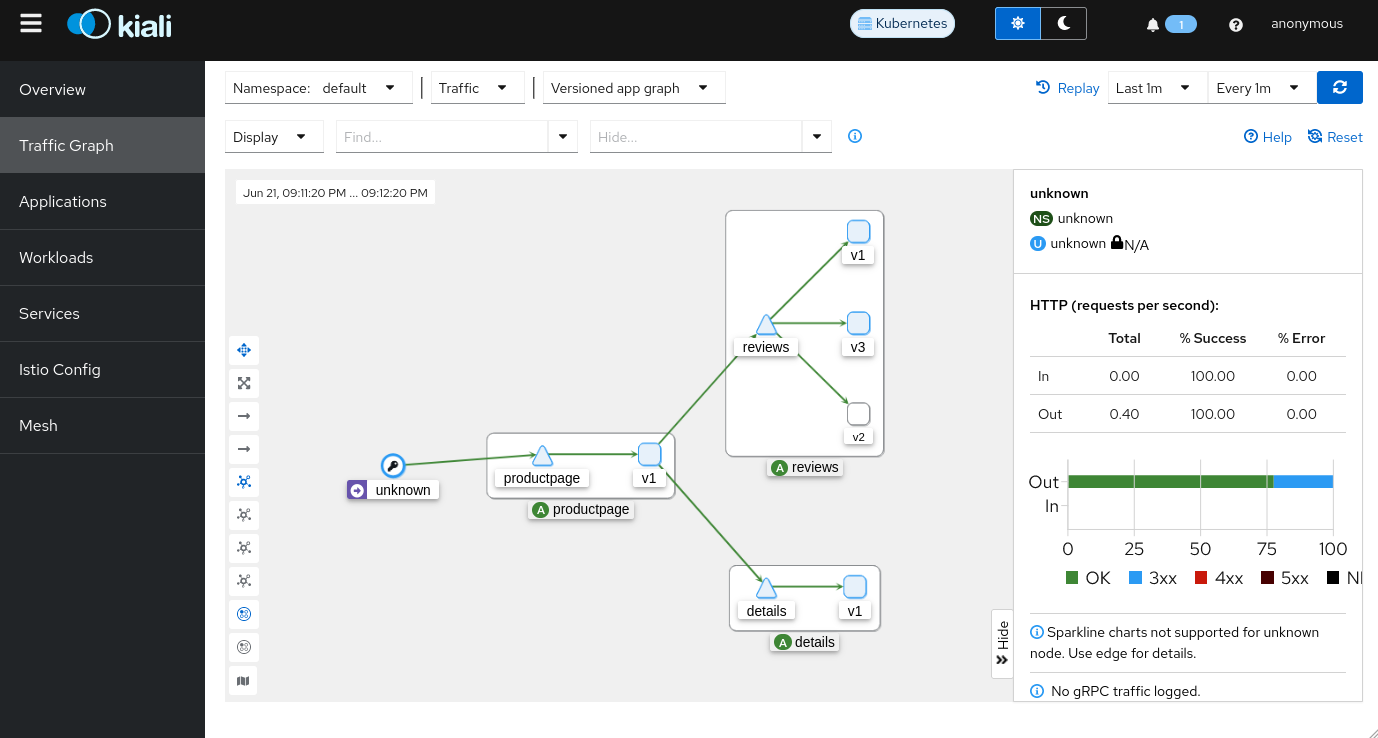
This page will likely be the one you’ll consult most often for debugging your applications. I’ll refer to it extensively in the rest of this article.
Jaeger & Zipkin
Zipkin and Jaeger are tracing tools that allow you to track the path of a request through the various services. They allow you to see the response time of each service, errors, and the delay of interactions.
This is comparable to OpenTelemetry (which I have not been able to test yet) and is very useful for understanding the performance of your applications and seeing which service is the bottleneck in them.
To install Jaeger, we can use the manifest present in the Istio repository. After deploying it, we can access the Jaeger web interface using a port-forward.
kubectl apply -f https://raw.githubusercontent.com/istio/istio/master/samples/addons/jaeger.yaml
istioctl dashboard jaeger
From Jaeger, I can see the traces of my requests and see the response time of each service.

Let’s take a trace of the “productpage” service (entry point of the Bookinfo application) and see the details of the trace:

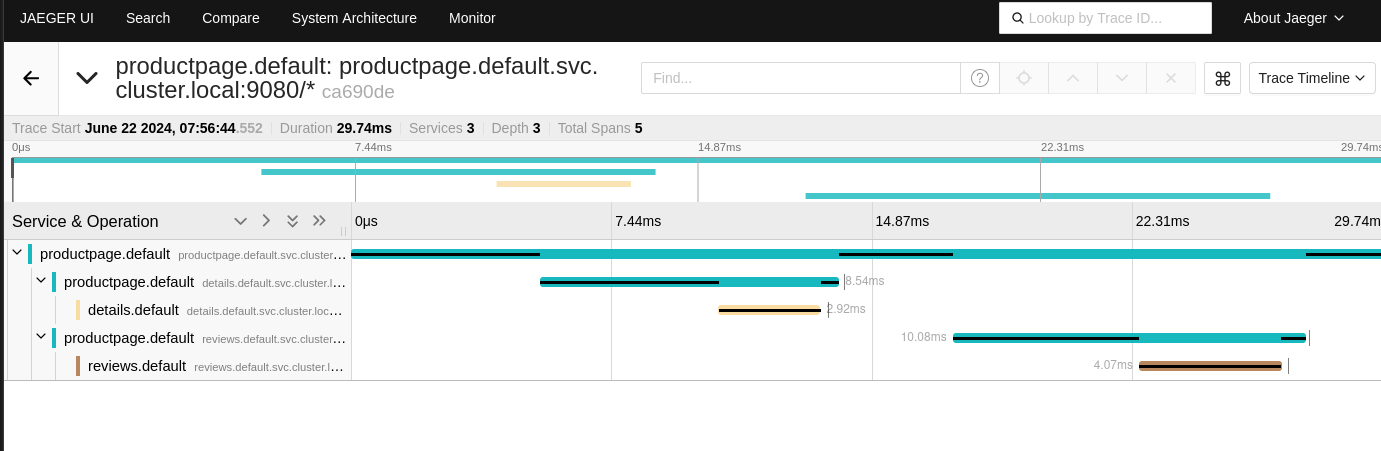
Of course, it is possible for me to see the details of each service and see the response time of each service.
In short, Jaeger is a very useful tool to see the details of requests and have more information about the performance of your applications.
Kiali is more oriented towards “overview” while Jaeger is more oriented towards “details”.
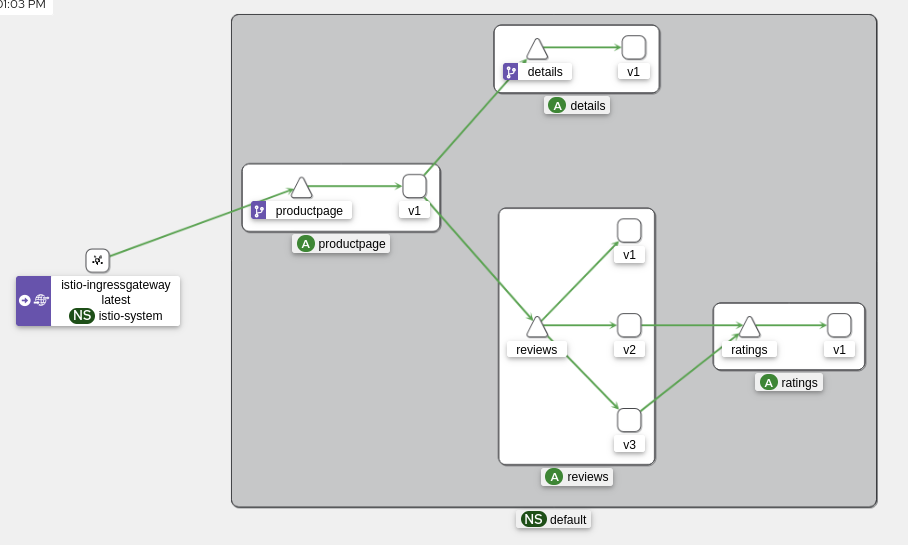
Architecture diagram of our Bookinfo application:
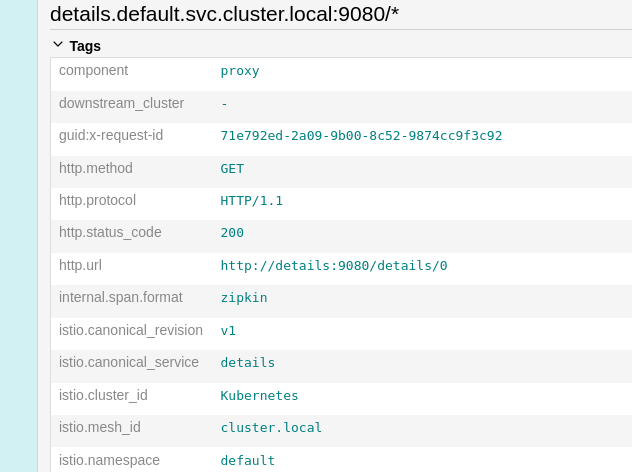
A typical use case is to look for the traces of a failed request in order to understand why. I can thus look for the traces of the failed request and see which service returned an error.
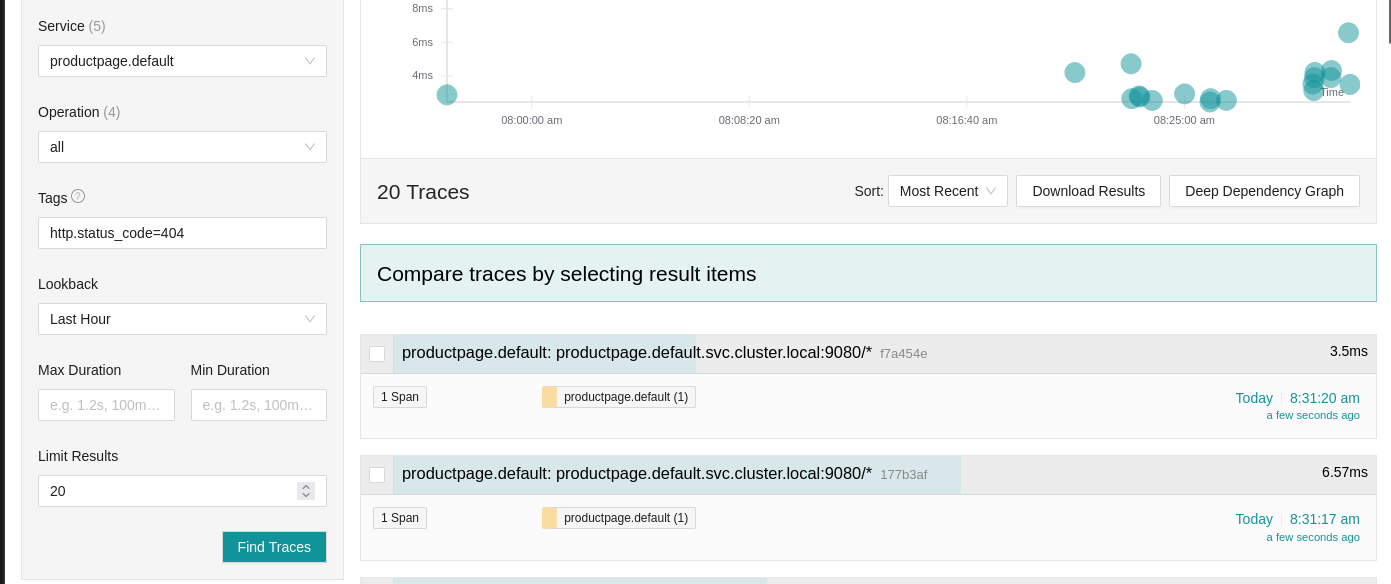
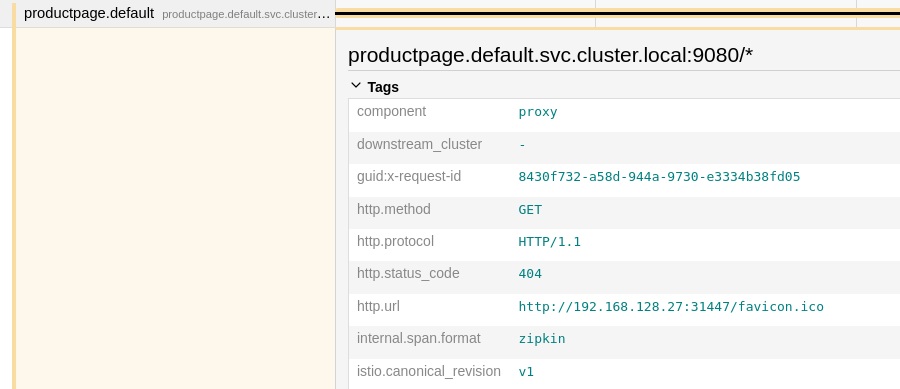
In this case, the front just returned a 404 error, we will see more interesting cases later.
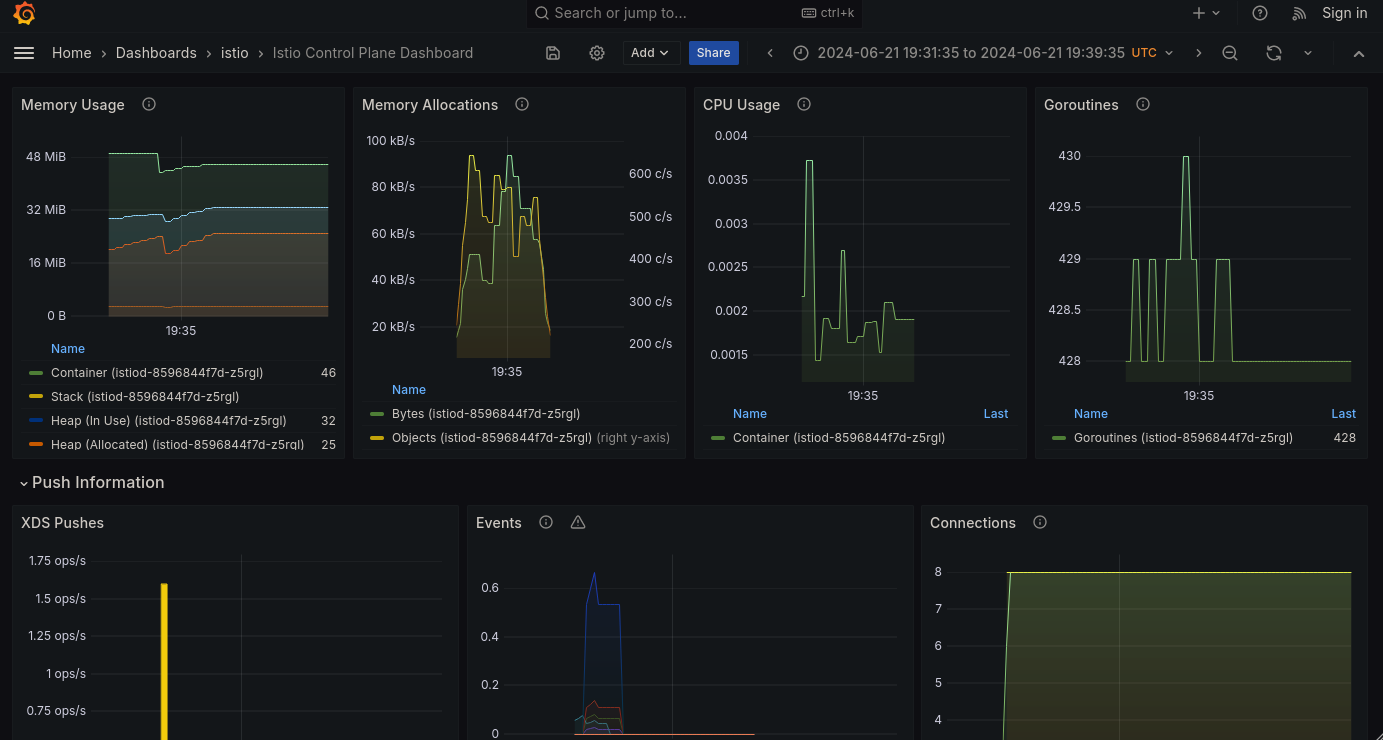
Prometheus & Grafana
For the question of metrics, Istio integrates perfectly with Prometheus (which is linked to Grafana for metric visualization). Using the manifests provided by Istio, we can deploy Prometheus and a pre-configured Grafana dashboard to display the metrics.
kubectl apply -f https://raw.githubusercontent.com/istio/istio/master/samples/addons/grafana.yaml
kubectl apply -f https://raw.githubusercontent.com/istio/istio/master/samples/addons/prometheus.yaml
istioctl dashboard grafana
Thus, we have dashboards to see:
- the resources used by Istio.
- the response time between services.
- the status of requests (200, 404, etc).
- the bandwidth used by the services.
Now that we’re ready, we can start playing with Istio.
Exposing our application
For now, traffic is only passing through the sidecars without Envoy doing anything (no filtering, no control, no security). We’re going to set it up so that Istio can do its job.
The first CRD (Custom Resource Definition) we’re going to see is the VirtualService. A VirtualService is an Istio object that allows you to configure routing rules for a Kubernetes service.
The route created by a VirtualService will be propagated to all sidecars, which will then redirect traffic based on defined rules.
For example, I’m going to create the first VirtualService for the “details” service of the Bookinfo application.
kind: VirtualService
apiVersion: networking.istio.io/v1beta1
metadata:
  name: details-vs
  namespace: default
spec:
  hosts:
  - details # valid for details and details.default.svc.cluster.local
  http:
  - route:
    - destination:
        host: details
From Kiali, we can see that “details” has a new icon indicating that the service is now managed by a VirtualService.
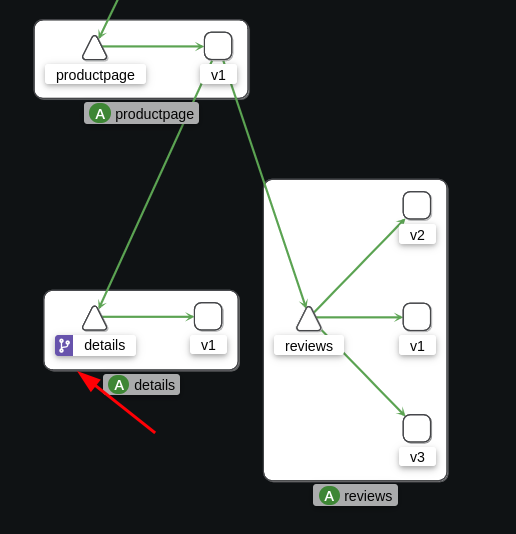
This VirtualService adds 2 passive features:
- If a request fails, Envoy will automatically retry it up to 3 times.
- mTLS is enabled in PERMISSIVE mode (HTTP is still possible).
We will talk about mTLS (and explain what it is) a little later.
For now, let’s just make the “productpage” service (the front of the Bookinfo application) accessible via a VirtualService. I will also take this opportunity to restrict access to the “/” route (the root of the site) which contains a page that is not intended to be viewed by the user.
apiVersion: networking.istio.io/v1alpha3
kind: VirtualService
metadata:
  name: bookinfo
spec:
  hosts:
  - "productpage"
  http:
  - match:
    - uri:
        exact: /productpage
    - uri:
        prefix: /static
    - uri:
        exact: /login
    - uri:
        exact: /logout
    - uri:
        prefix: /api/v1/products
    route:
    - destination:
        host: productpage
With our kubectl port-forward, we cannot test the restrictions brought by the VirtualService. For this, let’s make requests directly from a pod in the cluster.
$ kubectl exec deployments/ratings-v1 -c ratings -- curl http://productpage:9080/ -I -s
HTTP/1.1 404 Not Found
date: Sat, 22 Jun 2024 09:25:11 GMT
server: envoy
transfer-encoding: chunked

$ kubectl exec deployments/ratings-v1 -c ratings -- curl http://productpage:9080/productpage -I -s
HTTP/1.1 200 OK
server: envoy
date: Sat, 22 Jun 2024 09:25:55 GMT
content-type: text/html; charset=utf-8
content-length: 5293
vary: Cookie
x-envoy-upstream-service-time: 20
Note
The x-envoy-upstream-service-time header is a header added by Envoy that indicates the response time of the destination service.
You can remove it by modifying the VirtualService to not display it by adding the following code:
    options:
      stagedTransformations:
        early:
          responseTransforms:
          - responseTransformation:
              transformationTemplate:
                dynamicMetadataValues:
                - metadataNamespace: body-logging
                  key: upstream-service-time
                  value:
                    text: '{{ header("x-envoy-upstream-service-time") }}'
                headers:
                  x-envoy-upstream-service-time:
                    text: ''
We can see that the route “/” returns a 404 error (which was not the case before the VirtualService) while the route “/productpage” correctly returns the home page of the Bookinfo application.
Now… it would be better if we could access the application without having to go through a port-forward, wouldn’t it?
Gateway
A Gateway is equivalent to an Ingress. The difference is that an Ingress points directly to a service, while a Gateway allows for different functionalities to redirect traffic differently or with more monitoring.
A Gateway is an entry point for incoming traffic into the cluster. Just like an Ingress with an IngressController, a Gateway needs a GatewayController to function, which is managed by the pod istio-ingressgateway in the istio-system namespace.
Warning
Note that the istio-ingressgateway component is not systematically installed with Istio (it is with the demo profile). If you use a configuration file instead of a profile, make sure the istio-ingressgateway component is enabled as shown in the example below:
apiVersion: install.istio.io/v1alpha1
kind: IstioOperator
spec:
  components:
    base:
      enabled: true
    ingressGateways:             #
    - enabled: true              # This is the GatewayController
      name: istio-ingressgateway #
    pilot:
      enabled: true
  hub: docker.io/istio
  tag: 1.21.0
  values:
    defaultRevision: ""
    gateways:
      istio-egressgateway: {}
      istio-ingressgateway: {}
    global:
      configValidation: true
      istioNamespace: istio-system
    profile: a-cup-of-coffee
Since I don’t have a LoadBalancer, I will use a NodePort to access the Gateway :
kubectl patch service istio-ingressgateway -n istio-system --type='json' -p='[{"op": "replace", "path": "/spec/type", "value":"NodePort"}]'

export INGRESS_PORT=$(kubectl -n istio-system get service istio-ingressgateway -o jsonpath='{.spec.ports[?(@.name=="http2")].nodePort}')
export INGRESS_HOST=$(kubectl get po -l istio=ingressgateway -n istio-system -o jsonpath='{.items[0].status.hostIP}')
echo $INGRESS_HOST:$INGRESS_PORT # 192.168.128.30:30492
Keep these variables handy, we’ll use them a lot.
We now have an entry point to the Istio Gateway-Controller (ingress-gateway)! Let’s try making a first request to the Gateway.
curl -s $INGRESS_HOST:$INGRESS_PORT/productpage -I -v
*   Trying 192.168.128.30:30492...
* connect to 192.168.128.30 port 30492 failed: Connexion refusée
* Failed to connect to 192.168.128.30 port 30492 after 105 ms: Connexion refusée
* Closing connection 0
Ah! Yet I’m sure I’ve properly exposed the Gateway and I’m in the right network. Why a connection refused?
The reason: if no Gateway is linked to our Gateway-Controller, then the traffic is rejected. Let’s start by creating our Gateway object.
apiVersion: networking.istio.io/v1alpha3
kind: Gateway
metadata:
  name: bookinfo-gateway
spec:
  selector:
    istio: ingressgateway # use istio default controller
  servers:
  - port:
      number: 80
      name: http
      protocol: HTTP
    hosts:
    - "*" # It should match a domain-wildcard (ex: '*.istio.a-cup-of.coffee'), but in dev env, we can use a wildcard
Let’s try accessing the Gateway :
curl -s $INGRESS_HOST:$INGRESS_PORT -I

HTTP/1.1 404 Not Found
date: Sat, 22 Jun 2024 09:20:20 GMT
server: istio-envoy
transfer-encoding: chunked
Let’s then try accessing the Gateway via the “/productpage” route (used by the VirtualService “productpage”):
$ curl -s $INGRESS_HOST:$INGRESS_PORT/productpage -I
HTTP/1.1 404 Not Found
date: Sat, 22 Jun 2024 09:52:17 GMT
server: istio-envoy
transfer-encoding: chunked
Why a 404? Because the VirtualService “productpage” is not yet linked to the Gateway. We’ll take care of it right away.
apiVersion: networking.istio.io/v1alpha3
kind: VirtualService
metadata:
  name: bookinfo
spec:
  hosts:
  - "productpage"
  gateways:              # We add the Gateway
  - bookinfo-gateway     #
  http:
  - match:
    - uri:
        exact: /productpage
    - uri:
        prefix: /static
    - uri:
        exact: /login
    - uri:
        exact: /logout
    - uri:
        prefix: /api/v1/products
    route:
    - destination:
        host: productpage
Let’s try again? This time it’s the right one!
$ curl -s $INGRESS_HOST:$INGRESS_PORT/productpage -I
HTTP/1.1 404 Not Found
date: Sat, 22 Jun 2024 10:29:52 GMT
server: istio-envoy
transfer-encoding: chunked
Still a 404? 😅
- The VirtualService is properly configured and working.
- The Gateway is properly configured with the correct VirtualService.
- The gateway-controller is active.
Some of you may have already guessed the reason for this 404. In fact, the “productpage” service is only accessible via the domain “productpage.default.svc.cluster.local”.
$ curl  -H "Host: productpage.default.svc.cluster.local" $INGRESS_HOST:$INGRESS_PORT/productpage -I
HTTP/1.1 200 OK
content-type: text/html; charset=utf-8
content-length: 5290
vary: Cookie
x-envoy-upstream-service-time: 27
Tip
In a VirtualService, the “hosts” field must match the domain names where the service will be accessible. When the host is not a fully qualified domain name (FQDN), Istio will automatically complete it with the namespace and the cluster domain.
For example, if I put “productpage” in the “hosts” field, Istio will automatically complete it to productpage.default.svc.cluster.local.
It is then preferable to specify the complete domain name (productpage.default.svc.cluster.local) in the “hosts” field to avoid any confusion.
Victory, we now access the Bookinfo application via the Gateway! 🎉
From Kiali, here’s what we can see:
Tip
In our development environment, we can use a wildcard for the “hosts” field of the VirtualService. This allows incoming traffic to be redirected to the service without specifying a particular domain name.
apiVersion: networking.istio.io/v1alpha3
kind: VirtualService
metadata:
  name: bookinfo
spec:
  hosts:
  - "*"
  gateways:
  - bookinfo-gateway
  http:
  - match:
    - uri:
        exact: /productpage
    - uri:
        prefix: /static
    - uri:
        exact: /login
    - uri:
        exact: /logout
    - uri:
        prefix: /api/v1/products
    route:
    - destination:
        host: productpage
Now, let’s tackle the “reviews” application, which is a bit special.
Version Management with DestinationRules
The “reviews” service is a service that has 3 different versions. Each version is accessible via a different label (app=reviews, version=v1, v2, v3).
The service (in the Kubernetes way) is configured to redirect traffic to applications with the label app=reviews. But how do we redirect traffic to a specific version?
The answer is: DestinationRules, an Istio object that allows applying a set of treatments after traffic has been routed by a VirtualService.
For example, a DestinationRule can:
- Modify the LoadBalancing mode.
- Create a circuit breaker.
- Configure mTLS.
And of course, the most important thing: managing the “subsets” of applications to differentiate the versions of the same services.
Here’s what our DestinationRule for the “reviews” service will look like:
apiVersion: networking.istio.io/v1beta1
kind: DestinationRule
metadata:
  name: reviews
spec:
  host: reviews
  subsets:
  - name: v1
    labels:
      version: v1
  - name: v2
    labels:
      version: v2
  - name: v3
    labels:
      version: v3
Each subset is given a name based on the version label of each pod. We can then redirect traffic to a specific version using the corresponding subset.
Traffic Management with Istio
Now that we have a Gateway and have configured the VirtualServices and DestinationRules, we can play with the Envoy proxies and discover some of Istio’s features.
Traffic-Shifting
Traffic-Shifting is an Istio feature that allows redirecting traffic to a specific version of a service. This allows testing a new version of an application without impacting users.
To do this, we will use a VirtualService to redirect traffic to a specific subset of the “reviews” service.
apiVersion: networking.istio.io/v1alpha3
kind: VirtualService
metadata:
  name: reviews
spec:
  hosts:
    - reviews
  http:
  - route:
    - destination:
        host: reviews
        subset: v1
By reloading the page several times, we can see that the “Reviews” are always the same (no ratings). This is normal, the VirtualService redirects traffic to version 1 of “reviews”.
Let’s go a bit further and add versions 2 and 3 of “reviews” to the VirtualService with a new concept: weight.
apiVersion: networking.istio.io/v1alpha3
kind: VirtualService
metadata:
  name: reviews
spec:
  hosts:
    - reviews
  http:
    - route:
        - destination:
            host: reviews
            subset: v1
          weight: 15
        - destination:
            host: reviews
            subset: v2
          weight: 25
        - destination:
            host: reviews
            subset: v3
          weight: 60
Overall, the traffic will be distributed as follows:
- 15% of requests will be redirected to version 1,
- 25% to version 2,
- 60% to version 3.
To verify that the traffic is properly distributed, we can generate requests in a loop and inspect the results directly from Kiali.
while true; do curl $INGRESS_HOST:$INGRESS_PORT/productpage -s -I ; done
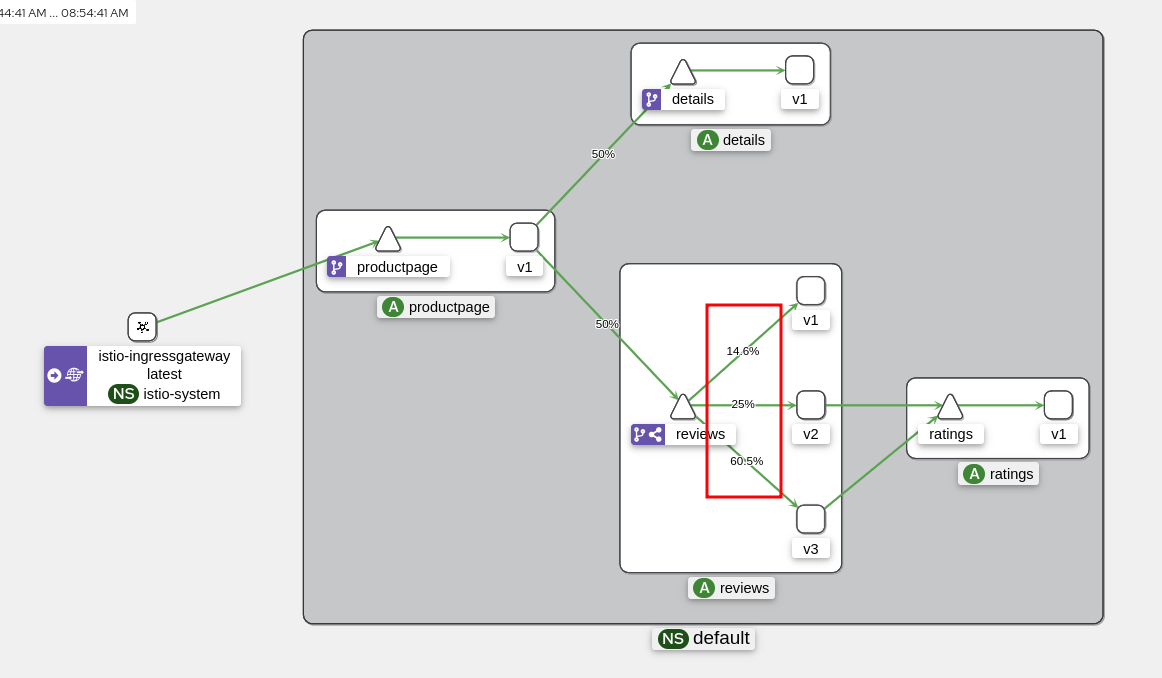
Now, we can see that the traffic is well distributed among the different versions of “reviews”: version 3 is the most used (60% of requests) while version 1 is the least used (15% of requests).
This can be compared to a canary deployment (or “canary deployment”) where a new version of an application is deployed and tested on a small part of users before being deployed for everyone. We can then redirect traffic to the new version gradually and control the adoption rate of the latter based on logs and metrics (thanks to Kiali, Jaeger, and Grafana).
In our canary deployment, we redirect traffic randomly to the different versions of the “reviews” service, but why not redirect it based on other criteria?
A/B Testing
A/B Testing is a technique that consists of redirecting traffic to different versions of an application based on certain criteria (for example, the user’s country, device type, etc.). It is extremely useful for testing a new version of an application on a specific group of users without impacting others.
For example, we will redirect traffic to version 3 of the “reviews” service for the user “quentin” and to version 2 for other users. Note that when we connect to the bookinfo application, it will create a session cookie that will contain the user’s name. The productpage application will transmit this user name to other applications (reviews, details) via an “end-user” header. It’s this header that we will use to redirect traffic.
If you want to verify this for yourself, I invite you to consult the getForwardHeaders() function of the Productpage application here.
Let’s start by authenticating with the username “quentin” (the password doesn’t matter, put anything) :
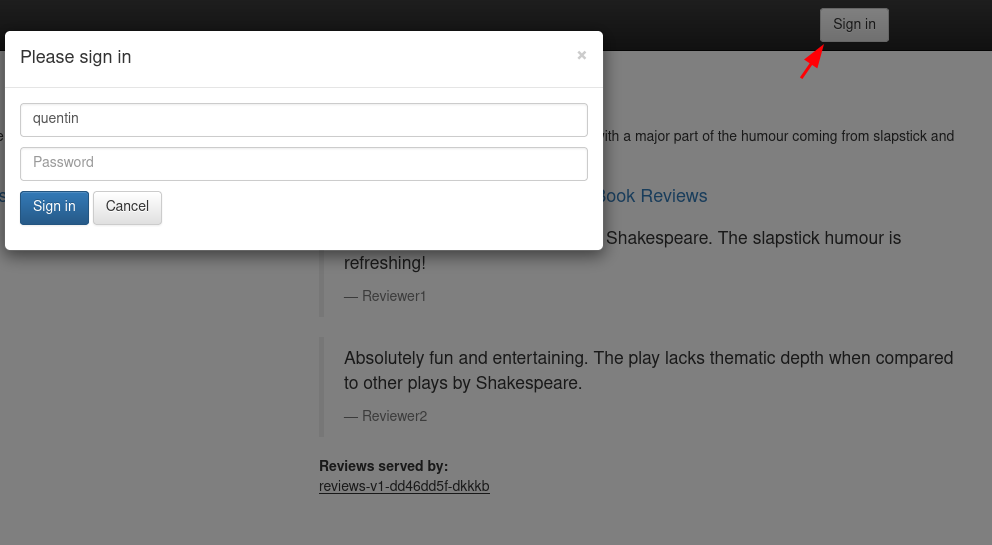
In the page header, we can see with which username we are connected:
Let’s then modify the VirtualService “reviews” as follows:
apiVersion: networking.istio.io/v1alpha3
kind: VirtualService
metadata:
  name: reviews
spec:
  hosts:
    - reviews
  http:
  - match:
    - headers:
        end-user:
          exact: quentin
    route:
    - destination:
        host: reviews
        subset: v3
  - route:
    - destination:
        host: reviews
        subset: v2
This configuration can be translated as follows:
- If the “end-user” header is equal to “quentin”, redirect traffic to version 3 of “reviews”.
- Otherwise, redirect traffic to version 2.
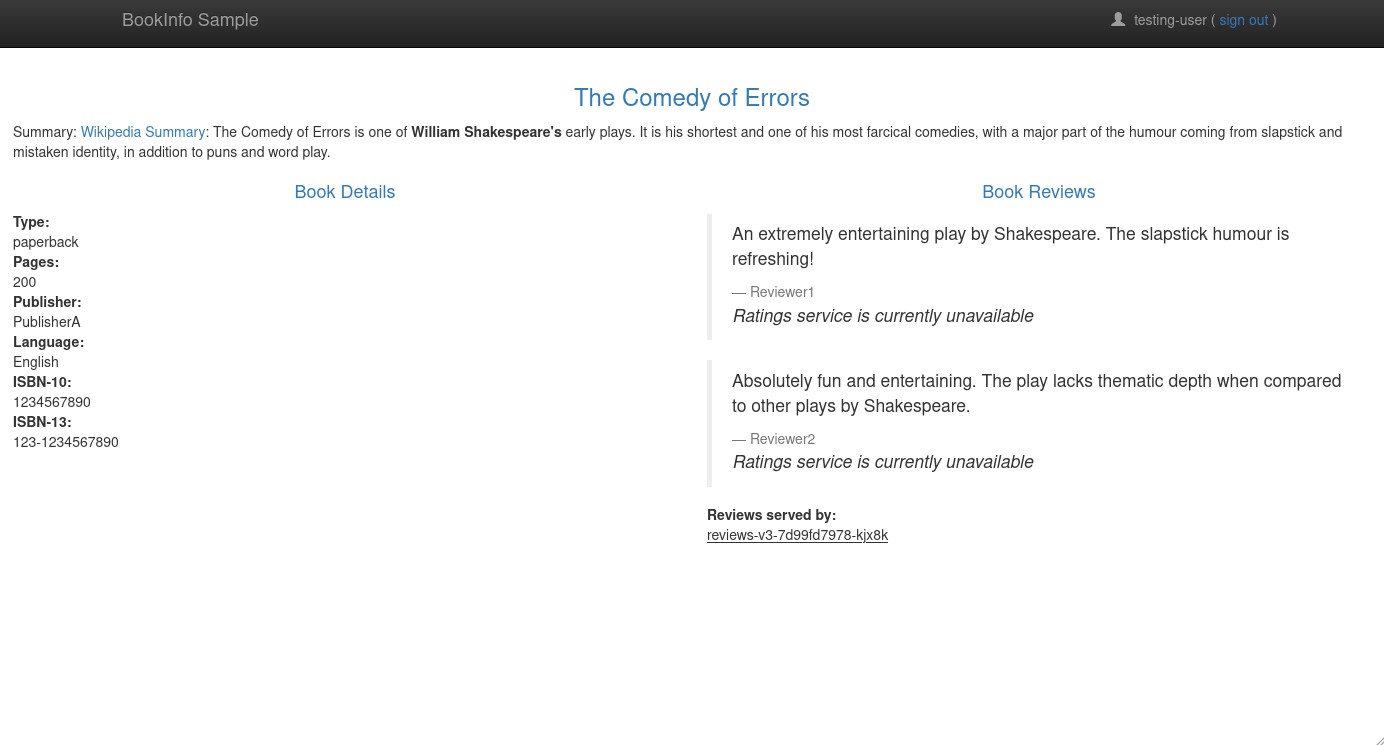
Without authenticating, we can see that traffic is redirected to version 2:

And if we authenticate with the username “quentin”, traffic is redirected to version 3:
From another user (for example “alice”), traffic is redirected to version 2.
Let’s now test another case of A/B Testing: redirecting traffic to a specific version based on whether the user opens the page from a mobile device or a computer.
apiVersion: networking.istio.io/v1alpha3
kind: VirtualService
metadata:
  name: reviews
spec:
  hosts:
    - reviews
  http:
  - match:
    - headers:
        user-agent:
          regex: .*Mobile.*
    route:
    - destination:
        host: reviews
        subset: v3
  - route:
    - destination:
        host: reviews
        subset: v2
- If I do not specify an user-agent, the traffic is redirected to version 2.
$ curl $INGRESS_HOST:$INGRESS_PORT/productpage -s | grep reviews-
        <u>reviews-v2-5b65c4bdb-76pd4</u>
- If I specify a user-agent containing “Mobile”, the traffic is redirected to version 3.
$ curl $INGRESS_HOST:$INGRESS_PORT/productpage --user-agent "Mozilla/5.0 (Linux; Android 14) AppleWebKit/537.36 (KHTML, like Gecko) Chrome/126.0.6478.110 Mobile Safari/537.36" -s | grep reviews-
        <u>reviews-v3-685dd59d69-tmzlf</u>
Now let’s look at the last feature of Istio for integrating new versions of an application: the “Dark Launch”.
Dark Launch (Mirroring)
The Dark Launch is a technique that allows testing a new version of an application in parallel with the old one without sending the response of the new version to the user.

So, when a user opens a page, the traffic is redirected to the current version of the application, but the new one is also called in parallel. The response of the new version is not sent to the user, but an administrator can view the logs to see if the application integrates correctly for a future deployment.
Let’s say we’re transitioning from version 2 to version 3 of the “reviews” service, we can configure a VirtualService to go into “mirroring” mode. This will allow us to verify that the version 3 application works correctly with current requests.
Of course, the performance of the “ratings” application will be impacted by the “mirroring” mode since each request will be called twice (once for version 2 and once for version 3).
apiVersion: networking.istio.io/v1alpha3
kind: VirtualService
metadata:
  name: reviews
spec:
  hosts:
    - reviews
  http:
  - route:
    - destination:
        host: reviews
        subset: v2
    mirror:
      host: reviews
      subset: v3
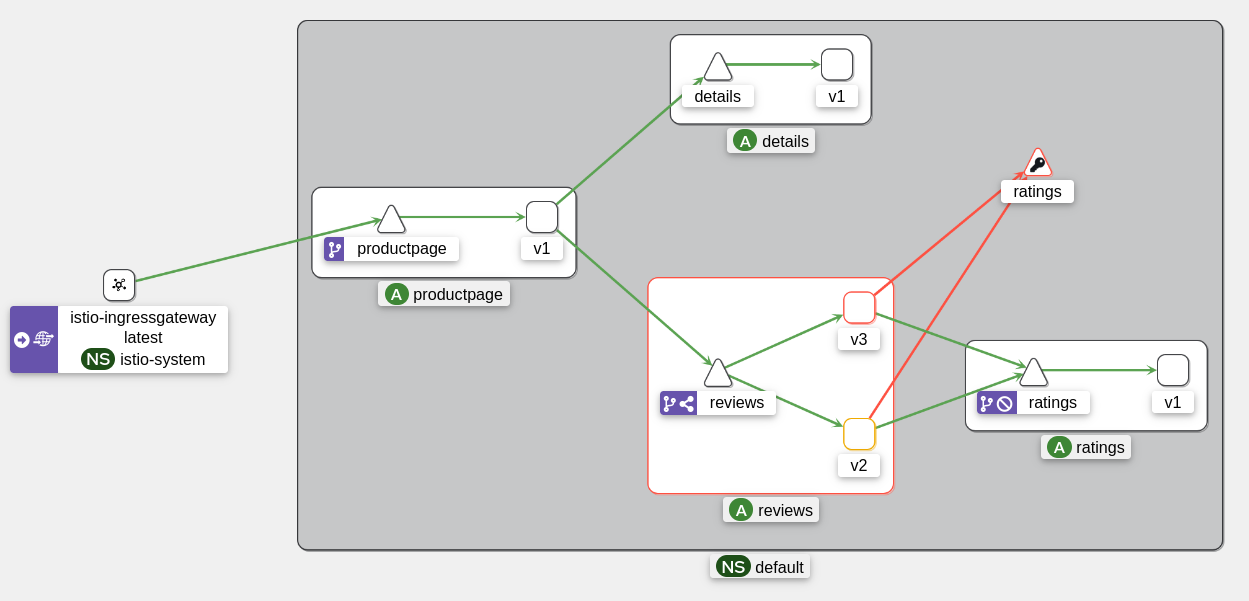
Here is the architecture diagram from Kiali:
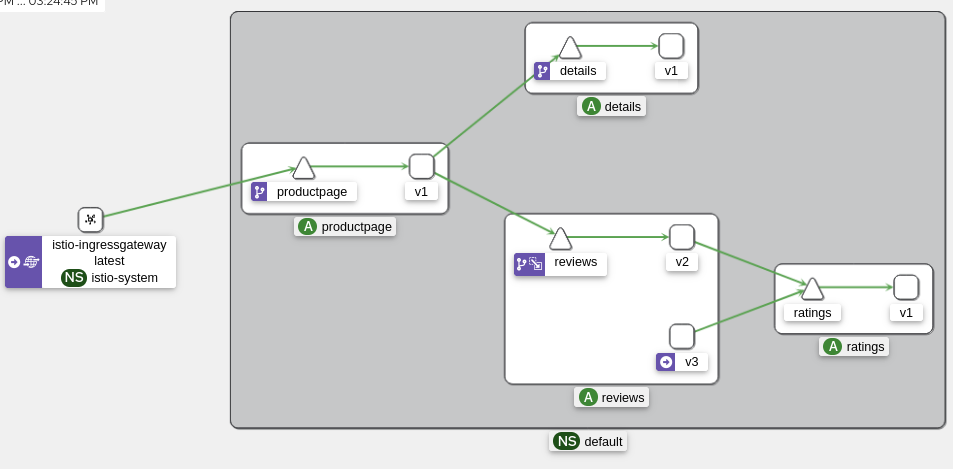
Once the “mirroring” mode is enabled, we need to analyze the logs to see if the new version of the application is working correctly. To do this, we can use tracing tools (Jaeger, Zipkin) and metrics (Prometheus, Grafana).
Fault Injection
Now that we are able to deploy new versions with a belt and suspenders, it’s time to see how Istio can help us test the resilience of our applications.
There is a feature that allows injecting errors into requests to see how the application reacts in case of an error. This is “Fault Injection”.
Let’s target the “ratings” service of the Bookinfo application. We’re going to inject 403 (Forbidden) errors on 30% of requests to see how the application reacts and how users are affected.
kind: VirtualService
apiVersion: networking.istio.io/v1beta1
metadata:
  name: ratings
  namespace: default
spec:
  hosts:
  - ratings
  http:
  - fault:
      abort:
        httpStatus: 403
        percentage:
          value: 30
    route:
      - destination:
          host: ratings
Info
To target when the 403 error will be injected, we can use the match field to specify the conditions. Here, the 403 error will only be injected if the “end-user” header is equal to “testing-user”.
kind: VirtualService
apiVersion: networking.istio.io/v1beta1
metadata:
  name: ratings
  namespace: default
spec:
  hosts:
  - ratings
  http:
  - fault:
      abort:
        httpStatus: 403
        percentage:
          value: 30
    route:
      - destination:
          host: ratings
    match:
      - headers:
          end-user:
            exact: testing-user
  - route:
    - destination:
        host: ratings
With the above configuration, 30% of requests to the “ratings” service will return a 403 error:
From Kiali, requests are thrown into a “Black Hole” (a black hole).
Delay Injection
Instead of injecting errors, we can add delays to requests to see how the application reacts in case of latency.
I will leave the “ratings” service alone and target the “details” service by injecting a 7-second delay on 50% of requests.
kind: VirtualService
apiVersion: networking.istio.io/v1beta1
metadata:
  name: details
  namespace: default
spec:
  hosts:
  - details
  http:
  - route:
    - destination:
        host: details
    fault:
      delay:
        fixedDelay: 7.000s
        percent: 50
And there you have it, 50% of requests to the “details” service will experience a 7-second delay. Let’s verify this:
$ curl $INGRESS_HOST:$INGRESS_PORT/productpage -s -w '\n* Response time: %{time_total}s\n' | grep 'Response time'
* Response time: 3.262570s
We didn’t get 7 seconds of delay, why? Because the delay is injected between the “productpage” and “details” services, and our frontend application has a 3-second timeout for requests to the “details” service.
Let’s then switch from 7 seconds to 2 seconds to see if the delay is taken into account.
kubectl patch virtualservice details -n default --type='json' -p='[{"op": "replace", "path": "/spec/http/0/fault/delay/fixedDelay", "value": "2.000s"}]'
$ curl $INGRESS_HOST:$INGRESS_PORT/productpage -s -w '\n* Response time: %{time_total}s\n' | grep 'Response time'
* Response time: 0.282223s
$ curl $INGRESS_HOST:$INGRESS_PORT/productpage -s -w '\n* Response time: %{time_total}s\n' | grep 'Response time'
* Response time: 2.264027s
And there you have it, the 2-second delay is well observed 🎉 !
Circuit Breaker
A Circuit Breaker is a mechanism that allows stopping requests to a service if a certain number of errors are encountered. This helps protect downstream services from an overload of requests and reduces latency times (by avoiding timeouts since requests are stopped before reaching them).
apiVersion: networking.istio.io/v1
kind: DestinationRule
metadata:
  name: productpage
spec:
  host: productpage
  trafficPolicy:
    connectionPool:
      tcp:
        maxConnections: 1 # Maximum number of connections in http 1.1
      http:
        http2MaxRequests: 3 # Maximum number of connections in http 2
        maxRequestsPerConnection: 1 # Maximum number of requests per connection
With this configuration, if the “productpage” service receives more than 3 requests in HTTP/2, the Circuit Breaker will stop the ongoing requests and return a 503 error (Service Unavailable). Thus, if the server receives too many requests, the service will not crash and will handle the requests it can handle without impacting other applications.
To test this, we can use a benchmarking tool like fortio to send a large number of requests to the “productpage”. (We’ll have the opportunity to talk about fortio a bit later.)
If we launch with one access at a time :
$ fortio load -c 1 -n 50 http://$INGRESS_HOST:$INGRESS_PORT/productpage
Connection time histogram (s) : count 1 avg 0.13487925 +/- 0 min 0.134879246 max 0.134879246 sum 0.134879246
# range, mid point, percentile, count
>= 0.134879 <= 0.134879 , 0.134879 , 100.00, 1
# target 50% 0.134879
# target 75% 0.134879
# target 90% 0.134879
# target 99% 0.134879
# target 99.9% 0.134879
Sockets used: 1 (for perfect keepalive, would be 1)
Uniform: false, Jitter: false, Catchup allowed: true
IP addresses distribution:
192.168.128.30:30492: 1
Code 200 : 50 (100.0 %)
Response Header Sizes : count 50 avg 188 +/- 0 min 188 max 188 sum 9400
Response Body/Total Sizes : count 50 avg 5399.12 +/- 271 min 4480 max 5481 sum 269956
All done 50 calls (plus 0 warmup) 162.183 ms avg, 6.2 qps
100% of the requests were successful. Now, let’s run the same test with 4 concurrent requests:
$ fortio load -c 4 -n 50 http://$INGRESS_HOST:$INGRESS_PORT/productpage
Connection time histogram (s) : count 7 avg 0.1462682 +/- 0.02803 min 0.106653371 max 0.176468802 sum 1.02387742
# range, mid point, percentile, count
>= 0.106653 <= 0.12 , 0.113327 , 28.57, 2
> 0.12 <= 0.14 , 0.13 , 42.86, 1
> 0.14 <= 0.16 , 0.15 , 57.14, 1
> 0.16 <= 0.176469 , 0.168234 , 100.00, 3
# target 50% 0.15
# target 75% 0.166862
# target 90% 0.172626
# target 99% 0.176085
# target 99.9% 0.17643
Sockets used: 7 (for perfect keepalive, would be 4)
Uniform: false, Jitter: false, Catchup allowed: true
IP addresses distribution:
192.168.128.30:30492: 7
Code 200 : 46 (92.0 %)
Code 503 : 4 (8.0 %)
Response Header Sizes : count 50 avg 172.96 +/- 51 min 0 max 188 sum 8648
Response Body/Total Sizes : count 50 avg 5000.3 +/- 1421 min 247 max 5481 sum 250015
All done 50 calls (plus 0 warmup) 195.516 ms avg, 7.0 qps
We can see that 8% of the requests returned a 503 error, which is the Circuit Breaker stopping these requests to prevent the “productpage” service from being overloaded.
Security in Istio
We’ve talked a lot about traffic management and error handling, but what about security? Istio offers a wide range of features to secure the exchanges between services, from certificate management to service authentication.
I suggest we delve into this aspect to see how Istio can help us secure our applications.

mTLS
I briefly mentioned it at the beginning of this article, Istio supports mTLS (mutual TLS) by default to secure the exchanges between services.

Every time an Envoy communicates with a new service, it requests Istiod to obtain a certificate that authenticates the exchanges. Thus, due to the nature of mTLS, both the sender AND the receiver can mutually authenticate each other.
By default, mTLS is enabled in “PERMISSIVE” mode in Istio. This means that services can communicate in HTTP or HTTPS.
We can force the exchanges to be in “STRICT” mode so that services can only communicate in HTTPS.
apiVersion: security.istio.io/v1beta1
kind: PeerAuthentication
metadata:
  name: default-mtls
  namespace: default
spec:
  mtls:
    mode: STRICT
Tip
Instead of forcing mTLS for the default namespace, we can do it at the scale of the entire cluster by specifying the istio-system namespace.
apiVersion: security.istio.io/v1beta1
kind: PeerAuthentication
metadata:
  name: default-mtls
  namespace: istio-system
spec:
  mtls:
    mode: STRICT
Once the “STRICT” mode is enabled, we can restart the services for mTLS to take effect.
kubectl rollout restart deployment -n default details-v1 productpage-v1 ratings-v1 reviews-v1 reviews-v2 reviews-v3
From Kiali, we can see that mTLS is properly enabled with the 🔒 symbol.

To test this ourselves, let’s expose the “productpage” service outside the cluster using a NodePort (a ClusterIP service is not sufficient).
kubectl patch svc productpage -n default --type='json' -p='[{"op": "replace", "path": "/spec/type", "value": "NodePort"}]'
PRODUCTPAGE_PORT=$(kubectl get svc productpage -n default -o jsonpath='{.spec.ports[0].nodePort}')
PRODUCTPAGE_HOST=$(kubectl get nodes -o jsonpath='{.items[0].status.addresses[0].address}')
echo $PRODUCTPAGE_HOST:$PRODUCTPAGE_PORT # 192.168.128.27:31447
Now, let’s try to view the “productpage” certificate:
$ openssl s_client -connect $PRODUCTPAGE_HOST:$PRODUCTPAGE_PORT < /dev/null 2>/dev/null | openssl x509 -noout -text

Certificate:
    Data:
        Signature Algorithm: sha256WithRSAEncryption
        Issuer: O = cluster.local
        Validity
            Not Before: Jun 22 06:20:33 2024 GMT
            Not After : Jun 23 06:22:33 2024 GMT
        Subject:
        Subject Public Key Info:
            Public Key Algorithm: rsaEncryption
                Public-Key: (2048 bit)
        X509v3 extensions:
            X509v3 Key Usage: critical
                Digital Signature, Key Encipherment
            X509v3 Extended Key Usage:
                TLS Web Server Authentication, TLS Web Client Authentication
            X509v3 Basic Constraints: critical
                CA:FALSE
            X509v3 Authority Key Identifier:
                E5:BD:7C:B1:C3:CE:56:30:B1:9F:59:BE:97:E5:76:BD:6C:7B:D3:02
            X509v3 Subject Alternative Name: critical
                URI:spiffe://cluster.local/ns/default/sa/bookinfo-productpage
    Signature Algorithm: sha256WithRSAEncryption
We can see that the certificate is properly signed by the local cluster and has a limited duration (1 day).
Without a valid certificate, we cannot communicate with the “productpage” service:
$ curl $PRODUCTPAGE_HOST:$PRODUCTPAGE_PORT -v
* Recv failure: Connection reset by peer
* Closing connection 0
curl: (56) Recv failure: Connection reset by peer
ACLs
Let’s now move on to creating ACLs (Access Control Lists) to allow or deny access to certain services based on certain criteria.
In general, ACLs can be based on several criteria:
- The namespace (input, output);
- the operation (GET, POST, PUT, DELETE) and its path;
- the labels of the services.
The idea is to allow a certain application to expose a certain path or HTTP operation and to deny access if the conditions are not met.
To see this in action, we will start by denying all exchanges in our “default” namespace.
apiVersion: security.istio.io/v1
kind: AuthorizationPolicy
metadata:
 name: allow-nothing
 namespace: default
spec: {}
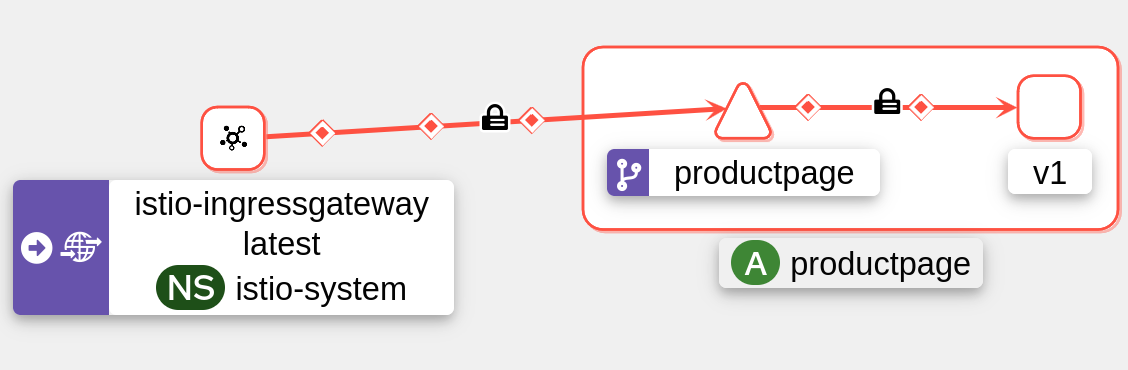
Now, if we try to access the “productpage”, we will receive a 403 (Forbidden) error:
curl $INGRESS_HOST:$INGRESS_PORT/productpage  -v
*   Trying 192.168.128.30:30492...
* Connected to 192.168.128.30 (192.168.128.30) port 30492 (#0)
> GET /productpage HTTP/1.1
< HTTP/1.1 403 Forbidden
< server: istio-envoy
< x-envoy-upstream-service-time: 0
<
* Connection #0 to host 192.168.128.30 left intact
Kiali indicates that the traffic is indeed blocked:
Jaeger also:
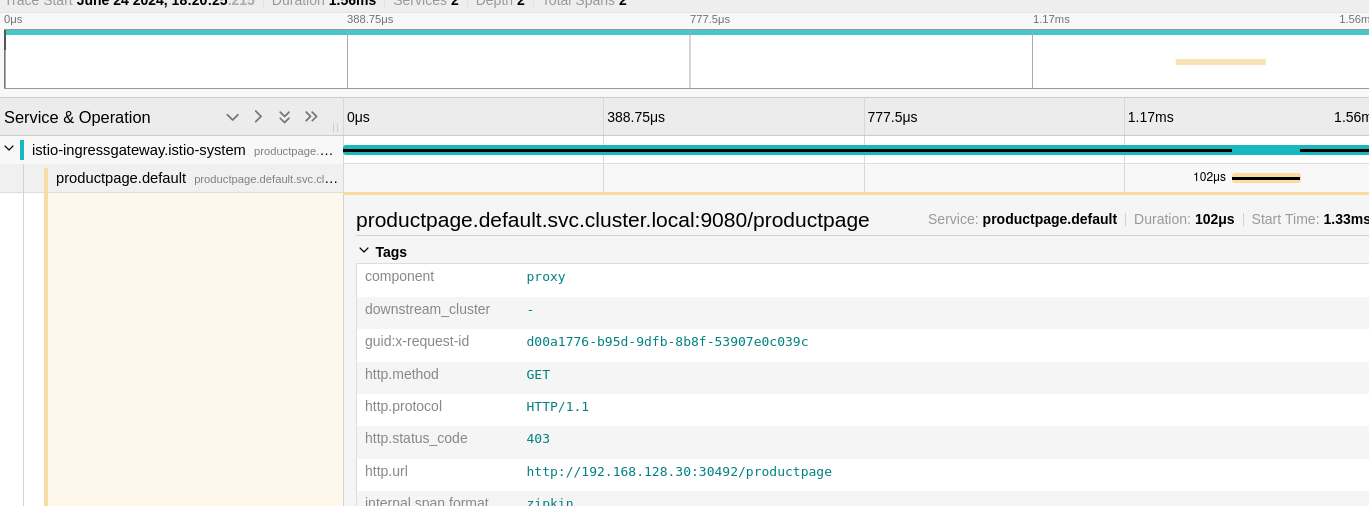
To re-authorize access to the “productpage”, we can create a new ACL rule allowing different operations on the “productpage” service:
apiVersion: security.istio.io/v1
kind: AuthorizationPolicy
metadata:
  namespace: default
  name: allow-productpage
spec:
  selector:
    matchLabels:
      app: productpage
  action: ALLOW
  rules:
  - to:
    - operation:
        methods: ["GET"]
        paths:
          - "/logout"
          - "/static/*"
          - "/productpage"
          - "/api/v1/products"
    - operation:
        methods: ["POST"]
        paths: ["/login"]
Cool, we can now access the “productpage” again:
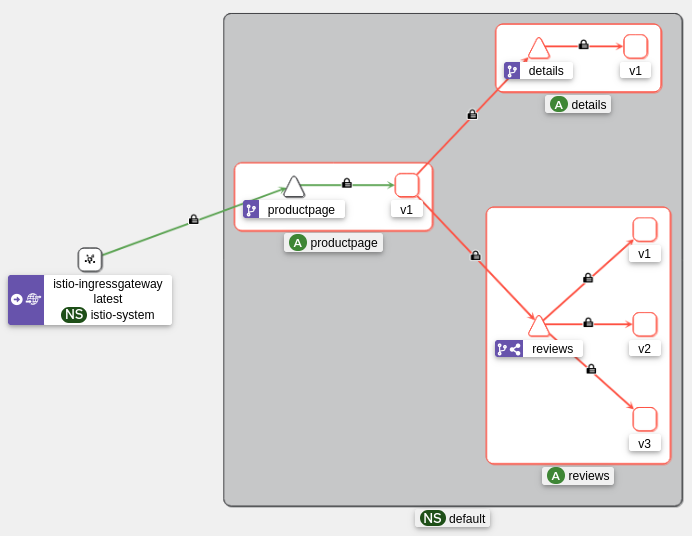

On the other hand, the other services are still blocked. No choice, we’ll have to create ACL rules for each of them.
So, let’s take this opportunity to authenticate them to prevent any application from communicating with containers it doesn’t need.
Authentication by SA
Let’s move on to service authentication. The goal is to allow a service to communicate with another using a ServiceAccount as the authentication key. As a result, only those with the correct ServiceAccount will be able to communicate with those authorized.
In this case, here are the rules we’re going to implement:
- “details” must be accessible by “productpage” ;
- “ratings” must be accessible by “reviews” ;
- “reviews” must be accessible by “productpage”.
The “bookinfo” application has provided ServiceAccounts for each service. Here are the ones available:
$ kubectl get sa
NAME                   SECRETS   AGE
bookinfo-details       0         3d19h
bookinfo-productpage   0         3d19h
bookinfo-ratings       0         3d19h
bookinfo-reviews       0         3d19h
default                0         4d11h
Let’s start by allowing “details” to be accessible by “productpage”.
apiVersion: security.istio.io/v1
kind: AuthorizationPolicy
metadata:
  namespace: default
  name: allow-details
spec:
  selector:
    matchLabels:
      app: details
  action: ALLOW
  rules:
  - from:
    - source:
        principals: ["cluster.local/ns/default/sa/bookinfo-productpage"]
    to:
    - operation:
        methods: ["GET"]
        paths: ["/details/*"]
From ProductPage, the “details” information is well displayed:

But if I try to access “details” from “ratings”, I get a 403 (Forbidden) error:
$ kubectl exec deployments/ratings-v1 -c ratings -- curl -s http://details:9080/details/0
RBAC: access denied
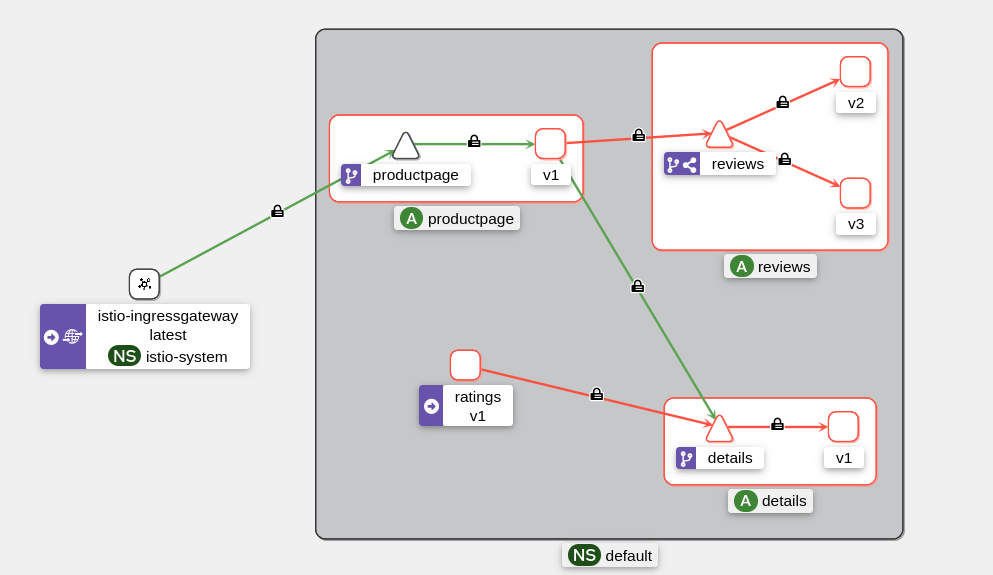
Now, let’s move on to the other services. Here are the ACL rules to allow “ratings” and “reviews”:
apiVersion: security.istio.io/v1
kind: AuthorizationPolicy
metadata:
  namespace: default
  name: allow-reviews
spec:
  selector:
    matchLabels:
      app: reviews
  action: ALLOW
  rules:
  - from:
    - source:
        principals: ["cluster.local/ns/default/sa/bookinfo-productpage"]
    to:
    - operation:
        methods: ["GET"]
        paths: ["/reviews/*"]
---
apiVersion: security.istio.io/v1
kind: AuthorizationPolicy
metadata:
  namespace: default
  name: allow-ratings
spec:
  selector:
    matchLabels:
      app: ratings
  action: ALLOW
  rules:
  - from:
    - source:
        principals: ["cluster.local/ns/default/sa/bookinfo-reviews"]
    to:
    - operation:
        methods: ["GET"]
        paths: ["/ratings/*"]
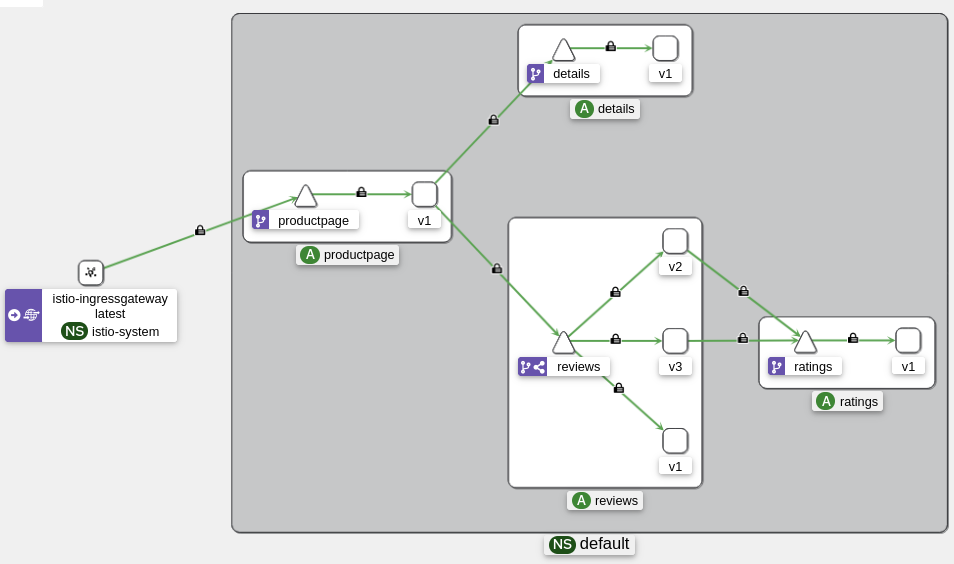
After applying these rules, we can see that “ratings” and “reviews” are accessible again from “productpage”:
JWT Authentication
Now that we have seen how to authenticate services with ServiceAccounts, let’s see how we can authenticate requests with JWT (JSON Web Tokens). This method is a bit more complex and requires that the applications’ requests be adapted to send a JWT (Envoy won’t do it for us).
Info
JWT, or JSON Web Token, is an open standard for creating access tokens that secure the exchange of information between parties. A JWT contains information (called “claims”) about the user, encoded in JSON. They are digitally signed, usually with a private key, to ensure their authenticity.
In this part, I will strongly draw inspiration from the InfraCloud Github repository without which I would not have been able to implement JWTs in Istio. Thanks to them for their work!
We will start by generating a private and public key to sign the JWTs. For this, we will use OpenSSL to generate an RSA key. A secret will be required to protect the private key.
openssl genrsa -aes256 -out private_encrypted.pem 4096
openssl rsa -pubout -in private_encrypted.pem -out public.pem
openssl rsa -in private_encrypted.pem -out private.pem -outform PEM
We get three files: private.pem, public.pem, and private_encrypted.pem.
Now, we’re going to generate a JWT key using private.pem:
# generatekey.py
from authlib.jose import jwt
import os
JWT_ISSUER=os.getenv('JWT_ISSUER') # ex: qjoly@a-cup-of.coffee
JWT_EXPIRATION=int(os.getenv('JWT_EXPIRATION')) # ex: 1685505001

header = {'alg': 'RS256'}
payload = {'iss': JWT_ISSUER, 'sub': 'admin', 'exp': JWT_EXPIRATION}
private_key = open('private.pem', 'r').read() #Provide the path to your private key
bytes = jwt.encode(header, payload, private_key)
print(bytes.decode('utf-8'))
export JWT_EXPIRATION=1782191719000
export JWT_ISSUER="qjoly@a-cup-of.coffee"
export JWT_TOKEN=$(python3 generatekey.py)
For the JWT_EXPIRATION variable, you can use the Epoch Converter site to convert a date to a timestamp.
Let’s now verify that the public key correctly validates the JWT:
# validatekey.py
import os
JWT_TOKEN=os.getenv('JWT_TOKEN')

from authlib.jose import jwt
public_key = open('public.pem', 'r').read() #Provide path to your public key
claims = jwt.decode(JWT_TOKEN, public_key)
claims.validate()
print(claims)
$ python3 validatetoken.py
{'iss': 'qjoly@a-cup-of.coffee', 'sub': 'admin', 'exp': 1782191719000}
Our token is well recognized and valid (and fortunately, because it’s the same mechanism that will be used by Istio to authenticate requests).
Let’s now generate a JWK (JSON Web Key) from our public key to configure it in Istio.
from authlib.jose import jwk
public_key = open('public.pem', 'r').read() #Provide path to your public key
key = jwk.dumps(public_key, kty='RSA')
print(key)
$ python3 generatejwk.py
{'n': 'rPbn21rfrOrjq5AZ4W6XMjfpUu0SMIAIY9zj6skWWRMEYJn4Jvj6v3olLgMd0JjJluPXxgBYalIL2Fv9mKnZIyFcaCWDkTKBj1xN9k4PN-g5pPSGtYEYHT-zfdBfH-8inea8c9XoQGwyqm7TEwmI4M43WsBoqsItBcB_rLTo8DLlRf0mzlbTeK-M0iEC8-Osfj2FV9vtHR_FdsWaLK5QN-c8aJZIAZQ_S81EvRzVYguJ2-3l05JNI0GGNdGwawvp4cXmvIlCGEuZ5fdNJTjd3pcEJqMR8Gzyd_kb32SiHDXvTdI48KHPo_EjUf_i1maufxJToqEBOPwjEdpg1D1BPQ', 'e': 'AQAB', 'kty': 'RSA'}
We provide the JSON generated by generatejwk.py to Istio so it can validate the JWTs in requests to “productpage”.
apiVersion: security.istio.io/v1beta1
kind: RequestAuthentication
metadata:
 name: productpage-jwt
 namespace: default
spec:
  selector:
    matchLabels:
      app: productpage
  jwtRules:
  - forwardOriginalToken: true
    issuer: qjoly@a-cup-of.coffee
    jwks: |
      {"keys": [{"n": "rPbn21rfrOrjq5AZ4W6XMjfpUu0SMIAIY9zj6skWWRMEYJn4Jvj6v3olLgMd0JjJluPXxgBYalIL2Fv9mKnZIyFcaCWDkTKBj1xN9k4PN-g5pPSGtYEYHT-zfdBfH-8inea8c9XoQGwyqm7TEwmI4M43WsBoqsItBcB_rLTo8DLlRf0mzlbTeK-M0iEC8-Osfj2FV9vtHR_FdsWaLK5QN-c8aJZIAZQ_S81EvRzVYguJ2-3l05JNI0GGNdGwawvp4cXmvIlCGEuZ5fdNJTjd3pcEJqMR8Gzyd_kb32SiHDXvTdI48KHPo_EjUf_i1maufxJToqEBOPwjEdpg1D1BPQ", "e": "AQAB", "kty": "RSA"}]}
We can now apply an ACL rule to allow traffic on the “productpage” only if the JWT is signed by the issuer “qjoly@a-cup-of.coffee”.
apiVersion: security.istio.io/v1beta1
kind: AuthorizationPolicy
metadata:
  name: productpage-jwt
  namespace: default
spec:
  selector:
    matchLabels:
      app: productpage
  action: ALLOW
  rules:
  - when:
    - key: request.auth.claims[iss]
      values: ["qjoly@a-cup-of.coffee"]
Now that everything is in place, let’s delete the ACL rule created in the previous step (the one that allowed all traffic on the “productpage”) :
kubectl delete authorizationpolicies.security.istio.io allow-productpage
In this configuration, I allow traffic on the “productpage” only if the JWT is signed by the issuer “qjoly@a-cup-of.coffee”. Let’s try making a request to verify this :
$ curl $INGRESS_HOST:$INGRESS_PORT/productpage -s -I
HTTP/1.1 403 Forbidden
server: istio-envoy
date: Sun, 23 Jun 2024 06:13:26 GMT
x-envoy-upstream-service-time: 1
Now let’s test with a valid JWT (remember, I generated the token from the command export JWT_TOKEN=$(python3 generatekey.py)).
$ curl $INGRESS_HOST:$INGRESS_PORT/productpage --header "Authorization: Bearer $JWT_TOKEN" -s -I
HTTP/1.1 200 OK
server: istio-envoy
date: Sun, 23 Jun 2024 06:16:08 GMT
x-envoy-upstream-service-time: 17
And with an invalid JWT:
$ curl $INGRESS_HOST:$INGRESS_PORT/productpage --header "Authorization: Bearer a-cup${JWT_TOKEN}of-coffee" -s -I
HTTP/1.1 401 Unauthorized
www-authenticate: Bearer realm="http://192.168.128.30:30492/productpage", error="invalid_token"
content-length: 42
content-type: text/plain
date: Sun, 23 Jun 2024 06:18:14 GMT
server: istio-envoy
x-envoy-upstream-service-time: 5
Managing External Access
It is possible to ask Envoy to manage external services (i.e. services that are not in the Istio mesh). This can be useful for managing communications to third-party services while taking advantage of Istio’s features (retries, observability, bandwidth management, etc).
To do this, you can use a ServiceEntry to declare an external service. Here is an example:
apiVersion: networking.istio.io/v1beta1
kind: ServiceEntry
metadata:
  name: coffee-website
spec:
  hosts:
  - a-cup-of.coffee
  - une-tasse-de.cafe
  location: MESH_EXTERNAL
  ports:
  - number: 443
    name: https
    protocol: TLS
  resolution: DNS
For our tests, I will declare a pod that will allow us to make requests to external services.
apiVersion: v1
kind: Pod
metadata:
  name: debug-network
spec:
  containers:
  - name: debug
    image: digitalocean/doks-debug:latest
    command: [ "sleep", "infinity" ]
I will generate some requests via this pod to see how Istio handles requests to a registered service.
while true; do kubectl exec pods/debug-network -c debug exec -- curl https://a-cup-of.coffee ; done
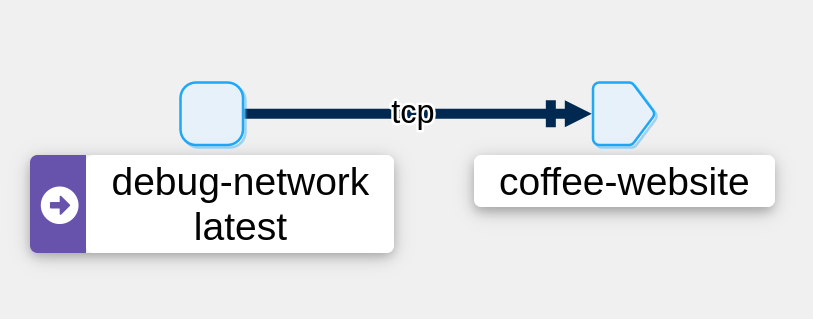
We can see that Istio recognizes the ServiceEntry well.
Let’s now try a request to a service not declared in a ServiceEntry:
kubectl exec pods/debug-network -c debug exec -- curl https://perdu.com
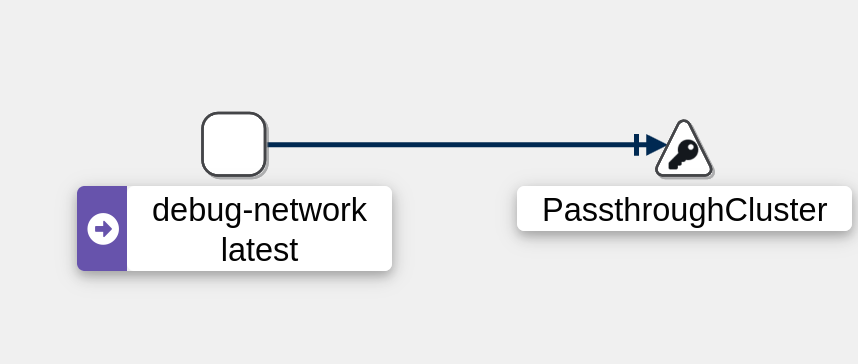 The traffic is sent to the “PassThroughCluster” (which indicates that requests are handled normally like a classic pod (Envoy does not process the request)).
Let’s now consider the case where I want to limit the outgoing traffic from my cluster. To do this, I will modify the settings of my Istio mesh to block all outgoing traffic except that which is declared in a ServiceEntry.
istioctl upgrade --set meshConfig.outboundTrafficPolicy.mode=REGISTRY_ONLY
Then, if I retry the request to perdu.com, I will get an error:
$ kubectl exec pods/debug-network -c debug exec -- curl https://perdu.com/ -v
ù* Recv failure: Connection reset by peer
* OpenSSL SSL_connect: Connection reset by peer in connection to perdu.com:443
  0     0    0     0    0     0      0      0 --:--:-- --:--:-- --:--:--     0
* Closing connection 0
curl: (35) Recv failure: Connection reset by peer
command terminated with exit code 35
On the other hand, if I make a request to a-cup-of.coffee, the request is successfully sent:
$ kubectl exec pods/debug-network -c debug exec -- curl https://a-cup-of.coffee -I -s
HTTP/2 200
accept-ranges: bytes
content-type: text/html
server: lighttpd/1.4.71
Note
To return to the default mode, simply set the meshConfig.outboundTrafficPolicy.mode variable to ALLOW_ANY.
istioctl upgrade --set meshConfig.outboundTrafficPolicy.mode=ALLOW_ANY
Note that the REGISTRY_ONLY mode allows traffic on all services declared in a ServiceEntry for each pod. I haven’t yet found how to limit outgoing traffic to a single application. For example, limiting outgoing traffic from “productpage” to “a-cup-of.coffee” and limiting that from “reviews” to “une-tasse-de.cafe”.
Tired of sidecars?
Istio offers a feature called “Ambient” that allows not deploying a sidecar in each pod. In this mode, Istio acts as a CNI (Container Network Interface) and intercepts incoming and outgoing network traffic from pods to apply security rules.
The primary goal of this mode is to reduce resource consumption (CPU, memory) by avoiding the deployment of a sidecar in each pod, as well as to increase the performance of the Istio mesh. We will see if this is truly the case in a dedicated section.
So, how can the “Ambient” mode improve the performance of the Istio mesh, you ask? Well, by reducing the number of sidecars and thus the number of L7 processing steps for each request.
Instead the biggest culprit is the intensive L7 processing Istio needs to implement its sophisticated feature set. Unlike sidecars, which implement two L7 processing steps for each connection (one for each sidecar), ambient mesh collapses these two steps into one. In most cases, we expect this reduced processing cost to compensate for an additional network hop. source
To activate the “Ambient” mode, we need to install Istio with the ambient profile and add the Gateway API (an official Kubernetes project aiming to replace Ingress with new objects. If you’re interested in the subject, you can consult the documentation here).
istioctl install --set profile=ambient --skip-confirmation
kubectl get crd gateways.gateway.networking.k8s.io &> /dev/null || \
  { kubectl kustomize "github.com/kubernetes-sigs/gateway-api/config/crd/experimental?ref=v1.1.0" | kubectl apply -f -; }
Ambient uses a new label for namespaces: istio.io/dataplane-mode=ambient. We can apply it to the “coffee” namespace to activate the “Ambient” mode and remove the istio-injection label to disable automatic sidecar injection.
kubectl label namespace coffee istio.io/dataplane-mode=ambient
kubectl label namespace default istio-injection-
kubectl rollout restart deployment -n default details-v1 productpage-v1 ratings-v1 reviews-v1 reviews-v2 reviews-v3
Now, there is no need for the “istio-ingressgateway” service to manage incoming traffic, we can directly use the Gateway object..
To do this, we apply the following configuration:
apiVersion: gateway.networking.k8s.io/v1beta1
kind: Gateway
metadata:
  name: bookinfo-gateway
spec:
  gatewayClassName: istio
  listeners:
  - name: http
    port: 80
    protocol: HTTP
    allowedRoutes:
      namespaces:
        from: Same
---
apiVersion: gateway.networking.k8s.io/v1beta1
kind: HTTPRoute
metadata:
  name: bookinfo
spec:
  parentRefs:
  - name: bookinfo-gateway
  rules:
  - matches:
    - path:
        type: Exact
        value: /productpage
    - path:
        type: PathPrefix
        value: /static
    - path:
        type: Exact
        value: /login
    - path:
        type: Exact
        value: /logout
    - path:
        type: PathPrefix
        value: /api/v1/products
    backendRefs:
    - name: productpage
      port: 9080
A “gateway” pod is successfully deployed:
$ kubectl get pods
NAME                                      READY   STATUS    RESTARTS   AGE
bookinfo-gateway-istio-7c755f6876-t59dn   1/1     Running   0          14s
details-v1-cf74bb974-ph5dd                1/1     Running   0          50s
productpage-v1-87d54dd59-nwxgd            1/1     Running   0          49s
ratings-v1-7c4bbf97db-sq475               1/1     Running   0          50s
reviews-v1-5fd6d4f8f8-2r4dz               1/1     Running   0          50s
reviews-v2-6f9b55c5db-4fkwb               1/1     Running   0          50s
reviews-v3-7d99fd7978-nbbdr               1/1     Running   0          49s
Without a LoadBalancer, I will expose the “bookinfo-gateway” service as a NodePort to access the application from the outside.
$ kubectl annotate gateway bookinfo-gateway networking.istio.io/service-type=NodePort --namespace=default
$ kubectl get svc
NAME                     TYPE        CLUSTER-IP      EXTERNAL-IP   PORT(S)                        AGE
bookinfo-gateway-istio   NodePort    10.98.171.168   <none>        15021:31677/TCP,80:31334/TCP   17s
details                  ClusterIP   10.105.80.56    <none>        9080/TCP                       51s
productpage              ClusterIP   10.109.221.79   <none>        9080/TCP                       51s
ratings                  ClusterIP   10.102.161.80   <none>        9080/TCP                       51s
reviews                  ClusterIP   10.100.182.23   <none>        9080/TCP                       51s
The following commands are used to find the port of our gateway service:
export INGRESS_PORT=$(kubectl get service bookinfo-gateway-istio -o jsonpath='{.spec.ports[?(@.name=="http")].nodePort}')
export INGRESS_HOST=$(kubectl get nodes -o jsonpath='{.items[0].status.addresses[?(@.type=="InternalIP")].address}')
$ curl $INGRESS_HOST:$INGRESS_PORT/productpage -I
HTTP/1.1 200 OK
server: istio-envoy
date: Tue, 25 Jun 2024 20:55:31 GMT
content-type: text/html; charset=utf-8
content-length: 4294
vary: Cookie
x-envoy-upstream-service-time: 28
In this case, traffic is only managed at L4 (and no longer at L7 as was the case with sidecars). This allows for reducing the load on pods and improving the performance of the Istio mesh. However, some features like HTTP traffic management (retries, circuit breaker, etc.) are lost. It is possible to mitigate this issue by using Gateways (or “Waypoint” in Istio terminology) to manage HTTP traffic.
I will continue to explore the “Ambient” mode in a future article to clarify these areas of uncertainty.
Performance Benchmark
Finally, I will perform a performance benchmark to see how Istio impacts the performance of my Kubernetes cluster. To do this, we will compare two communication methods (HTTP and TCP) across three different scenarios:
- Without Istio;
- with Istio;
- with Istio in “Ambient” mode.
For this, I will use Fortio which is a benchmarking tool for HTTP and TCP services developed by Istio.
The CNI used in my cluster is Flannel (I had issues between Cilium and Istio Ambient). However, I still performed a performance test with Cilium to give you an idea of the bandwidth between my pods.
🔥 Network Performance Test Summary [cilium-test]:
--------------------------------------------------------------------------------------------------------------------------------------------------------------------------------------------------------
📋 Scenario        | Node       | Test            | Duration        | Min             | Mean            | Max             | P50             | P90             | P99             | Transaction rate OP/s
--------------------------------------------------------------------------------------------------------------------------------------------------------------------------------------------------------
📋 pod-to-pod      | same-node  | TCP_RR          | 10s             | 27µs            | 75.32µs         | 8.115ms         | 69µs            | 108µs           | 211µs           | 13149.99
📋 pod-to-pod      | same-node  | UDP_RR          | 10s             | 29µs            | 81.06µs         | 23.993ms        | 67µs            | 113µs           | 308µs           | 12222.58
📋 pod-to-pod      | same-node  | TCP_CRR         | 10s             | 143µs           | 320.87µs        | 14.373ms        | 284µs           | 411µs           | 1.068ms         | 3106.70
📋 pod-to-pod      | other-node | TCP_RR          | 10s             | 129µs           | 298.52µs        | 14.168ms        | 245µs           | 395µs           | 1.197ms         | 3340.77
📋 pod-to-pod      | other-node | UDP_RR          | 10s             | 147µs           | 382.21µs        | 37.771ms        | 309µs           | 573µs           | 1.534ms         | 2609.31
📋 pod-to-pod      | other-node | TCP_CRR         | 10s             | 440µs           | 1.21346ms       | 17.531ms        | 1.061ms         | 1.797ms         | 4.255ms         | 823.03
--------------------------------------------------------------------------------------------------------------------------------------------------------------------------------------------------------
-------------------------------------------------------------------------------------
📋 Scenario        | Node       | Test            | Duration        | Throughput Mb/s
-------------------------------------------------------------------------------------
📋 pod-to-pod      | same-node  | TCP_STREAM      | 10s             | 610.56
📋 pod-to-pod      | same-node  | UDP_STREAM      | 10s             | 272.15
📋 pod-to-pod      | other-node | TCP_STREAM      | 10s             | 1506.68
📋 pod-to-pod      | other-node | UDP_STREAM      | 10s             | 209.39
-------------------------------------------------------------------------------------
Now that we have an idea of the maximum achievable performance, we’re going to start our benchmark.
It will consist of two parts:
- An HTTP part with Fortio to test latency;
- a TCP part with Iperf to test bandwidth.
Small disclaimer: The results I will obtain may not be the same as yours. Performance can vary depending on the configuration of your cluster, the load on it, the configuration of your application, etc. The results I will obtain are not necessarily representative of reality. They are there to give an idea of Istio’s performance in a Kubernetes cluster for a given use case.
If you want to read a slightly more comprehensive benchmark, I invite you to consult this Github repository offering very complete and interesting results.
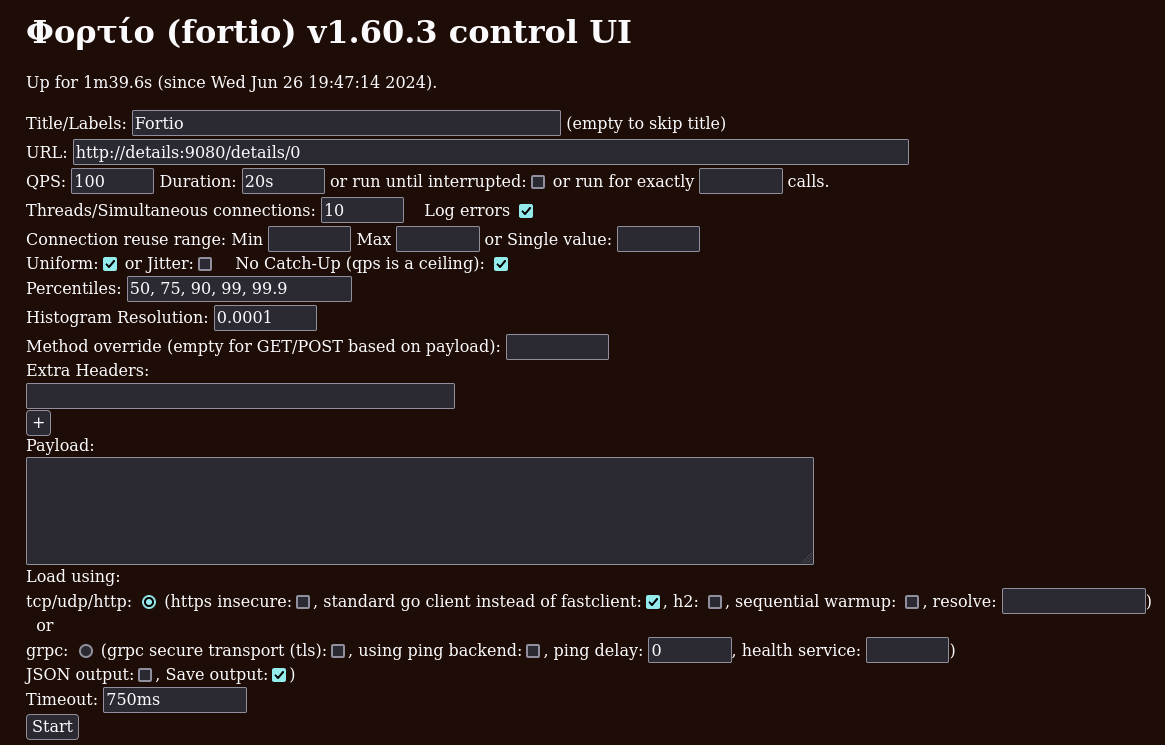
HTTP Benchmark
As I mentioned earlier, I will use Fortio to test the latency of my services. To do this, I will deploy a Fortio pod in my cluster and make requests to one of the services of the “bookinfo” application: “details”.
To install Fortio, I first deployed the Fortio operator before preferring a classic deployment (KISS).
apiVersion: v1
kind: Service
metadata:
  name: fortio-debug
spec:
  ports:
  - port: 8080
    name: http-debug
  selector:
    app: fortio-debug
---
apiVersion: apps/v1
kind: Deployment
metadata:
  name: fortio-debug-deployment
spec:
  replicas: 1
  selector:
    matchLabels:
      app: fortio-debug
  template:
    metadata:
      labels:
        app: fortio-debug
    spec:
      containers:
      - name: fortio-debug
        image: fortio/fortio:latest_release
        imagePullPolicy: Always
        ports:
        - containerPort: 8080
To launch and configure the tests, I simply did a port-forward on the Fortio pod:
kubectl port-forward svc/fortio-debug 8080:8080
The rest of the configuration is done directly on the Fortio web interface at http://localhost:8080/fortio/. I chose to perform latency tests with 10 simultaneous connections each making 100 requests per second. Of course, I made sure the tests were always between two different nodes.
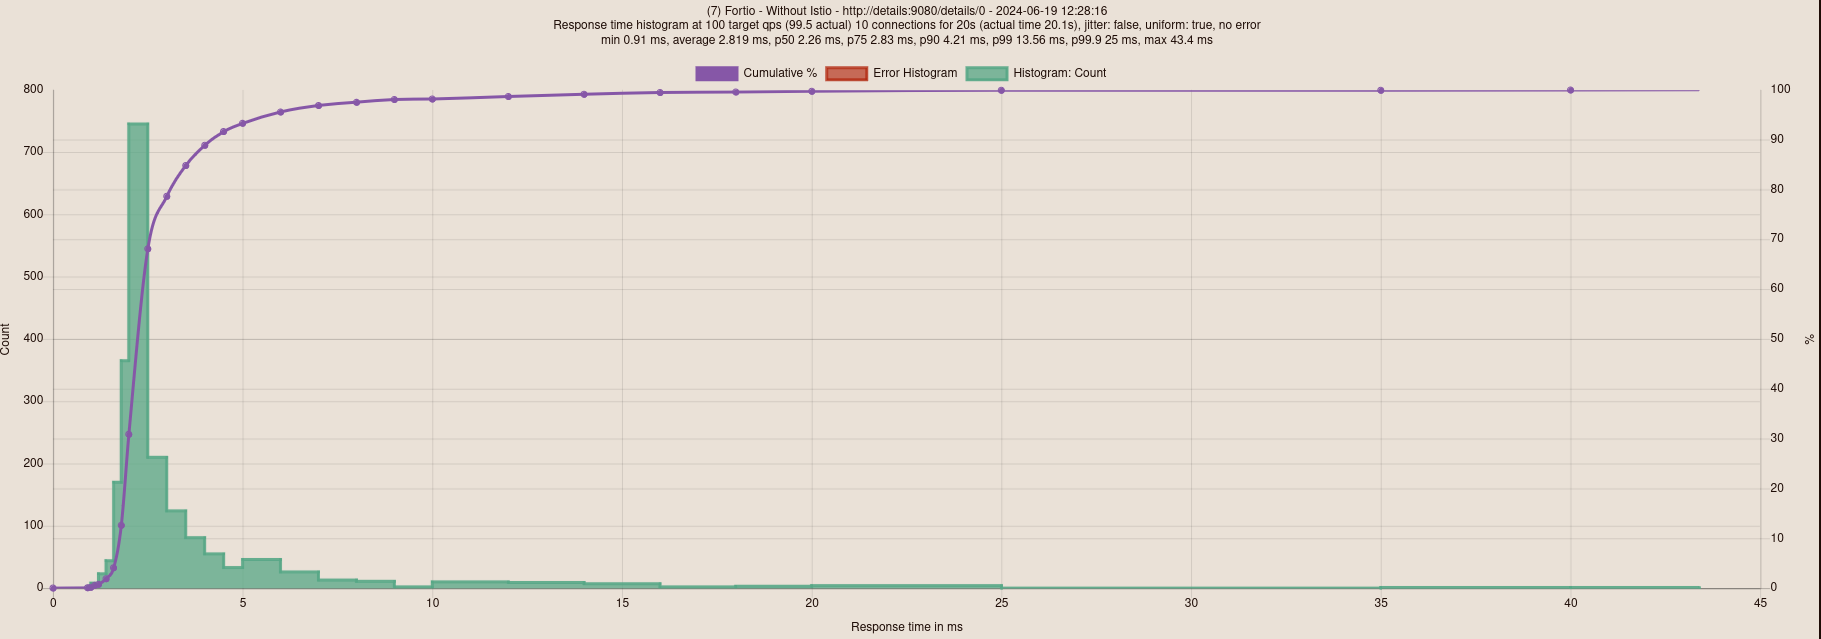
Here are the results obtained for the three scenarios:
Without Istio
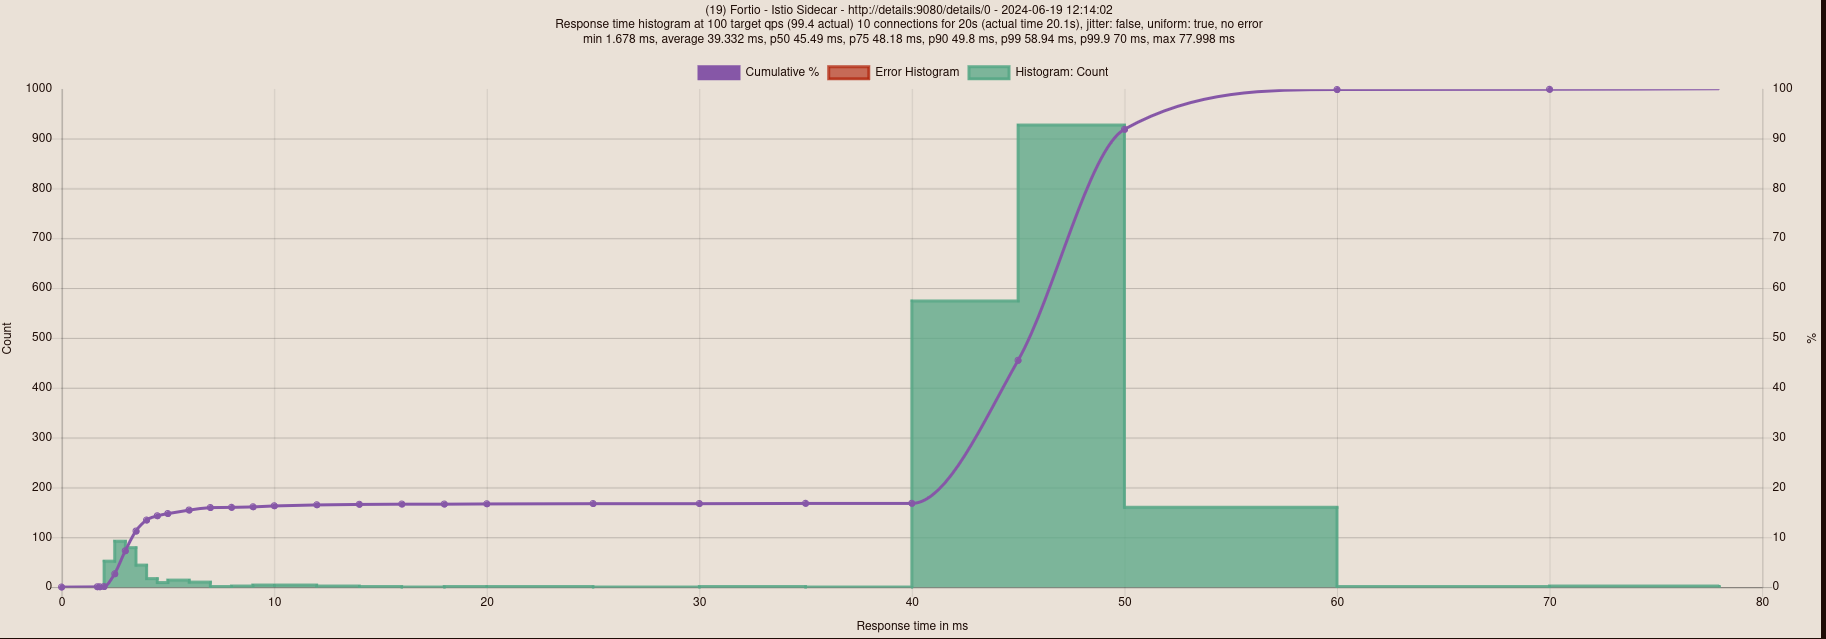
With Istio sidecar
With Istio Ambient
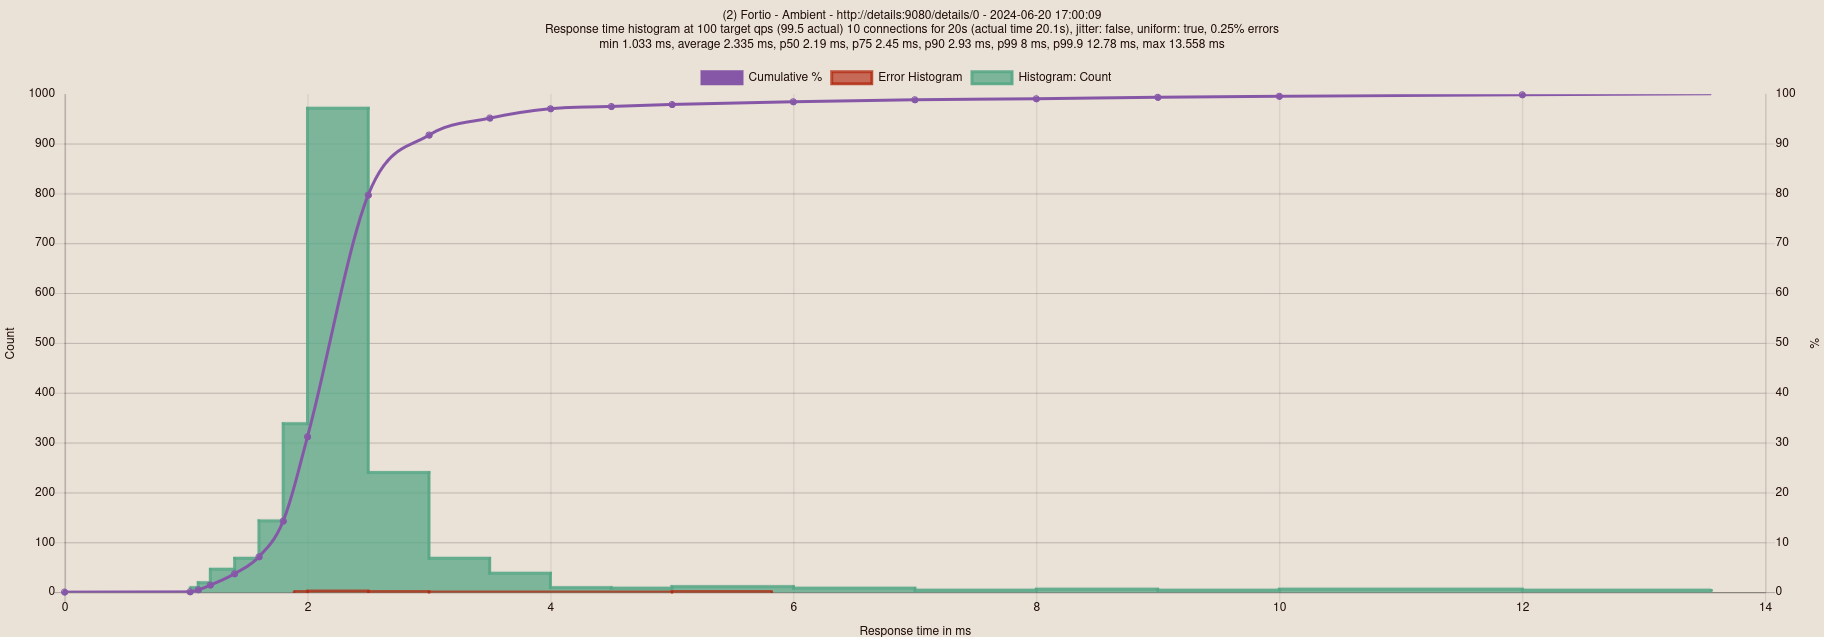
What’s cool is that we have very different results. In terms of latency, here’s what it gives:
- Istio Ambient: 2.35ms latency;
- Without Istio: 2.8ms latency;
- Istio Sidecar: 39.3ms latency.
I note that there were connection errors that I don’t explain with Istio Ambient (even after performing several tests).
It’s quite amazing that Istio Ambient manages to reduce latency compared to a cluster without Istio (I even checked the results several times to be sure). This shows that the “Ambient” mode is a viable solution that can potentially improve the performance of your Kubernetes cluster.
TCP Benchmark
For this benchmark, I will use Iperf to test the bandwidth between my services. I will then deploy an Iperf pod as a server and use a “tcp-iperf-client” pod to make requests to the Iperf server.
Manifests IPerf
Client Iperf
apiVersion: v1
kind: Pod
metadata:
  name: tcp-iperf-client
spec:
  containers:
  - name: debug
    image: digitalocean/doks-debug:latest
    command: [ "sleep", "infinity" ]
Serveur Iperf
apiVersion: apps/v1
kind: Deployment
metadata:
  name: tcp-iperf
  namespace: default
spec:
  replicas: 1
  selector:
    matchLabels:
      app: tcp-iperf
      version: v1
  template:
    metadata:
      labels:
        app: tcp-iperf
        version: v1
    spec:
      containers:
      - args:
        - -s
        - --port
        - "5201"
        image: mlabbe/iperf
        imagePullPolicy: IfNotPresent
        name: tcp-iperf
        ports:
        - containerPort: 5201
          name: tcp-app
          protocol: TCP
---
apiVersion: v1
kind: Service
metadata:
  labels:
    app: tcp-iperf
    service: tcp-iperf
  name: tcp-iperf
  namespace: default
spec:
  ports:
  - name: tcp-iperf
    port: 5201
    protocol: TCP
  selector:
    app: tcp-iperf
  type: ClusterIP
---
apiVersion: networking.istio.io/v1alpha3
kind: VirtualService
metadata:
  name: tcp-iperf
spec:
  hosts:
  - "*"
  gateways:
  - tcp-iperf
  tcp:
  - match:
    - port: 5201
    route:
    - destination:
        host: tcp-iperf
        port:
          number: 5201
I will also enforce mTLS to be in a more realistic use case.

# Without Istio (no sidecar, no ambient)
iperf -c tcp-iperf --port 5201
------------------------------------------------------------
Client connecting to tcp-iperf, TCP port 5201
TCP window size: 16.0 KByte (default)
------------------------------------------------------------
[  1] local 10.244.2.4 port 56286 connected with 10.102.184.216 port 5201 (icwnd/mss/irtt=13/1398/585)
[ ID] Interval       Transfer     Bandwidth
[  1] 0.0000-10.0207 sec  4.22 GBytes  3.62 Gbits/sec
# With Istio Sidecar
iperf -c tcp-iperf --port 5201
------------------------------------------------------------
Client connecting to tcp-iperf, TCP port 5201
TCP window size: 2.50 MByte (default)
------------------------------------------------------------
[  1] local 10.244.2.215 port 41158 connected with 10.106.115.53 port 31400 (icwnd/mss/irtt=13/1398/34)
[ ID] Interval       Transfer     Bandwidth
[  1] 0.0000-10.1227 sec  2.22 GBytes  1.88 Gbits/sec
# With Istio Ambient
 iperf -c tcp-iperf --port 5201
------------------------------------------------------------
Client connecting to tcp-iperf, TCP port 5201
TCP window size: 2.50 MByte (default)
------------------------------------------------------------
[  1] local 10.244.1.9 port 54814 connected with 10.110.166.223 port 5201 (icwnd/mss/irtt=13/1398/50)
[ ID] Interval       Transfer     Bandwidth
[  1] 0.0000-10.0806 sec  2.48 GBytes  2.12 Gbits/sec
In contrast to the latency for which Istio Ambient was the most performant, it’s the “no Istio” mode that outperforms the other two modes in terms of bandwidth.
- No Istio : 3.62 Gbits/sec;
- Istio Ambient : 2.12 Gbits/sec;
- Istio Sidecar : 1.88 Gbits/sec.
Conclusion
Istio is an incredibly powerful and complete product, but it’s not without its flaws. It’s very easy to get lost in Istio’s configuration and end up with a mesh that doesn’t work as expected (plus, the logs are not always very explicit). That’s why it’s important to understand Istio’s concepts well before diving into the configuration of your mesh.
Despite the time I’ve spent learning Istio, I don’t feel comfortable enough for production use, there’s still a lot to learn from this solution. I hope reading this article will be useful for those who want to start learning Istio.
If you want to encourage me to write this kind of article (and fund my sleepless nights), don’t hesitate to make a small donation on my Kofi page, you can also give me a little shoutout on the social networks below:
Until then, I wish you a good day and good luck in your Istio adventure !