GoAuthentik from A to Y
I have been using Github as an OAuth2 support for authenticating myself on applications for a while now. However, I have always been content with just following documentation without really trying to understand what was happening each time I wanted to authenticate.
As a result, I have been motivated to write this article about SSO. The goal is to discover the mechanisms available to manage a large number of users and their access to infrastructure applications.
But in order not to lose readers who do not yet know what SSO is, I will tell you a little story to explain the importance of this method of identification.
Axelle is an accountant, she manages the small taxation of her department and goes through many applications to validate, verify, or record transactions. Every morning, she authenticates herself on application A to consult transactions, then on application B to record purchases.
As soon as she accesses an internal site: she must authenticate, as soon as she accesses a new resource: a new form to fill out, etc.
As an infrastructure administrator, I want to facilitate access to applications and resources as much as possible, provided that it does not penalize me in the next security audit!
Having an LDAP is a feasible possibility and simple to set up (and many applications are compatible), but we always have to go through this heavy authentication step. If I have ~10 applications, I have to authenticate 10 times (i.e., enter my username 10 times, and my password 10 times, some sites use a username, others an email…). Additionally, LDAP mainly deals with the authorization part, and it is complex to manage user permissions and rights.
It is also worth noting that LDAP is not an all-in-one solution, so I have to add many application components to allow users to:
- Add centralized MFA support,
- Reset a password,
- View compatible applications (a dashboard).
In short, LDAP is a solution, which has its constraints and advantages.
However, I am looking for something simple where I can modify users’ access rights to applications and they can authenticate once for all the company’s applications.
This is typically what Google does, with a single account we are authenticated on Youtube, Gmail, Maps, GCP…
Therefore, what we are looking for is an SSO application.
Single Sign On (SSO)
Single Sign On (or in French “Authentification unique”) is a method to authenticate on an application and make its session reusable by other products to authenticate the user.
| Advantages | Disadvantages |
|---|---|
| Reduces Phishing risks | If malfunctioning, many applications are affected |
| Comfort of not having to type passwords repeatedly | If there is a breach, the attacker will have “the keys to the castle” |
| Facilitates auditing (everything is logged in one place) |
In practice, the user authenticates on a site called the IdP (Identity Provider) so that others can refer to it to identify a user.
The most commonly used framework is OAuth2/OIDC, which we will have the opportunity to explore in this article.
Mechanisms to Authenticate a User
OAuth2
OAuth (or Web Authorization Protocol) version 2 is nowadays the standard used to allow a user to obtain permission from a server to access a resource. It is primarily a protocol for authorization, not authentication.
The purpose of OAuth2 is to authorize a website, software, or application (referred to as a “consumer”) to use the secure API of another website (referred to as a “provider”) with the authorization of an authorization server.
As mentioned in the previous paragraph: there is a clear distinction between authorization and identification (or authentication). Identification allows recognizing a specific user by providing the application with details about the requester (whereas authorization can be granted to an unnamed entity).
In simple terms, it is important to remember that OAuth2 is not an authentication protocol but a “delegated authorization” protocol. To use OAuth2 as an authentication method, two steps are required. The first step is to obtain an authorization token, called “accessToken,” after the user authenticates on the trusted application. The second step, using this accessToken, is to call an API to confirm that the user has sufficient permissions to access the resource.
Here are the steps to authorize a user:
- The user tries to access a resource/site.
- The site redirects the client to the trusted site.
- The user authenticates.
- The trusted site redirects the user by adding a token to the request.
- The site retrieves the token and contacts the trusted site to validate it.
- The user is authorized to access the resource.
Once the user is authorized, they can continue to use their access token until it expires. They will then need to re-authenticate or use a refresh token. The refresh token allows the user to claim a new pair of tokens from the IdP. For this request to succeed, the client must provide both tokens together. The IdP may also choose not to respond to the request and ask the user to re-authenticate, ending their session.
Knowing this, the logic is to create short-lived authorization tokens (so if an attacker obtains it, they have only a limited time to use it) and to have refresh tokens with a later expiration date.
Now, let’s add a layer of identification/authentication to OAuth2 with a framework called OpenID Connect.
OpenID Connect
OpenID Connect is a simple layer of identification based on OAuth 2.0. This protocol allows verifying the identity of a user with an authorization server. The difference from OAuth2 is that OIDC adds numerous information regarding the person requesting access to the resource, making the request no longer anonymous. Operations are carried out via REST web services, and data is exchanged in JSON format.
An important contribution of OpenID Connect is the standardization of data obtained after authentication. These are formalized in an “ID token” in JWT format, which contains mandatory parameters (e.g., identifier, email…) and optional parameters (e.g., phone number, groups…). The ‘mandatory’ parameters will always be named the same regardless of the federation partner.
Here are some data that can be transmitted:
- Name
- Profile picture
- Gender
- Other custom information
Not all data is necessarily transmitted to the application (the IdP decides which ones to send).
In short, OIDC is the missing layer in OAuth2 to manage access for different named and individual entities.
The steps to authenticate a user are the same as for OAuth2, except that the token contains the additional information necessary for identification.

SAML
Mainly used for enterprise and government applications, SAML uses XML for its identity data format and simple HTTP or SOAP data transport mechanisms. The service that requests and receives data from the IdP is known as the “relying party.” User identity data, encapsulated in an XML document called SAML Assertion, is presented as attributes. For example, email address, name, phone number, etc.
In practice, the outcome is very similar to OIDC. The popularity of OIDC makes it a potential replacement, but SAML remains heavily implemented in enterprise solutions.
The schema remains identical to OAuth2.
GoAuthentik
GoAuthentik is an open-source Single Sign-On (SSO) solution that allows managing authentication across multiple applications using a single account. It provides the ability to grant or revoke access to an application for a user, facilitates authentication using third-party providers such as Google or Github, and enables controlling user rights from the SSO application. Additionally, GoAuthentik offers a feature to protect incompatible applications through a Traefik middleware or a sidecar acting as a Reverse Proxy.
It is a direct competitor to Keycloak known for its ease of use and compatibility with numerous authentication and authorization protocols/frameworks.
For instance, as a provider, it supports:
- OAuth2 / OIDC
- SAML
- SCIM
- RADIUS
- LDAP
This list only pertains to the protocols through which applications will connect via GoAuthentik (for LDAP, it does expose a server).
Installation of GoAuthentik
In this article, let’s keep things simple and start with a Docker image.
Let’s begin by downloading the docker-compose, which consists of four containers. Here are the images present, at the time of writing this:
- The server (
ghcr.io/goauthentik/server:2024.6.1) - A worker (
ghcr.io/goauthentik/server:2024.6.1) - Redis (
docker.io/library/redis:alpine) - A postgres database (
docker.io/library/postgres:16-alpine)
wget https://goauthentik.io/docker-compose.yml
We then generate the database password and the secret key for Authentik (no need to specify that this information is sensitive).
echo "PG_PASS=$(openssl rand 36 | base64)" >> .env
echo "AUTHENTIK_SECRET_KEY=$(openssl rand 60 | base64)" >> .env
You can now access GoAuthentik through port 9000 and the path /if/flow/initial-setup/ to create the first admin account. In my case, I will expose it behind a Reverse Proxy to add TLS (GoAuthentik supports importing TLS certificates, but does not support generating/renewing them).
Note (for later in the article) that my GoAuthentik is on a completely isolated machine with no shared network with my other applications.
Email (optional)
I also recommend configuring Authentik to be able to send emails. This will be useful for notifying us as administrators, as well as users to confirm their emails and reset their passwords.
For this, here are the variables to put in the .env:
AUTHENTIK_EMAIL__HOST=mon-host-mail
AUTHENTIK_EMAIL__PORT=465
AUTHENTIK_EMAIL__USERNAME=votre-mail@vivele.cafe
AUTHENTIK_EMAIL__PASSWORD=cafelover
AUTHENTIK_EMAIL__USE_TLS=false
AUTHENTIK_EMAIL__USE_SSL=true
AUTHENTIK_EMAIL__TIMEOUT=10
AUTHENTIK_EMAIL__FROM=votre-mail@vivele.cafe
Info
This is not an error, there are indeed two underscores in the GoAuthentik variables!
I also invite you to add the variable AUTHENTIK_ERROR_REPORTING__ENABLED=true to receive emails when an error occurs in the processes.
After restarting the containers, our GoAuthentik server is now functional 😁 !
Before we continue, we must explain some concepts to understand how GoAuthentik works.
How GoAuthentik works
To ensure that my article is in line with the documentation, I will make an effort to use English terms related to GoAuthentik as they are the ones presented in the documentation. So, do not be surprised if I talk about “Flow” and not “Flux” or “Stage” and not “Étapes”.
GoAuthentik is very flexible, and this freedom comes at the cost of having to understand what GoAuthentik expects from us. For example, when a user authenticates, we can decide on the steps (Stages) they will follow to confirm their identity (from the name and password form, to 2FA and email confirmation if the user has not validated it).
So, here are the terms to know:
A Stage is an action expected from the user or performed by the server. For example:
- Request a password from the user.
- Ask the user to authenticate through a specific source.
- Send a confirmation email to the user to confirm their identity.
- Save the user’s settings.
These are just examples; many steps are already pre-configured. Here is one for example: default-authentication-mfa-validation.
This Stage allows validating MFA (Ex: TOTP or Yubikey) if the user has configured it correctly. We can choose to trigger this stage within a Flow.
A Flow is a sequence of Stages. These always start with an initial dependency to fulfill and belong to a category that defines the expected context (certain actions will follow).
The original dependency always relates to the user’s authentication level:
- If they are not authenticated.
- If they are properly authenticated.
- If they are an administrator.
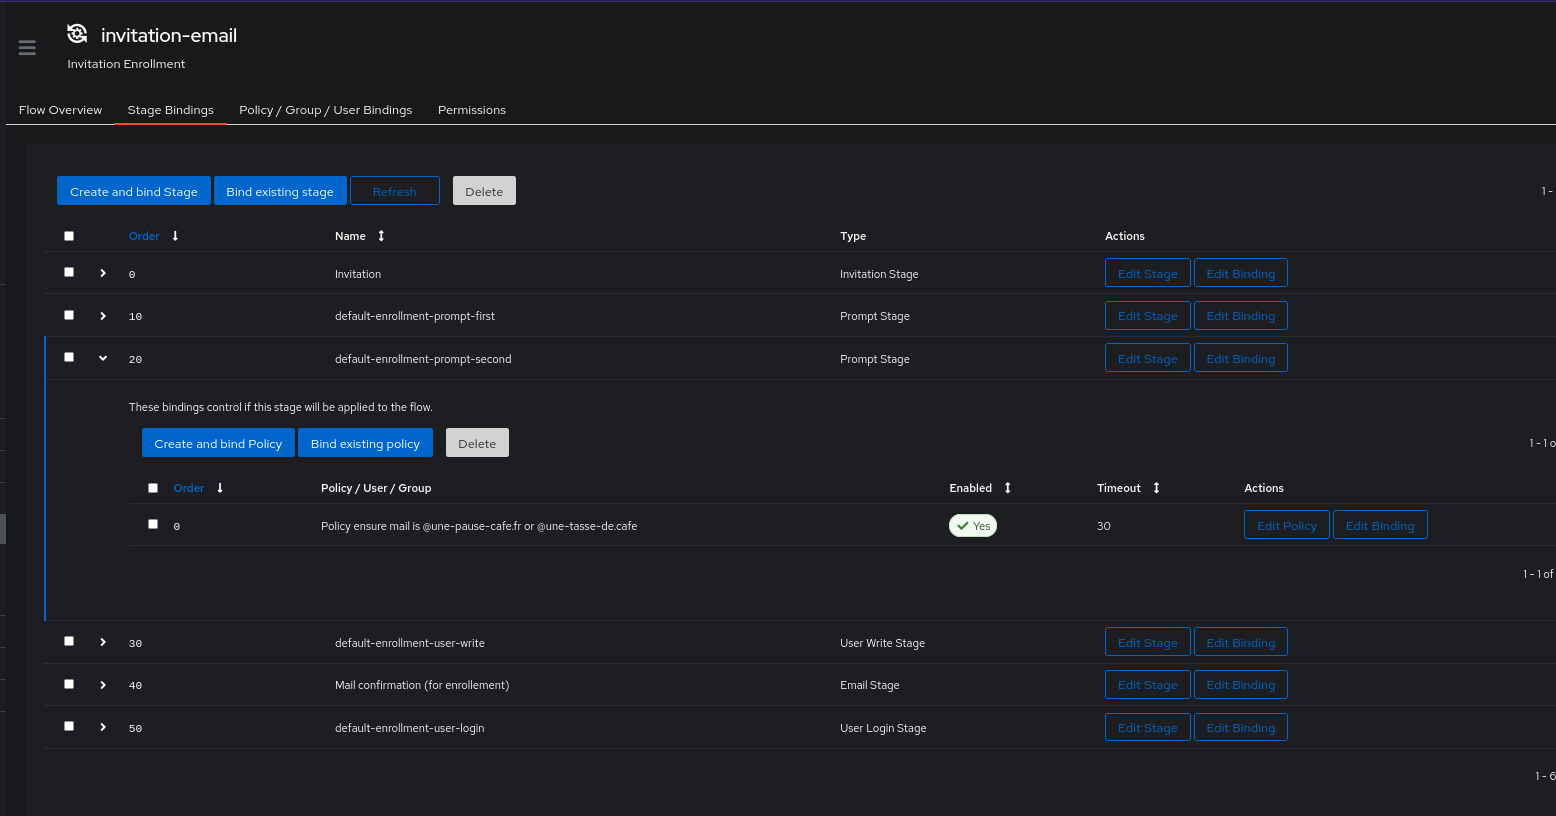
Here is a visualization of a flow in GoAuthentik as shown in the admin interface.

In summary:
- This flow requires the user to be not authenticated.
- The Stages
default-enrollment-prompt-firstanddefault-enrollment-prompt-secondprompt for username, password, full name, and email address. - The Stage
default-enrollment-user-writerecords the information provided by the user and creates an inactive account. Mail confirmation (for enrollment)sends an email to the user to activate their account.- Finally,
default-enrollment-user-loginlogs in the user.
As you have understood, this flow is used to create a new user from a form.
Each step or flow can be associated with Policies to validate or reject them (e.g., reject a password that is too short or deny access to the registration form if the user is not on the company’s network).
Hoping you didn’t skip the somewhat boring explanation of how GoAuthentik works, we can now move on to practice.
GoAuthentik in practice
Let’s start by adding our first application in the GoAuthentik authentication management. I will choose Proxmox as the first demonstration.
An application is always defined in two parts:
- The application (which defines access permissions, who can modify the entity, and how to access it),
- The provider (allowing to choose the authentication mechanism).
To create both at the same time, I encourage you to make use of the Create with wizard button that will allow you to create the application and the provider at the same time.
Here are the parameters for the ‘application’ part:
- Name: Proxmox - Application name (will be shown to the user).
- Slug: proxmox - Name used in URLs related to this application (simple, short, easy to type).
- Group: Tech - Applications of the same group will be grouped on the user interface (no relation to user-related groups).
In the “Provider type,” Proxmox is compatible with OAuth2/OIDC.
Here are the parameters for the provider:
- Name: Proxmox provider
- Authentication flow:
default-authentication-flow - Authorization flow:
default-provider-authorization-explicit-consentif you want the user to have to accept that the application accesses the user’s data (example below). Otherwise, choose:default-provider-authorization-implicit-consent. - The
Redirect URIs/Originspart is optional, but I strongly recommend configuring it systematically. For Proxmox, it will behttps://your_proxmox:8006(URL accessible from the user’s browser). You can also use REGEX in this field.
Tip
I also take this opportunity to remind you that Proxmox does not need to be exposed in the same network as GoAuthentik. In the OAuth2 authentication process, it is Proxmox that will contact GoAuthentik and not the other way around.
Here is what my Provider looks like:
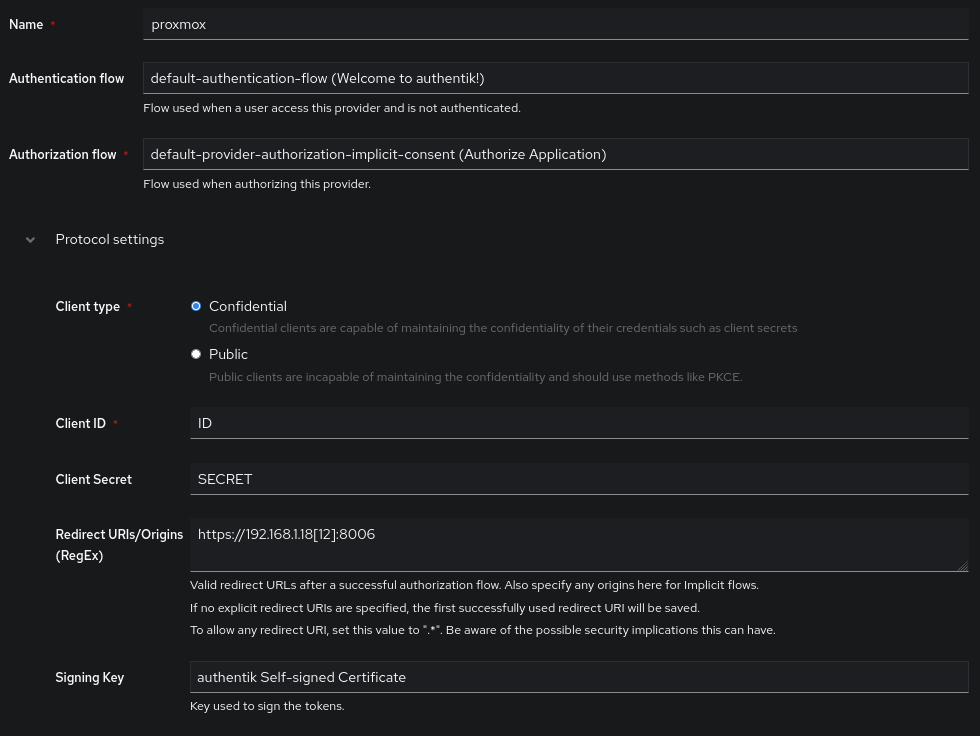
In my case, I use https://192.168.1.18[12]:8006 as the redirection URI since it matches the two IP addresses of my nodes in my Proxmox cluster.
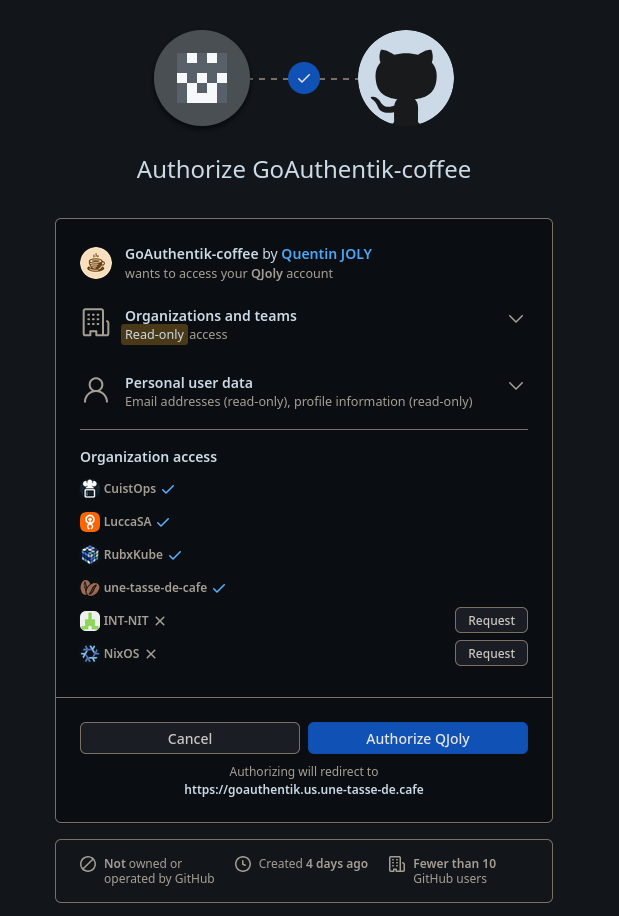
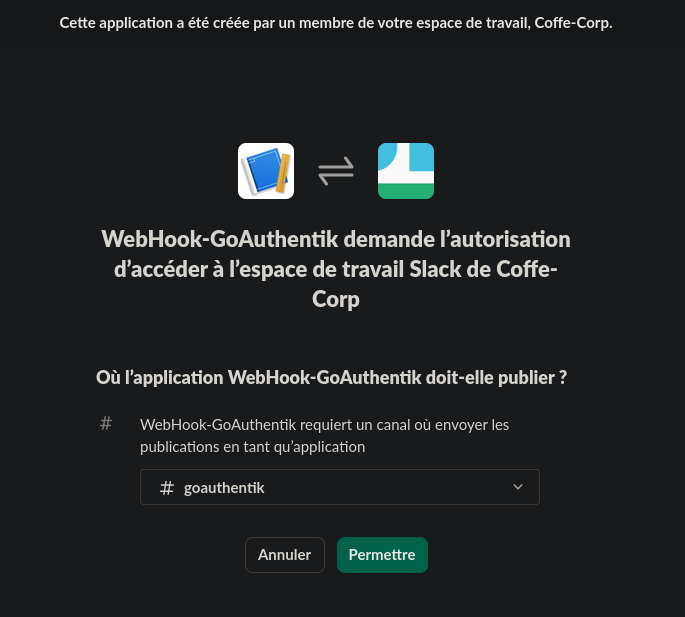
If you choose an Authorization Flow with explicit consent, here is the type of message you will receive (example with the Matomo application):
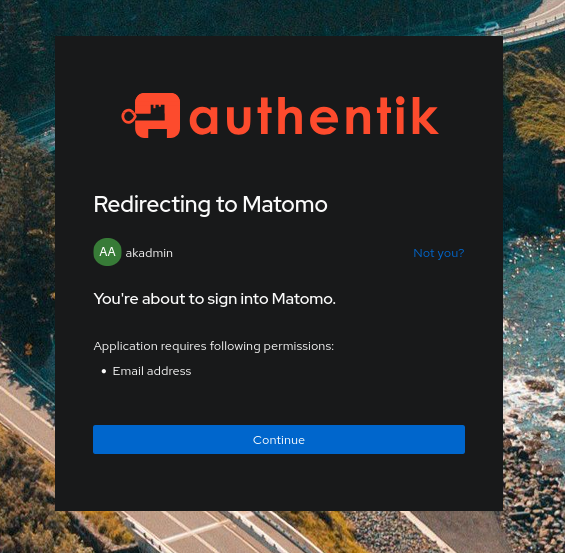
Note
A consent has a duration and can be revoked in the user’s settings. The user will need to re-validate it if they attempt to access the application again.

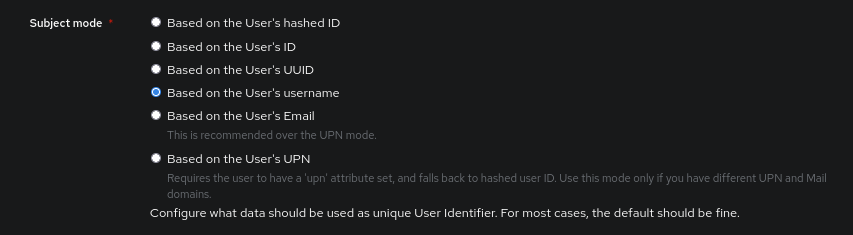
In the advanced settings of the Provider, we also need to configure how the subject is “named”. I invite you to use Based on the User’s username in Proxmox to define the user.
In the settings of our provider, we can see all the URLs that our application (proxmox) will be able to use to communicate with our IDP, and to communicate with it, we have our Client ID/Secret pair to configure on the hypervisor.
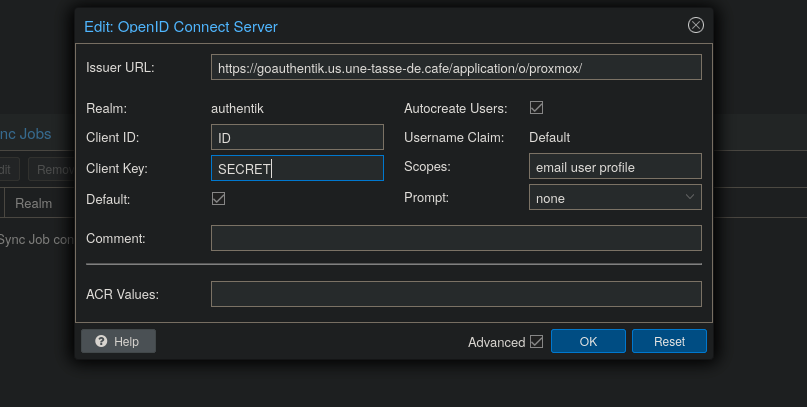
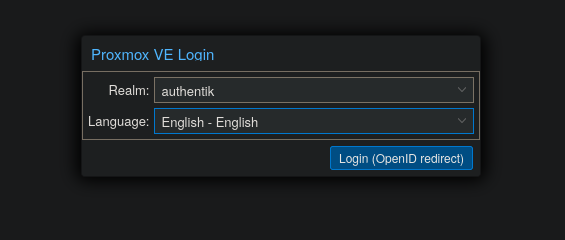
By checking “Default”, Proxmox will display Authentik authentication as the default mechanism.
Tip
The documentation also specifies that Proxmox can be configured directly via command line:
pveum realm add authentik --type openid --issuer-url https://authentik.company/application/o/proxmox/ --client-id xxx --client-key xxx --username-claim username --autocreate 1
Once authenticated, you will obviously have no permissions on virtual machines. The OIDC framework does not allow the transfer of permissions and rights (each application manages this individually).
Let’s now delve deeper into the authentication methods by GoAuthentik.
Add Users
Create Users
The simplest way to add a user is, of course, to create them manually (in Directory -> Users).
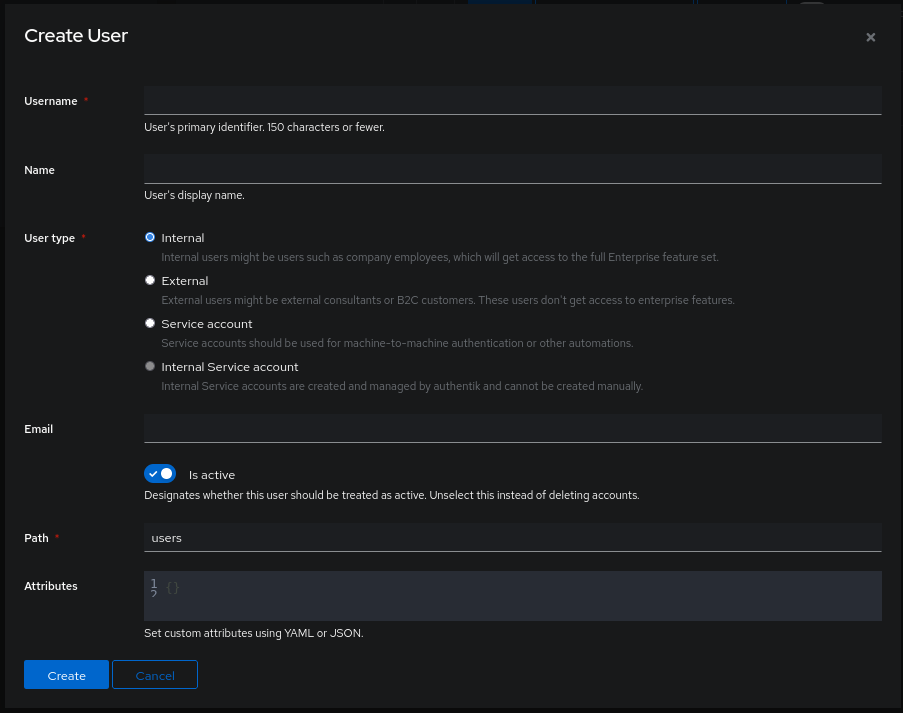
Is it relevant to say that I don’t want to have to manually create 700 users so that each employee in my company can have their own account?
Let’s explore a new method: social login. A practice that allows an external provider to confirm a user’s identity (Github, Google, LDAP, Okta…).
It works exactly the same as when you arrive on a site (without having created an account) and you log in with Google.
Since it’s also based on OIDC, the majority of Identity Providers are directly compatible with GoAuthentik. Let’s see how this works with Github…
Social Login with Github
The goal is to have an almost “automatic” registration method for users with a Github authentication without requiring any manual action from administrators (other than assigning them groups and rights related to their status).
Info
In case you already have users, you will need to choose a strategy to link a Github user to a user already present on GoAuthentik. The choices available to you will be as follows:
- Link if a Github user and GoAuthentik have the same username or email.
- Automatically refuse to link if the username/email corresponds to an existing account.
To link a Github account, the user can go to their settings directly:

Assuming there is no existing GoAuthentik user linked to this Github account.
To set up authentication on Github, we need to create an OAuth2 application from Github, this can be done directly in settings -> Developer settings -> OAuth Apps, or via this link.
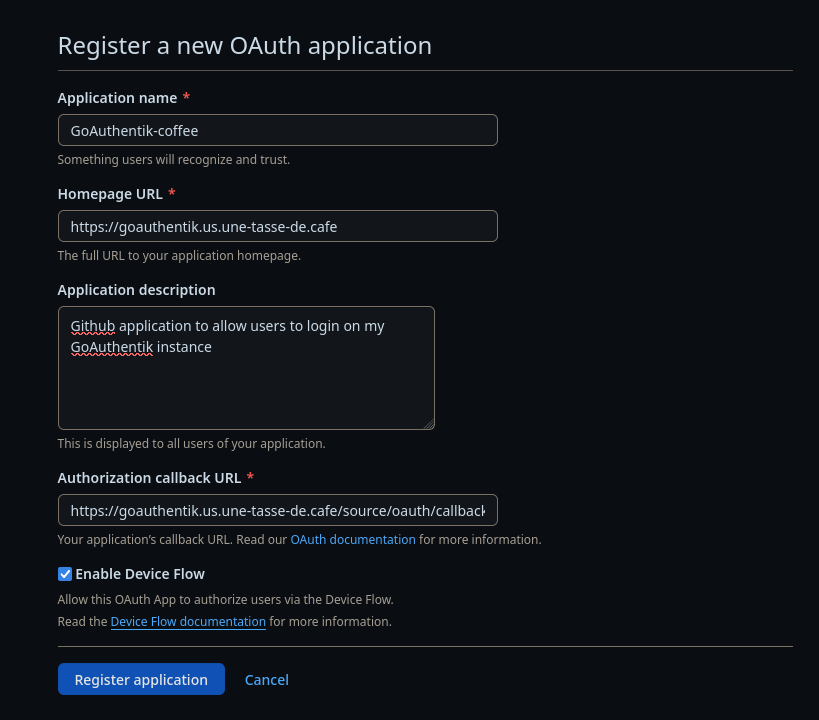
The Callback URL will be https://goauthentik.us.une-tasse-de.cafe/source/oauth/callback/github where github will correspond to our OAuth2 source on GoAuthentik (which we will create just after).
Once the application is created on GitHub, we will obtain an ID/Secret pair to keep carefully.
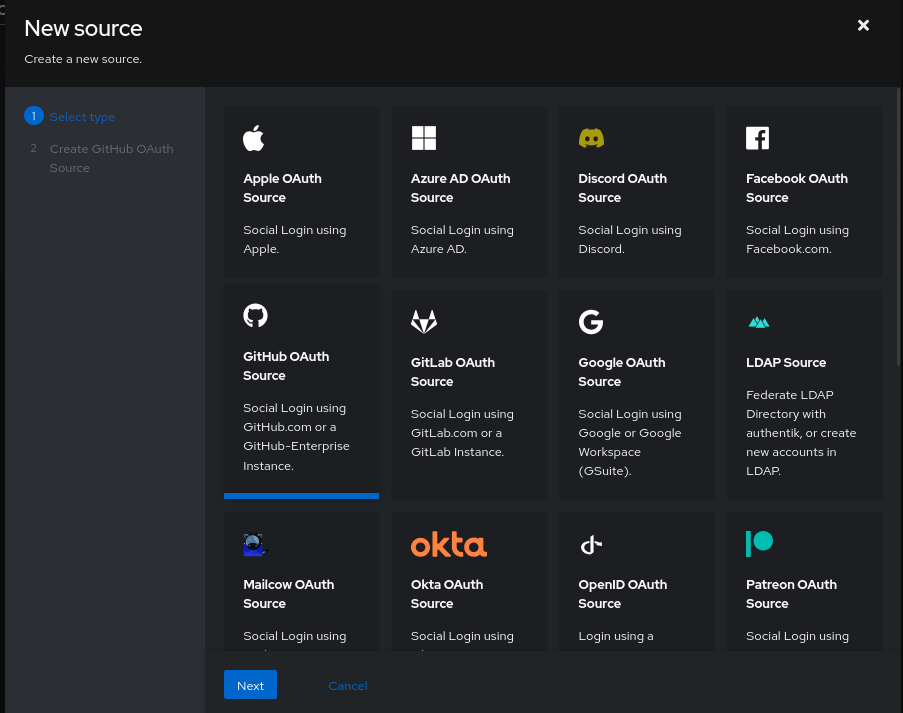
On the GoAuthentik interface, go to the section “Federation and Social login” in Directory to add a Social Login (and it’s convenient because there is a preset for GitHub to facilitate the configuration).
The only parameters I am going to change are:
Namewhere I need to putgithubto match with the Callback URL.Consumer keyandConsumer secret(mandatory)Scopewhere I want the application to be able to see the organizations of the users who log in (we will see why a little later).Slugwhere I want the created users to be at the pathgithub/, so I put%(slug)sin this field.
Tip
GoAuthentik has a “folder” display to view users. The goal is not to associate permissions based on the path, but rather to make life easier for administrators however, it is possible to use them to grant access to certain resources to folder members.

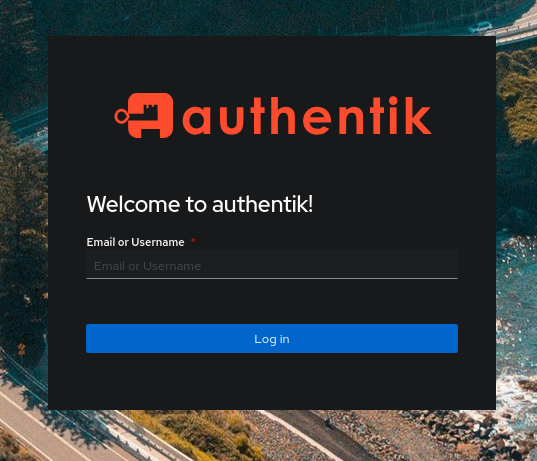
But if I log out… I still don’t have the option to use Github as an authentication method ☹.
The reason: Github is not present in the stage used for displaying authentication methods. By default, GoAuthentik uses the default-authentication-flow flow, which itself calls the default-authentication-identification stage that I will modify to add Github as a “source”:
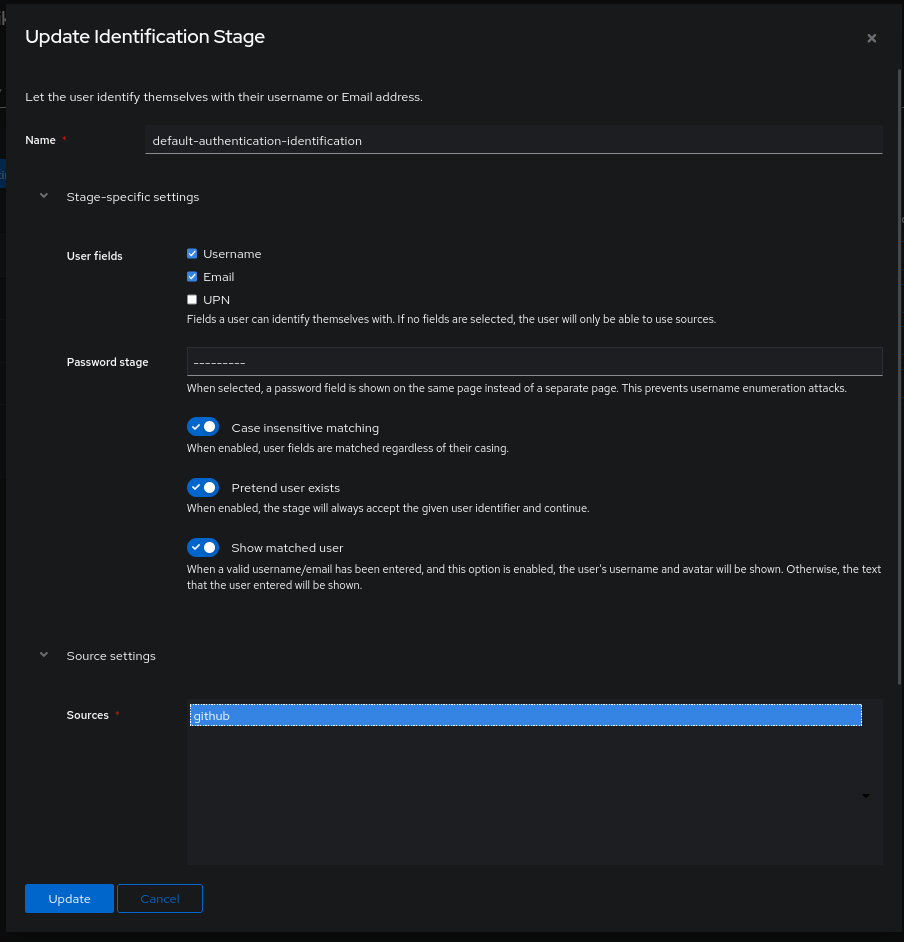
Ta-da 🥳! GitHub has been successfully added to our login form. Anyone with a Github account can now create an account on our GoAuthentik!
Wait… did we say “anyone” 😵💫 ?
Allow only a specific organization
In a business context, we may not necessarily want just anyone to have their account on the IdP (even if no permissions are added). To address this issue, we can decide to allow authentication via Github only if the user belongs to a specific Github organization.
This is the perfect time to use the latest concept discussed in the paragraph: Policies.
A policy will define what a user is allowed to do, if the context permits access to a resource, or to validate data in a flow (e.g., reject a weak password).
Here are the types of policies that can be created:
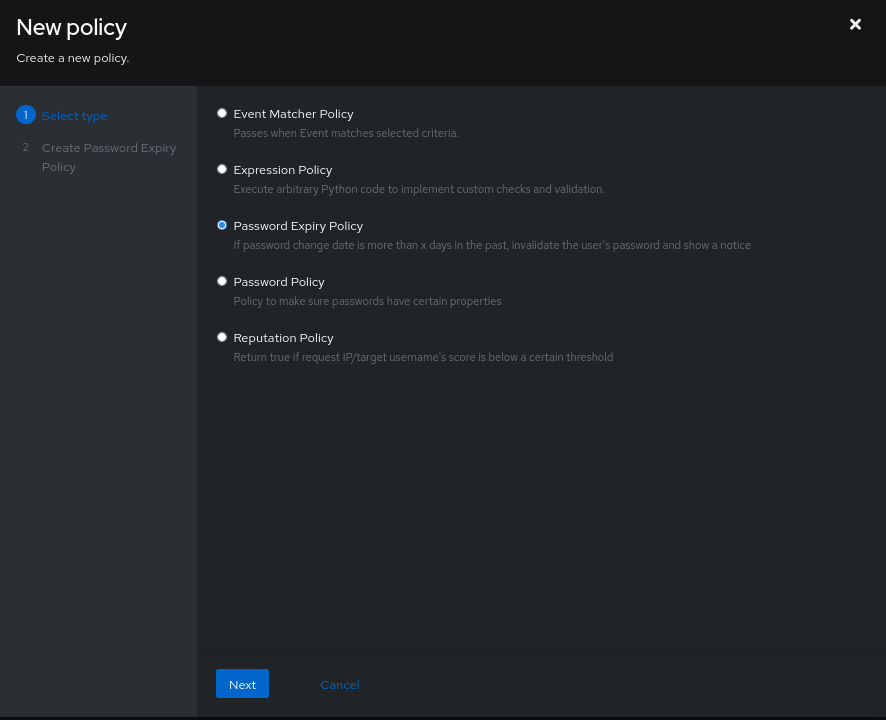
Most of the time, we will use the Expression Policy type which is a bit different from the others. Indeed, it is the most flexible and takes into account the most amount of information, the reason being that the format of policies is not a DSL but is in the form of a Python script.
In short, a return True will be an authorization and a return False a denial.
We can then base ourselves on the context of the request (which user, their groups, their IP, their browser, the time…) or make requests to external services (provided we use the built-in libraries).
Returning to our context, we want to block a user’s authentication if they do not belong to an organization. Unfortunately, this information is not included in the authentication requests coming from Github.
To obtain this information, we need to contact the Github API using the PAT token generated by the user during authentication. Here is the code provided by GoAuthentik in its documentation:
if context["source"].provider_type != "github":
    return True

accepted_org = "une-tasse-de-cafe"

connection = context["goauthentik.io/sources/connection"]
access_token = connection.access_token

github_username = context["oauth_userinfo"]Check if user is in Github

orgs_response = requests.get(
    "https://api.github.com/user/orgs",
    auth=(github_username["login"], access_token),
    headers={
        "accept": "application/vnd.github.v3+json"
    }
)
orgs_response.raise_for_status()
orgs = orgs_response.json()

user_matched = any(org['login'] == accepted_org for org in orgs)
if not user_matched:
    ak_message(f"User is not member of {accepted_org}.")
return user_matched
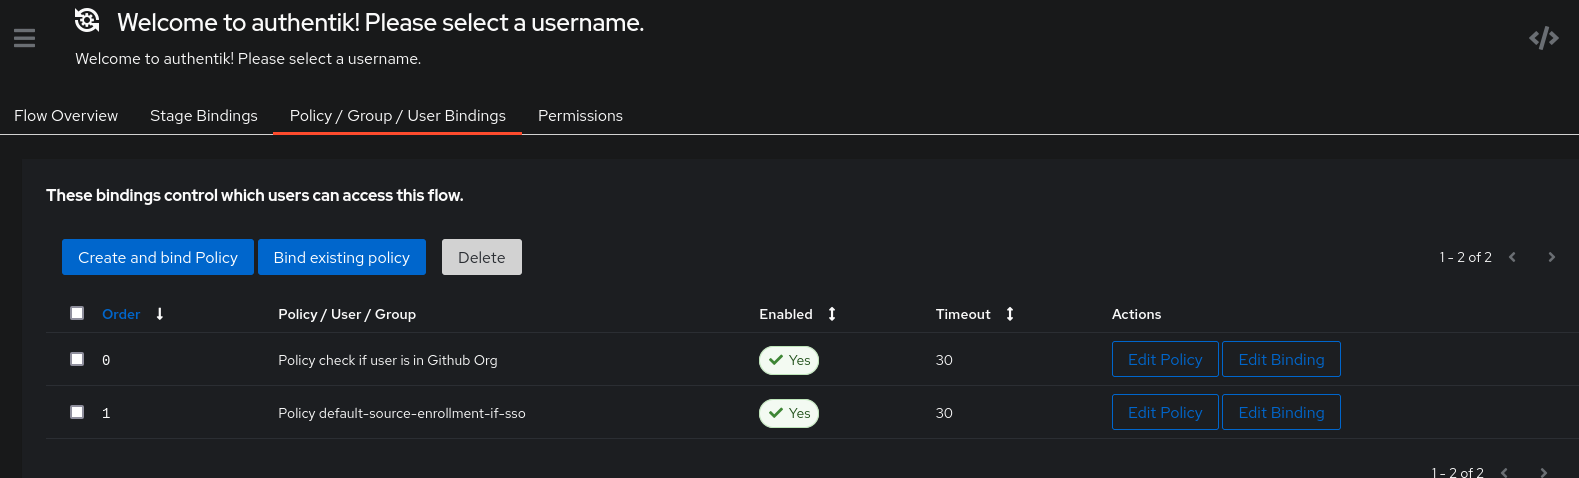
Let’s create the policy Check if user is in Github Org and assign it to the flow default-source-enrollment. We also need to modify the execution order of the existing policy (default-source-enrollment-if-sso) so that it runs after the policy we just created.
Here is the expected result:
Then modify the Flow so that it is in “success” only when all conditions are checked (previously, the success of a single condition was enough for the authentication to succeed).
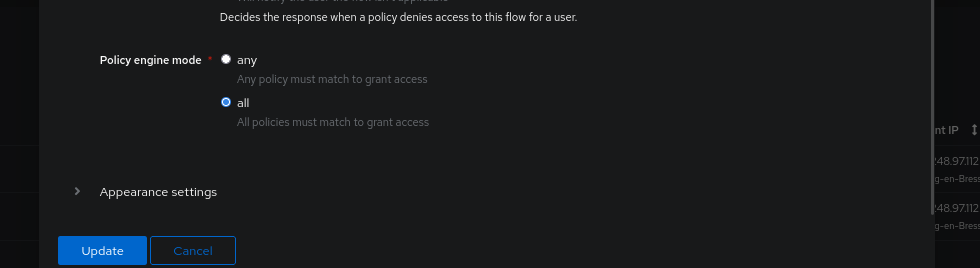
When connecting to GoAuthentik, it will see the organizations present on my account and the policy will be authorized.
Info
If you encounter difficulties testing the policy, you can generate a PAT token with the same permissions requested by GoAuthentik, and then make a Curl request to display the visible organizations.
TOKEN="pat_mylittletoken"
USER="qjoly"
curl -L \
\-H "Accept: application/vnd.github+json"
\-H "Authorization: Bearer $TOKEN"
\-H "X-GitHub-Api-Version: 2022-11-28"
https://api.github.com/users/${USER}/orgs
The response to this request will be in the same format as what we can read in the Python policy.
Invite Users
A final method to create users is to let them register themselves (like adults). For this, we can generate a unique link in the Invitations section (in the ‘Directory’ category) of GoAuthentik.
Invitations use all flows of type Enrollment (for example, the default-enrollment-flow but I recommend creating a dedicated flow for inviting users). An invitation can be used once or multiple times and can have an expiration date.
It is also possible to pre-fill information if you have a stage of type “Invitation” by filling in the “Custom attributes” section.
- Create the
Invitationstage:
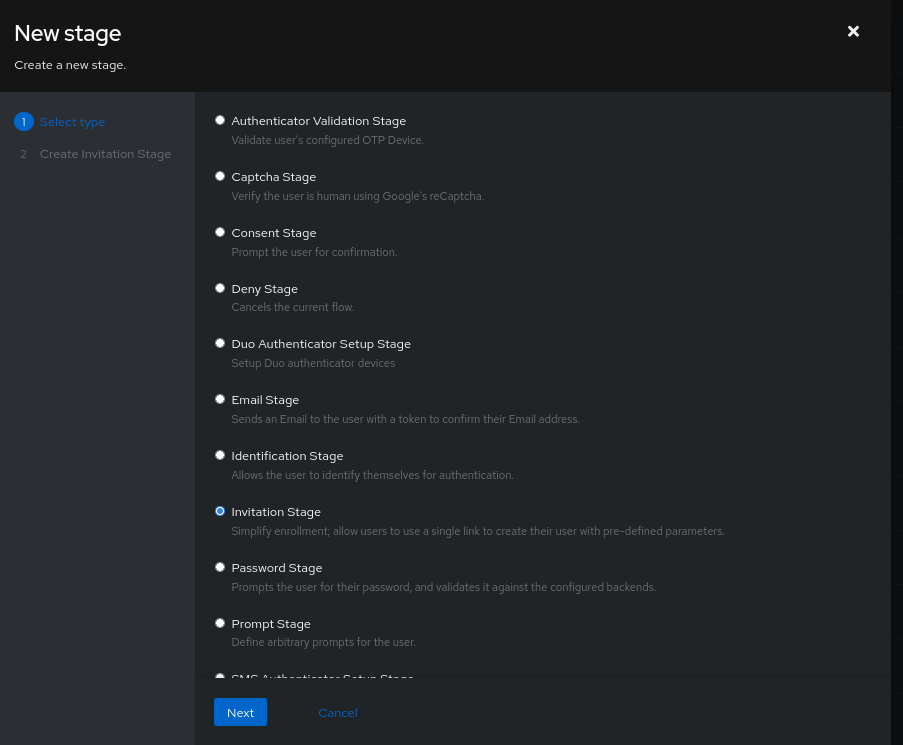
- Create the invitation and define the “Custom attributes”:
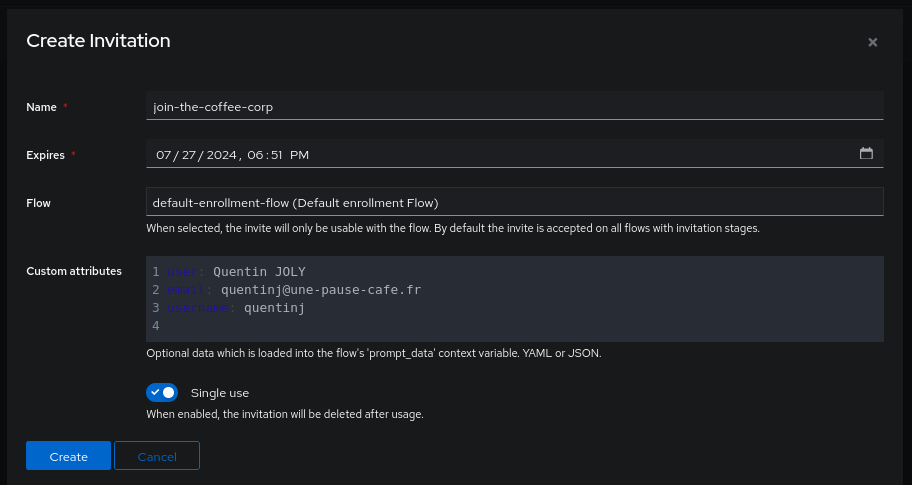
As soon as the user clicks on the link, certain fields will already be filled out.
Tip
If you want to automatically add a user to a group, you will need to configure a stage of type ‘User Write’ that will finalize the user’s registration by adding a specific group.
Manage access to applications
Now that we have our users, we surely want to authorize certain individuals to access specific applications. For example, allowing SREs to administer the hypervisor but not accountants.
To do this, by going into the settings of an application, we can grant access to it to:
- A user;
- A group;
- The result of a policy.
Depending on how the application is configured, the result of a rule may grant access to a user (or conversely, all rules must be passed through to gain access).
In 99% of cases, I simply create a group with access to sites and then add users to these same groups. This ensures a simple and easy-to-maintain configuration. But sometimes, we want to have policies a little more complex than just checking the groups, here are some examples:
- Prohibit access to an application during a backup slot:
from datetime import datetime

current_time = datetime.now().time()
start_time = current_time.replace(hour=0, minute=0, second=0, microsecond=0)
end_time = current_time.replace(hour=2, minute=0, second=0, microsecond=0)

if start_time <= current_time < end_time :
  ak_message("It's backup time. Go take a coffee and comeback.")
  return False
else:
  return True
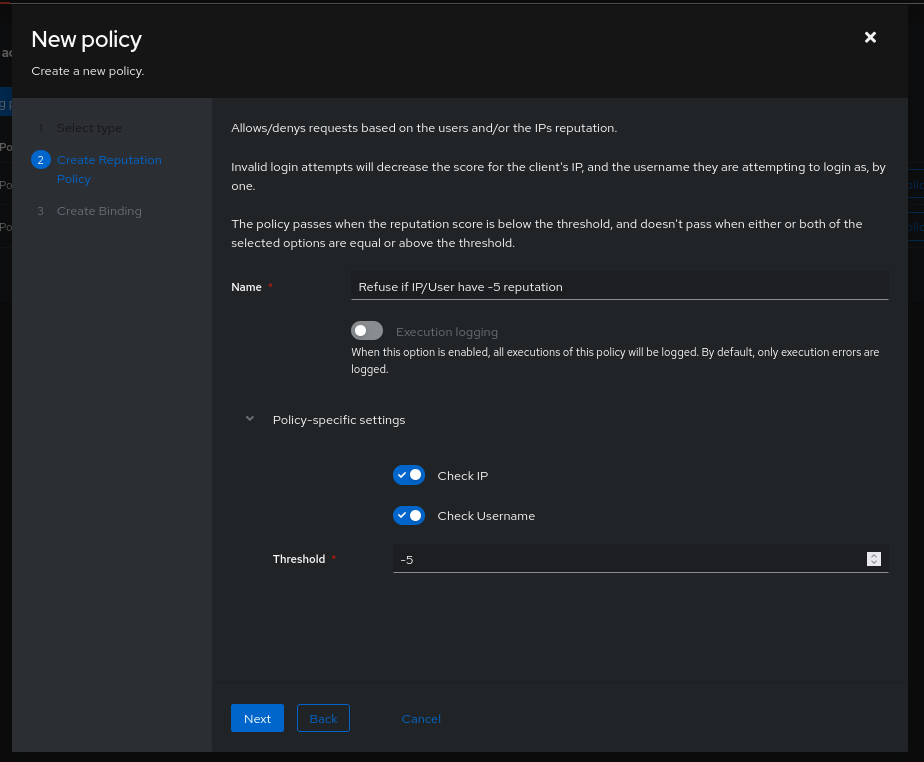
- Deny the user if their “reputation” (success/failure actions ratio) is low:
- Deny a user if accessing an application from a foreign IP address:
return context["geoip"]["country"] == "FR"
- Allowing authentication only from the company network:
return ak_client_ip in ip_network('10.0.0.0/8')
- Deny users who have not configured MFA:
return ak_user_has_authenticator(request.user)
It is worth noting that you can configure policies to validate Stages (and not just access to an application). Let’s take the case where I want my users to register only with a company email address. I could write Python code to reject users who do not have the correct email format, but instead of going that route, we can simply prevent the user from registering with this address.
To do this, we need to create a policy and map it directly to a specific stage of a flow (not necessarily the entire flow) to allow restarting from the same step without invalidating other stages.
Here is the code I will use:
if regex_match(request.context["prompt_data"]["email"], '(.+)@(une-tasse-de.cafe|une-pause-cafe.fr)'):
  return True
else:
  ak_message("Please enter an email address from the company")
  return False
I will map this to the stage default-enrollment-prompt-second (where the user needs to enter their email address) of my invitation flow.
Thus, users not using company domains will be rejected during registration!
Notifications
You may have noticed if you have played around with policies in Python: we receive an error message by email (and on the interface of admin accounts) whenever an error occurs (incorrect syntax, variable not found in the array… you will have many while debugging).
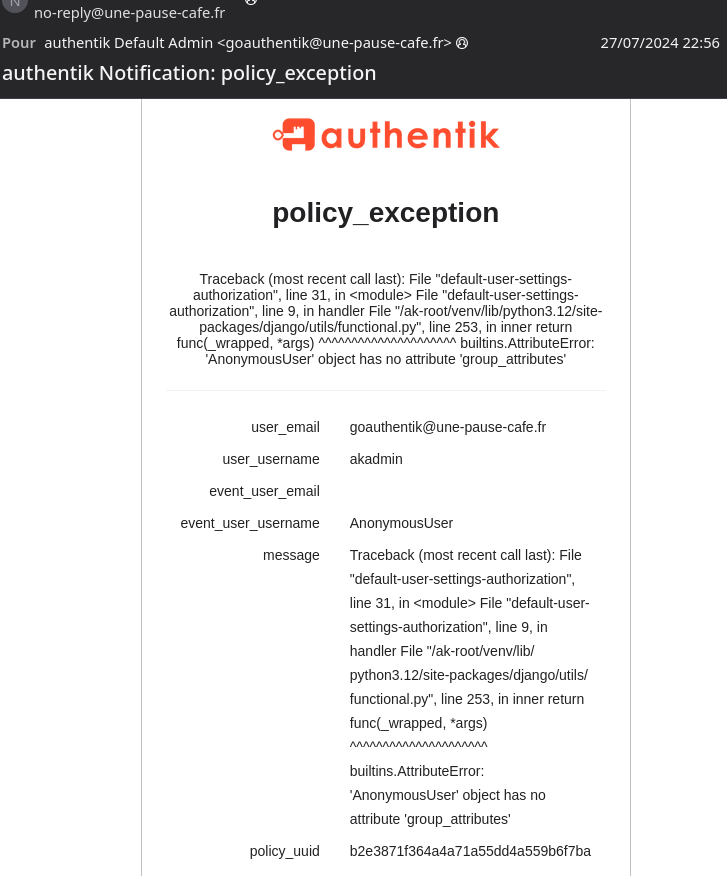
We can choose who receives these notifications (by default, users from the authentik Admins group) but most importantly when (and through what means?) to receive a notification.
Currently, the three configured notifications are:
- If there is a configuration error in the GoAuthentik server.
- If a stage is in error.
- If an update is available.
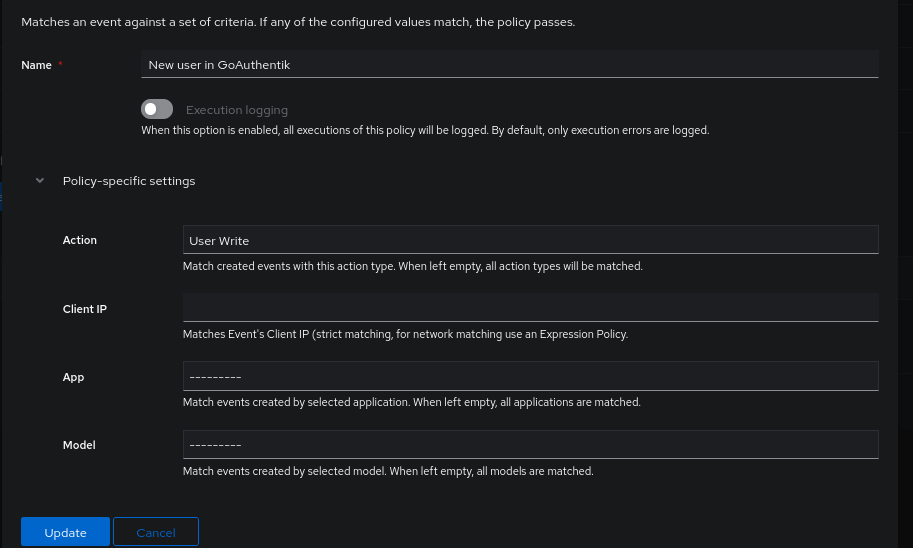
Notifications are triggered by policies (often of the Event Matcher Policy type).
I want to be notified on Slack when a new user joins my GoAuthentik (whether it’s through Github or if an invitation is used).
GoAuthentik can indeed send notifications via WebHook (a method compatible with Slack). Let’s create our Slack application:
- Go to Slack’s developer interface.
- Create your application (do not use a Preset).
- On the application dashboard, go to
Incoming Webhooksand enable the option. - Add our application to a Slack channel (on the same page).
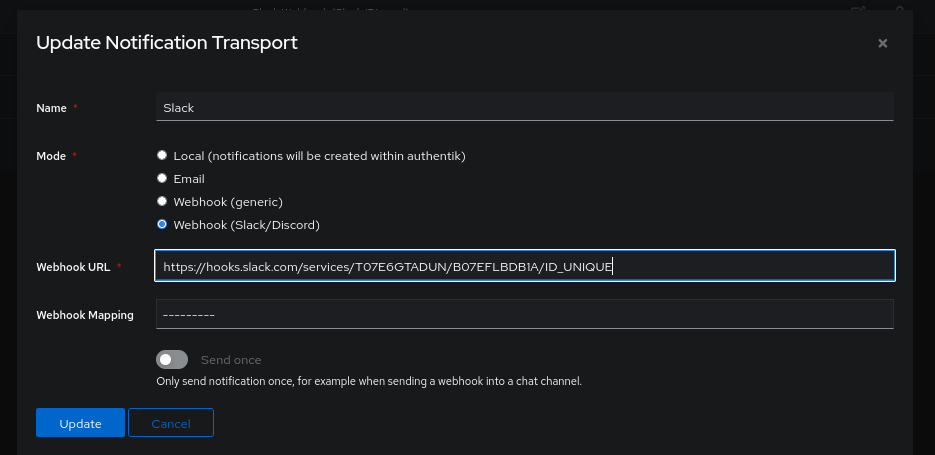
We obtain a Webhook URL that GoAuthentik can request to send messages. Let’s now create our Notification Transports on GoAuthentik using this URL.
Next, we create our Notification Rule that will notify the authentik Admins group (it is mandatory to include one, even if it is not relevant here) with a Notice alert.
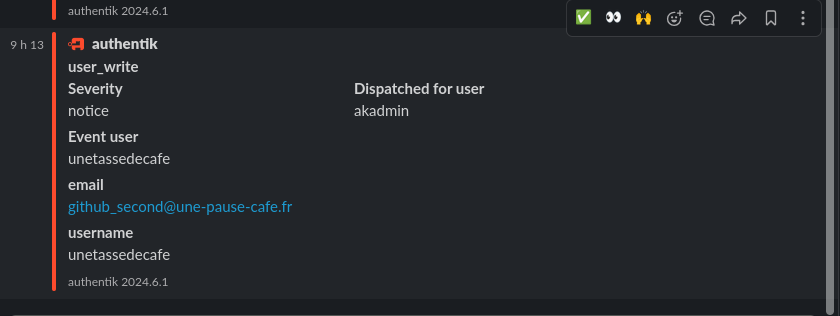
Now, I will log in to a freshly created Github account for this article and register on my GoAuthentik:
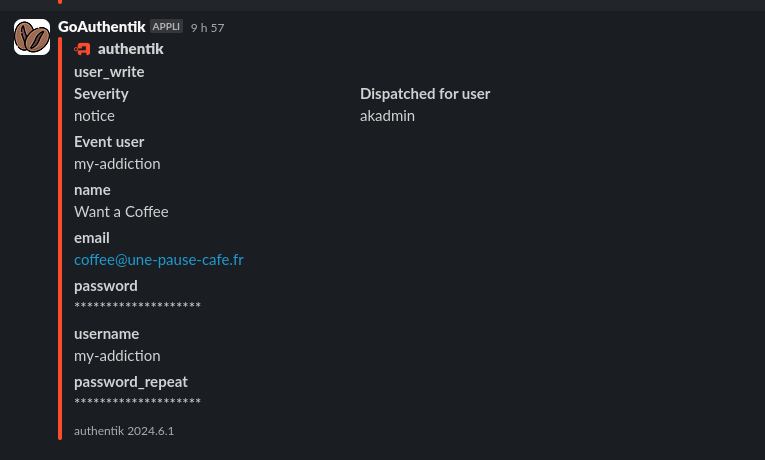
And with a user going through invitations:
Reverse Proxy
One of the features that attracted me to GoAuthentik is the ability to use a reverse proxy adding an authentication step to an application that cannot interface with GoAuthentik’s authentication protocol (e.g., a static application like an mkDocs containing sensitive documentation). Typically, we would use an OAuth2 Proxy like this project, but we won’t need it with Authentik.
We have two options:
- Deploy a GoAuthentik agent acting as a Proxy.
- Use an existing Reverse Proxy (Traefik, Nginx, Caddy).
We will explore both methods starting with the agent.
Agent GoAuthentik
It is important to note that currently, my Authentik is on an isolated machine and is not present on the network of the application I want to protect.
The application I want to expose is accessible via the following URL: http://192.168.1.39:8080 (Authentik cannot access this IP address). However, thanks to the Authentik agent system, we can create a Reverse-Proxy redirecting requests to our actual IdP.
(Sorry, English-speaking friend, this image is in French and I no longer have the sources. To make up for it, here are a few words you can learn in French: sécurisé = secured, privée = private. It won’t be enough to shine at family dinners, but it’s still 2 words learned.)

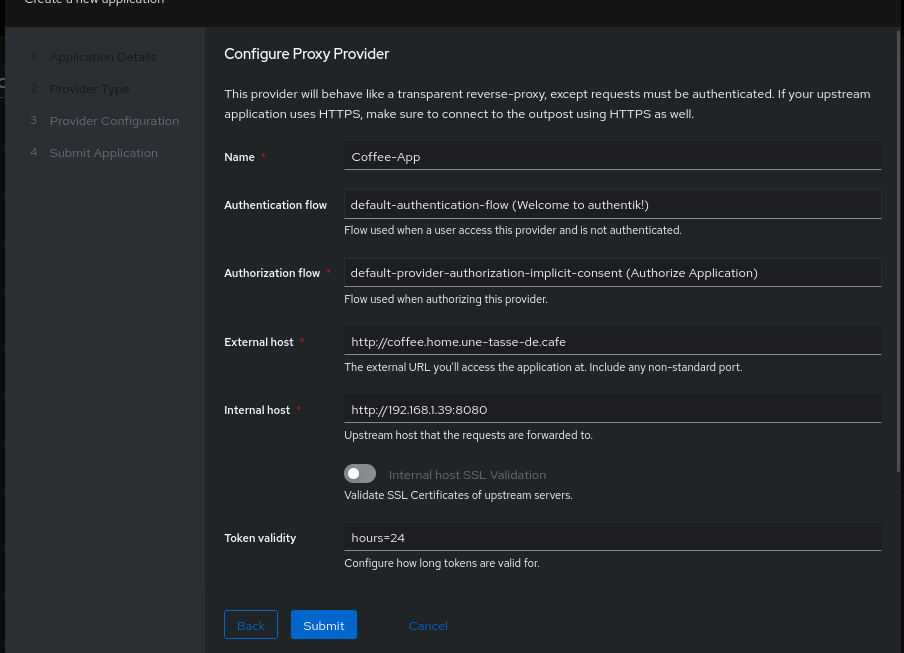
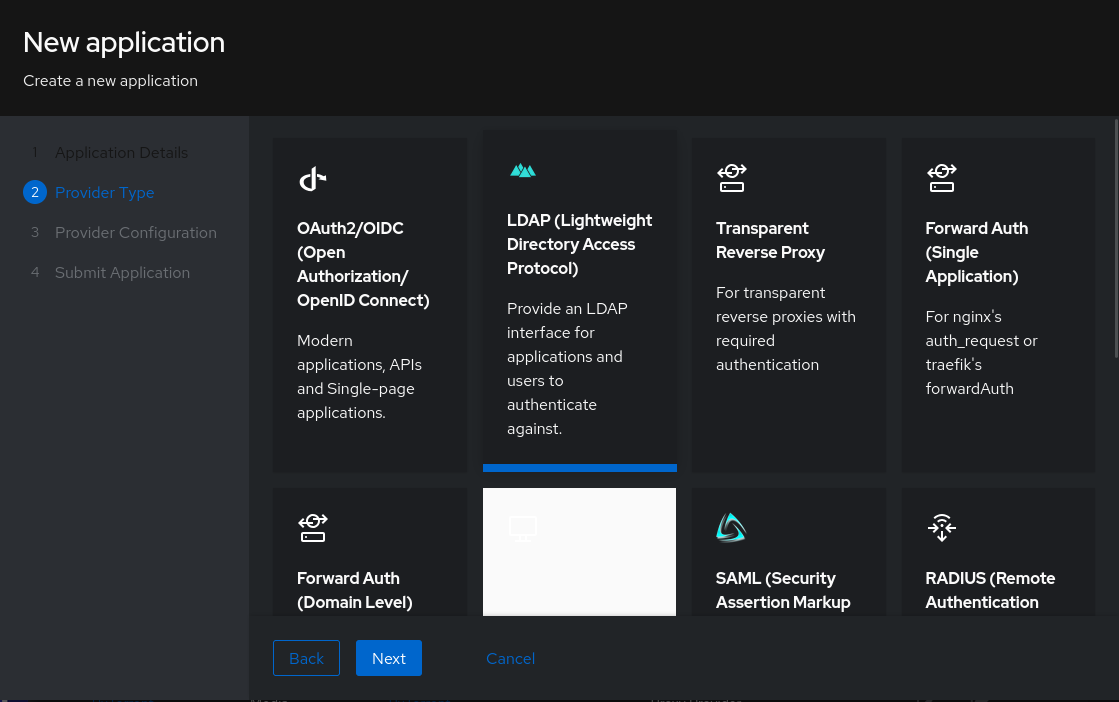
We will start by creating our application on GoAuthentik. In the Provider Type, we select Transparent Reverse Proxy.
We choose the authentication and authorization flows and we define:
- The URL of the application we want to expose.
- The URL that the user will access to reach the application.
After this step, we have our application and our Provider. However, on the Provider page, we see an error message Warning: Provider is not used by any Outpost..
This means that no GoAuthentik agent is exposing this application, so we need to deploy one (on a machine that has access to the application we want to expose).
To do this, we create an Outpost of type Proxy and select the application we just created.
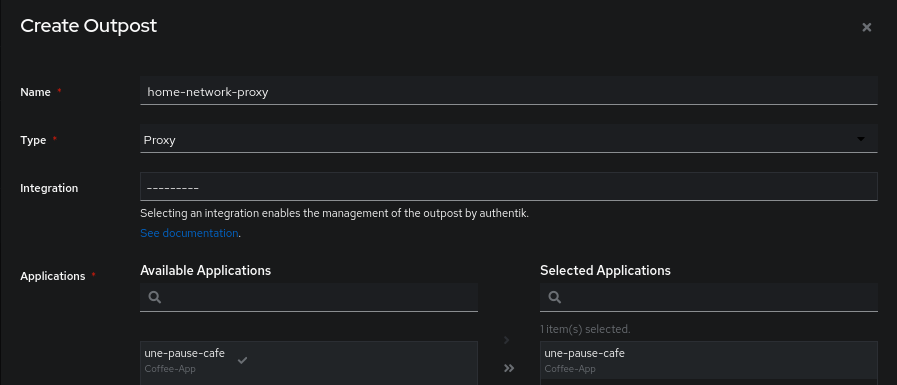
On the right side of our Outpost, we have a button View Deployment Info to see the variables needed to create our authentic agent, namely:
AUTHENTIK_HOST- The URL of our GoAuthentik server that the agent will connect to.AUTHENTIK_HOST_BROWSER- The URL of our GoAuthentik server (where the user will be redirected to authenticate).AUTHENTIK_TOKEN- The token of the Service Account that will be used to authenticate on GoAuthentik.AUTHENTIK_INSECURE- Whether the agent should validate the SSL certificate or not.
Therefore, I will deploy a Docker image that will act as a Proxy with the environment variables mentioned above.
service:
  authentik_proxy:
      image: ghcr.io/goauthentik/proxy
      restart: unless-stopped
      ports:
        - 80:9000
        - 443:9443
      environment:
          AUTHENTIK_HOST: "https://goauthentik.us.une-tasse-de.cafe"
          AUTHENTIK_HOST_BROWSER: "https://goauthentik.us.une-tasse-de.cafe"
          AUTHENTIK_INSECURE: "false"
          AUTHENTIK_TOKEN: keep-calm-and-take-a-coffee
Info
You will need to configure the SSL certificate directly on the GoAuthentik administration interface. In my case, I have not set up any certificate here.
After launching the Docker image, we can see that our proxy is recognized by the GoAuthentik instance (the last health check is successful):

Of course, we need to configure our domain to redirect to the IP address and Port of the Authentik agent.
Now, if I try to access my application via the URL http://coffee.home.une-tasse-de.cafe, I am automatically redirected to an authentication page on GoAuthentik.
Here is the result in the image:
The two drawbacks of this method are the lack of flexibility (we cannot achieve high availability) or generate certificates from the agent (currently, we have to import the certificates on the Authentik server for the agent to use).
Now, what if I want to go through a reverse proxy instead of directly through the agent?
Middleware with Traefik
I start by creating my application that will serve to expose a preview of my blog (to see the layout of my articles), this one is at the address https://staging.a-cup-of.coffee. I then add this application to Authentik by choosing the Forward Auth (Single Application) mode for the provider. I configure the internal URL (used by Traefik) and the URL that users will use.
I will update the Traefik docker-compose to match this:
Traefik Configuration
services:
  traefik:
    image: "traefik:v3.0.1"
    container_name: "traefik"
    restart: always
    hostname: "traefik"
    networks:
      - traefik-net
    ports:
      - "443:443"
      - "80:80"
    volumes:
      - "/var/run/docker.sock:/var/run/docker.sock:ro"
      - "./config:/etc/traefik"

  authentik-proxy:
    image: ghcr.io/goauthentik/proxy
    networks:
      - traefik-net
    environment:
      AUTHENTIK_HOST: https://goauthentik.us.une-tasse-de.cafe
      AUTHENTIK_INSECURE: "false"
      AUTHENTIK_TOKEN: still-dont-want-a-coffee?
      AUTHENTIK_HOST_BROWSER: https://goauthentik.us.une-tasse-de.cafe
    labels:
      traefik.enable: true
      traefik.port: 9000
      traefik.http.routers.authentik.rule: Host(`staging.a-cup-of.coffee`) && PathPrefix(`/outpost.goauthentik.io/`)
      traefik.http.middlewares.authentik.forwardauth.address: http://authentik-proxy:9000/outpost.goauthentik.io/auth/traefik
      traefik.http.middlewares.authentik.forwardauth.trustForwardHeader: true
      traefik.http.middlewares.authentik.forwardauth.authResponseHeaders: X-authentik-username,X-authentik-groups,X-authentik-email,X-authentik-name,X-authentik-uid,X-authentik-jwt,X-authentik-meta-jwks,X-authentik-meta-outpost,X-authentik-meta-provider,X-authentik-meta-app,X-authentik-meta-version
    restart: unless-stopped

networks:
  traefik-net:
    external: true
    driver: overlay
    name: traefik-net
Note that in the labels of authentik-proxy, I added the redirection to Authentik for the domain staging.a-cup-of.coffee to the paths /outpost.goauthentik.io/*.
Now, I need to configure the Authentik middleware in the docker-compose.yml of my blog.
services:
  acupofcoffee-staging:
    build: .
    image: staging-blog-en
    networks:
      - traefik-net
    labels:
      - "traefik.enable=true"
      - "traefik.http.routers.a-cup-of-coffee-staging.entrypoints=secure"
      - "traefik.http.routers.a-cup-of-coffee-staging.rule=Host(`staging.a-cup-of.coffee`)"
      - "traefik.http.services.a-cup-of-coffee-staging.loadbalancer.server.port=80"
      - "traefik.http.routers.a-cup-of-coffee-staging.tls.certresolver=letsencrypt"
      - "traefik.http.routers.a-cup-of-coffee-staging.middlewares=authentik@docker"  # <--- Just here

networks:
  traefik-net:
    external: true
    driver: overlay
    name: traefik-net
After restarting my Traefik and my Hugo container:
Info
If we want to expose multiple applications in Traefik, it is fortunately possible, we just need to:
- Create an application on GoAuthentik.
- Link it to the Outpost proxy from GoAuthentik.
- Modify the labels of the Authentik agent to also match the domain of the new application:
  labels:
  # ...
      traefik.http.routers.authentik.rule: Host(`staging.a-cup-of.coffee`, `staging.une-tasse-de.cafe`) && PathPrefix(`/outpost.goauthentik.io/`)
  # ...
All good! No chance of leaking any credentials/tokens while writing my articles (it has never happened, I assure you 😇).
LDAP Authentication
An added value of using Authentik rather than Keycloak is that it is compatible with LDAP to authenticate our users. To make this work, we need to create a dedicated LDAP flow that only requires the username/password pair (in a single stage and without MFA).
type:
Password stagename:ldap-authentication-passwordBackends (leave default):- User database + standard password
- User database + app passwords
- User database + LDAP password
type:
User Login Stagename:ldap-authentication-logintype:
Identification stagename:ldap-identification-stageUser fields:- Username
- Email
Password stage:
ldap-authentication-password
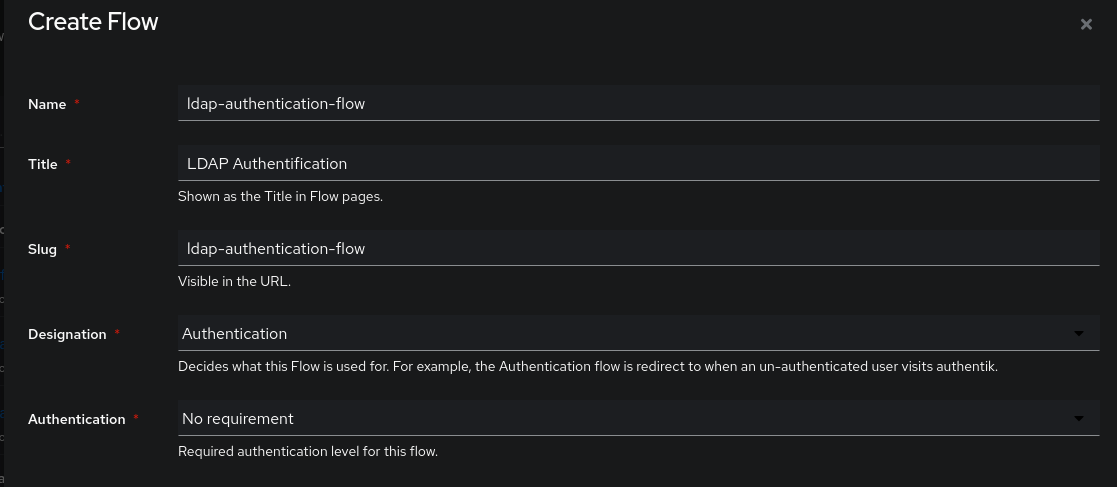
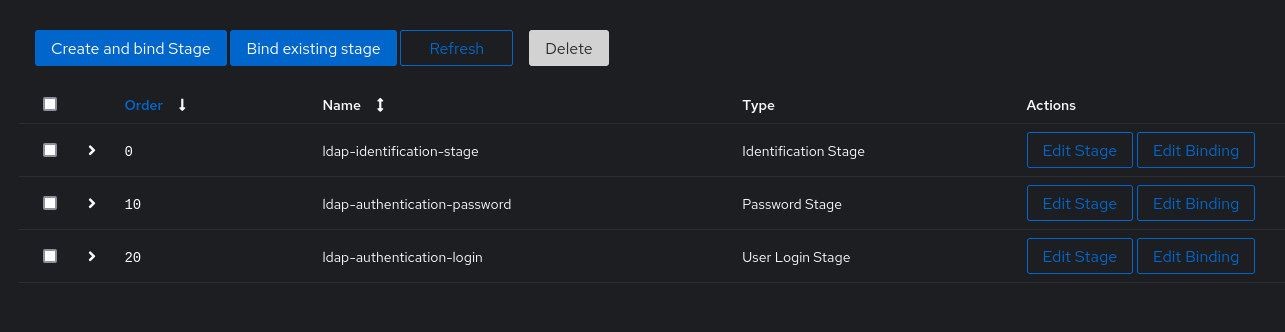
Now we can create our ldap-authentication-flow flow of type Authentication. We will bind our stages created just before in this order:
Identification stageldap-authentication-passwordldap-authentication-login
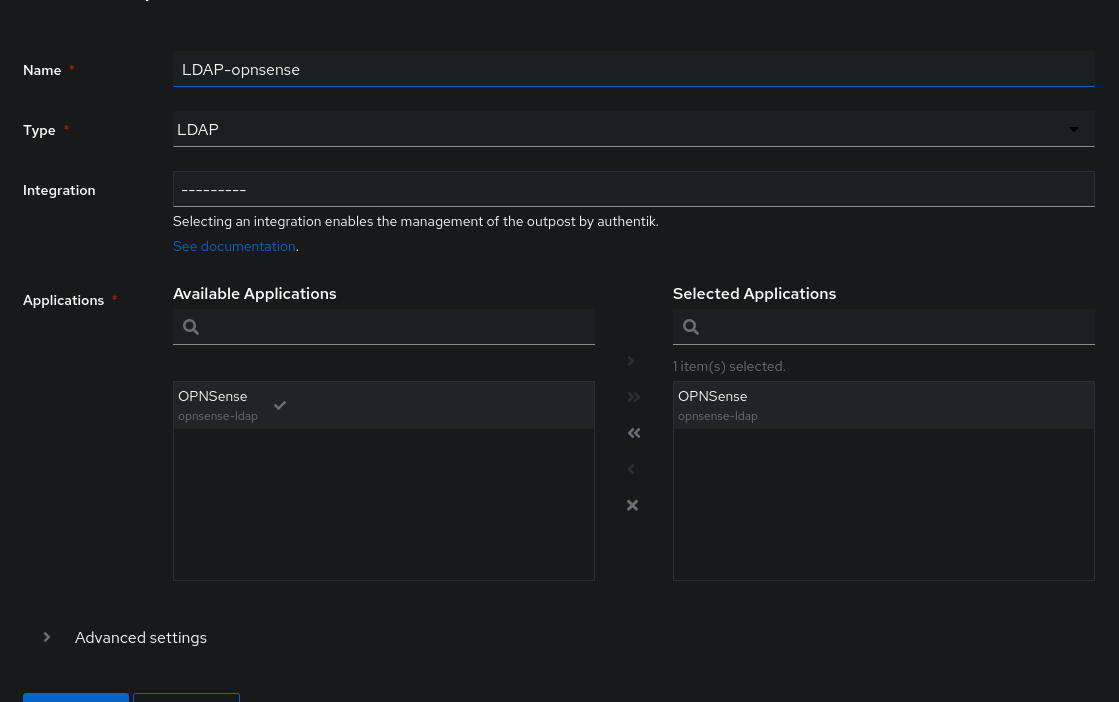
Now we will create an LDAP application. In my case, I want to be able to authenticate on OPNSense using Authentik, so I will create the dedicated application for my router. I will choose a group later for users with the rights to make requests.
I leave the Base DN by default: DC=ldap,DC=goauthentik,DC=io.
Next, we can create the Outpost that will expose the LDAP server linked to our Authentik, it is a step similar to when we exposed an Authentik Agent as a Reverse-Proxy.
services:
    authentik_ldap:
        image: ghcr.io/goauthentik/ldap
        ports:
            - 389:3389
            - 636:6636
        environment:
            AUTHENTIK_HOST: https://goauthentik.us.une-tasse-de.cafe
            AUTHENTIK_INSECURE: "false"
            AUTHENTIK_TOKEN: still-a-good-time-to-take-a-coffee
We need the application (OPNSense in my case) to be able to authenticate on the LDAP server. Let’s create a Service Account in the Directory/User section:
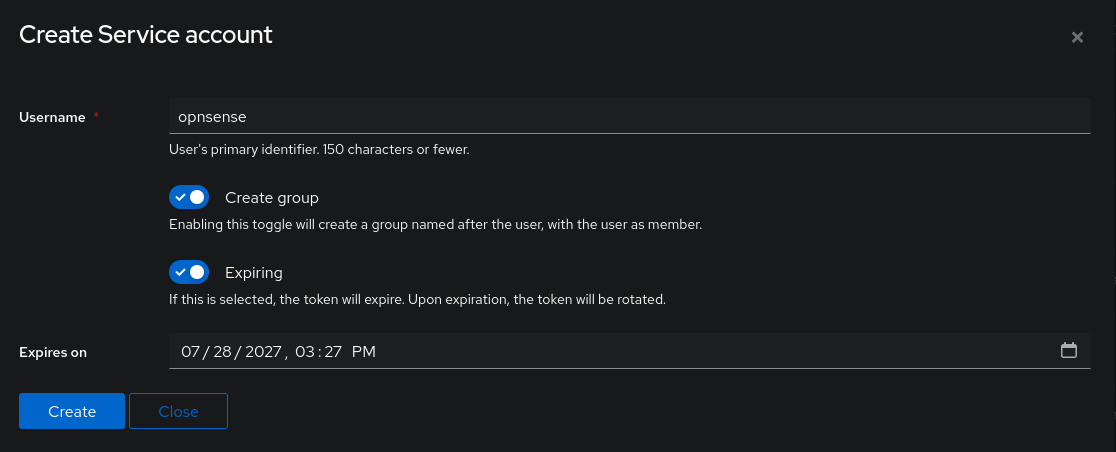
After this step, we obtain our user and a password. Make sure to also create a group with the same name as the Service Account.
Now, we can go back to defining our LDAP provider to select the group of users allowed to make requests: this group must be the same as the one created during the addition of the Service Account (for security reasons, do not add any other users to this group).

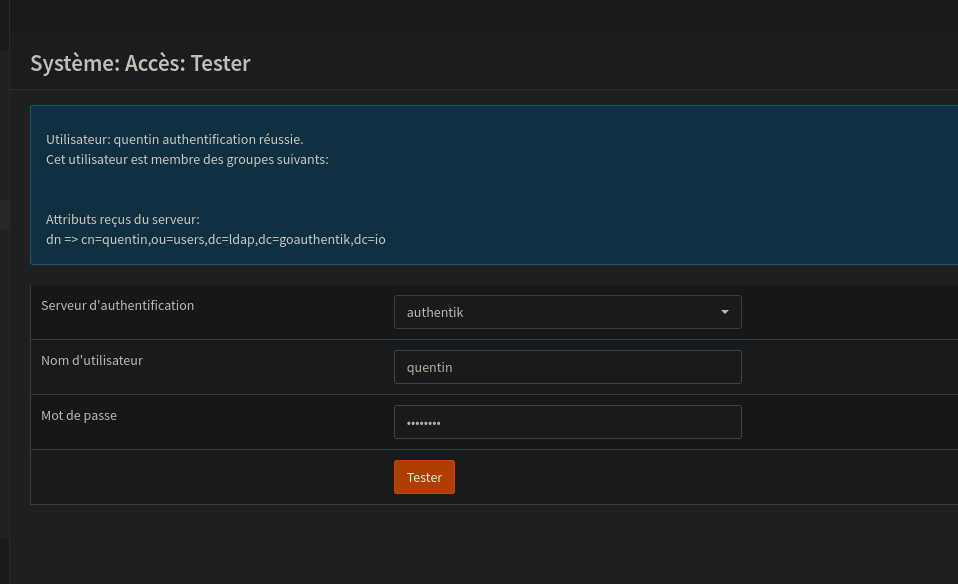
From now on, we can configure LDAP on OPNSense to use it as an authentication system:
Allow your users to reset their passwords
I noticed that by default, the GoAuthentik configuration does not allow a user to reset their password. However, we have everything we need to set this up in Authentik.
To design our flow, let’s start by listing the stages that the user must go through to reset their password:
- The user must not be authenticated.
- Ask for the user’s email address.
- Send an email to confirm that they are indeed the user.
- Display the form for them to enter their new password twice.
- Save the new password.
This flow belongs to the Recovery category.
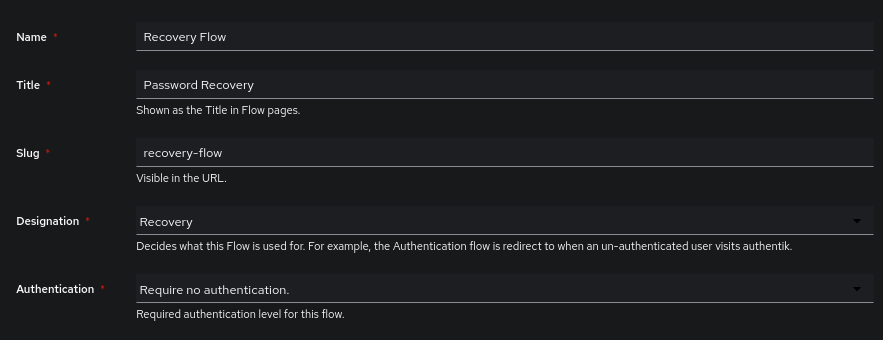
Here is the graph of our Flow:

To activate it on our authentication flow, I need to go to the settings of our Brand (which represent the settings that modify the aesthetic aspect of GoAuthentik or enable certain buttons depending on the domain).
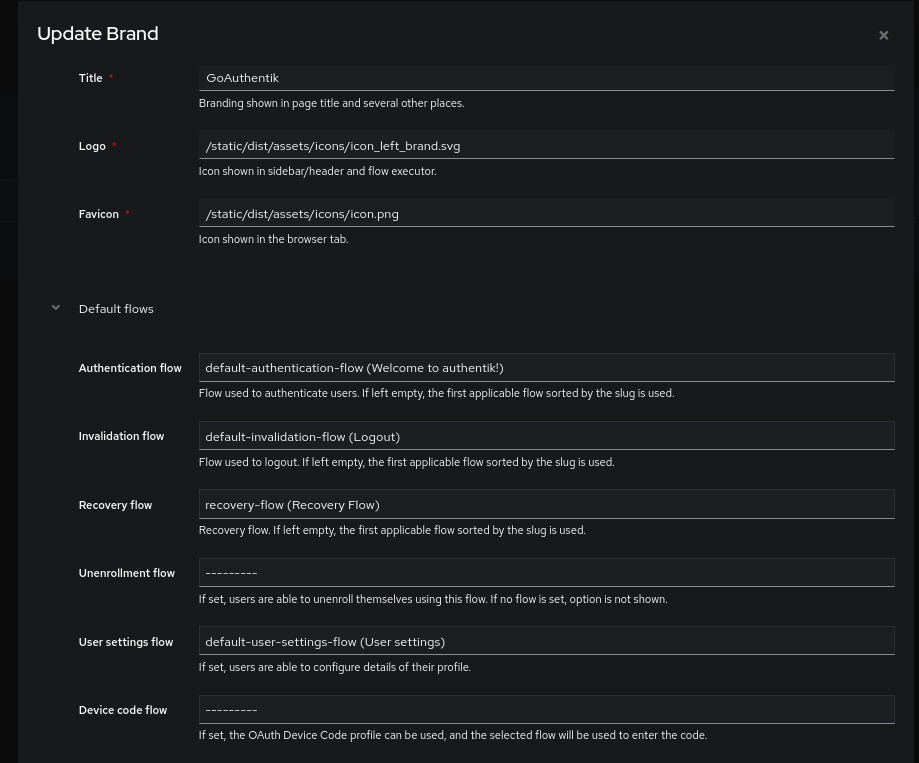
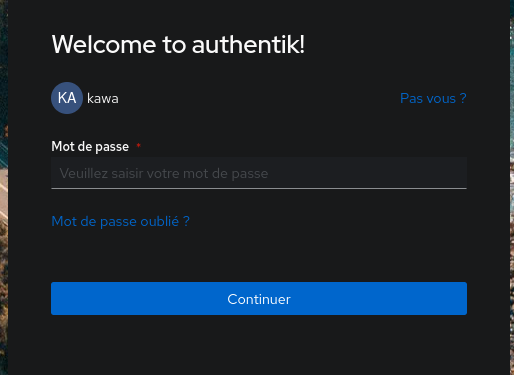
We will have a new “forgot password” button on the identification stage:
Forcing MFA validation when a user accesses an application
While experimenting with different flows, I noticed that it was quite easy to create a stage that forces the user to confirm their 2FA when accessing an application.
To achieve this, I relied on the Authorization Flows (default-provider-authorization-implicit-consent and default-provider-authorization-explicit-consent) which are used to respectively determine whether the user will receive a message to authorize the target application to access the user’s data on Authentik.
Therefore, I wanted to try creating a similar flow where the user had to confirm their 2FA using Yubikey or TOTP. The goal is to prevent compromising access to the application if the user leaves their computer unlocked.
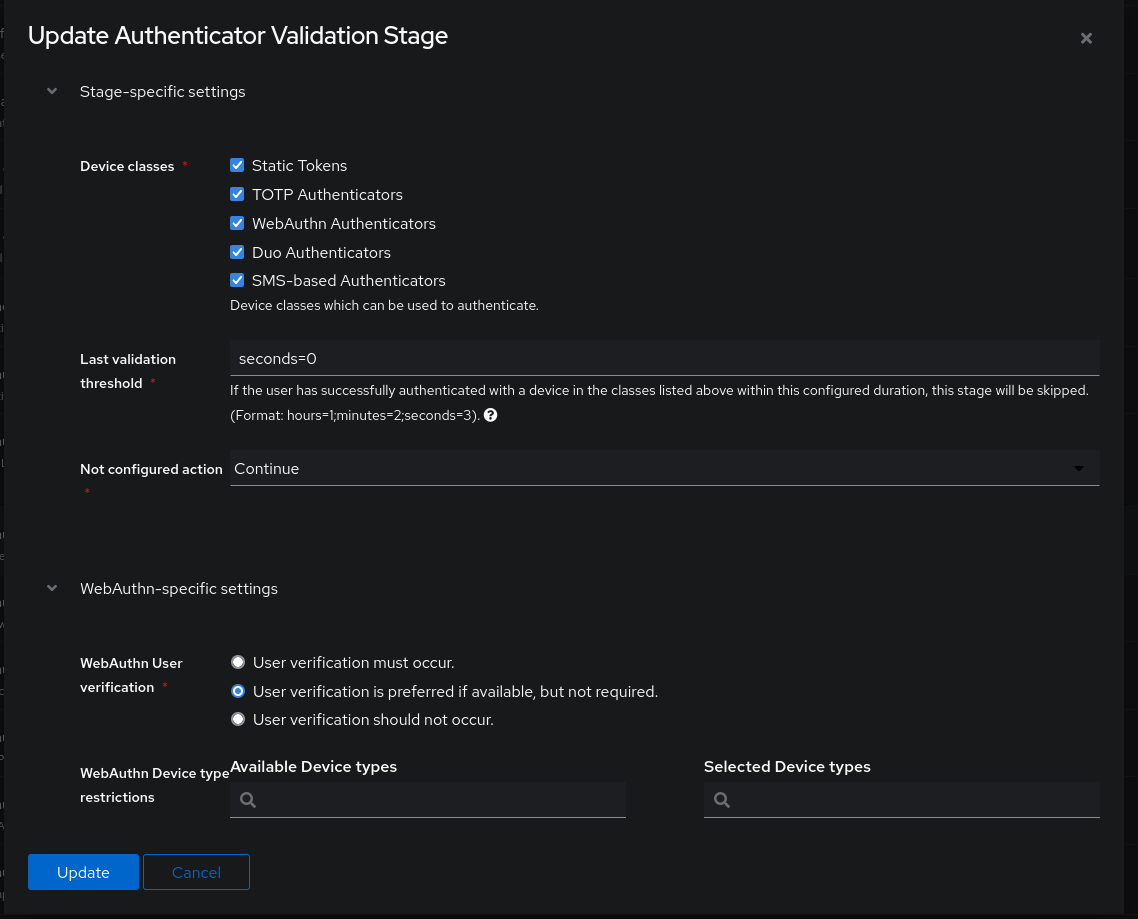
The stage is as follows:
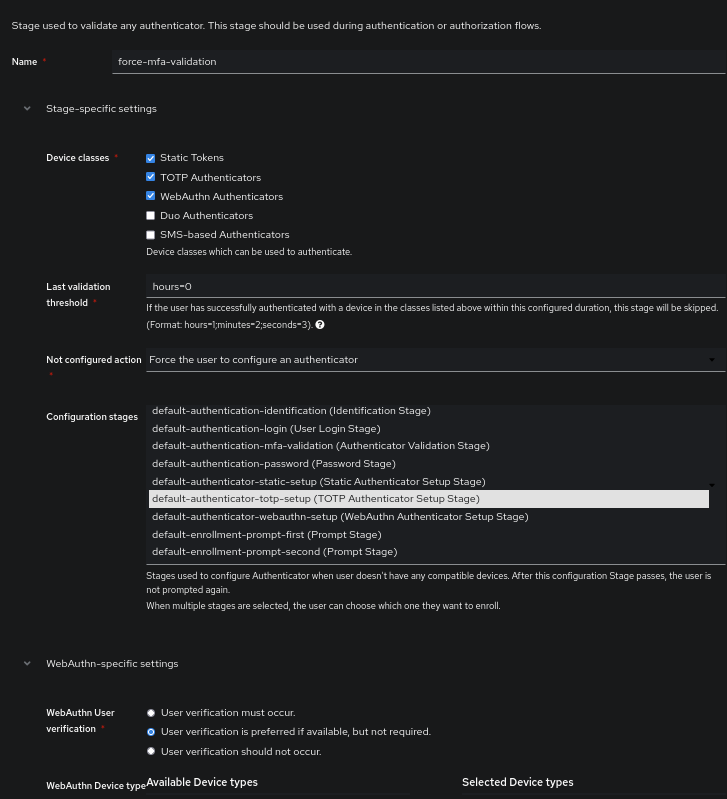
And the flow is as follows:

Info
The field Last validation threshold allows configuring a time before the user must re-validate. In my case: I set hours=0 so that the user does it systematically (note that this verification only occurs at user authentication and not every time they access the application).
API-server + OIDC = <3
Let’s finish this article beautifully by authenticating on a Kubernetes cluster via GoAuthentik. Indeed, the API server is natively compatible with OIDC and as long as we configure the pod correctly, we can ask it to validate a user’s authentication directly with an issuer (in this case: our GoAuthentik).
(And besides, the Kubernetes documentation is quite comprehensive 😄)
To do this, we start by generating an application on GoAuthentik of type OIDC with the following parameters (I won’t teach you how to do this at this stage).
- Redirect URIs:
http://localhost:8000(yes, yes, trust me) - Scopes:
openidemailprofile
- Subject Mode:
Based on the User's email. - Include claims in id_token: Enabled.
As usual, we obtain our Client ID / Secret pair.
My application is named kubernetes-talos-hb-01 on GoAuthentik, I will now add the following arguments in the command calling the API-Server:
oidc-issuer-url- L’issuer OIDC (ex:https://goauthentik.us.une-tasse-de.cafe/application/o/kubernetes-talos-hb-01/)oidc-client-id- Le client-id pour confirmeroidc-username-claim- L’emplacement de l’username dans le JWToidc-groups-claim- L’emplacement du groupe dans le JWT
If you deploy your cluster with Kubespray, you can directly modify the inventory variables at this location.
In my case, I use Talos (there is not an article where I don’t talk about it), so here is the configuration I add in my talconfig.yaml:
controlPlane:
  patches:
    - |-
      - op: add
        path: /cluster/apiServer/extraArgs
        value:
           oidc-issuer-url: "{{ ISSUER_URL }}"
           oidc-client-id: {{ CLIENT_ID}}
           oidc-username-claim: email
           oidc-groups-claim: groups
Info
If you are not using talhelper, here is the patch to apply directly:
cluster:
  apiServer:
    extraArgs:
      oidc-issuer-url: "{{ ISSUER_URL }}"
      oidc-client-id: {{ CLIENT_ID}}
      oidc-username-claim: email
      oidc-groups-claim: groups
Now that the API server is ready to authenticate the JWTs provided by GoAuthentik, we can configure our kubectl client to support OIDC authentication!
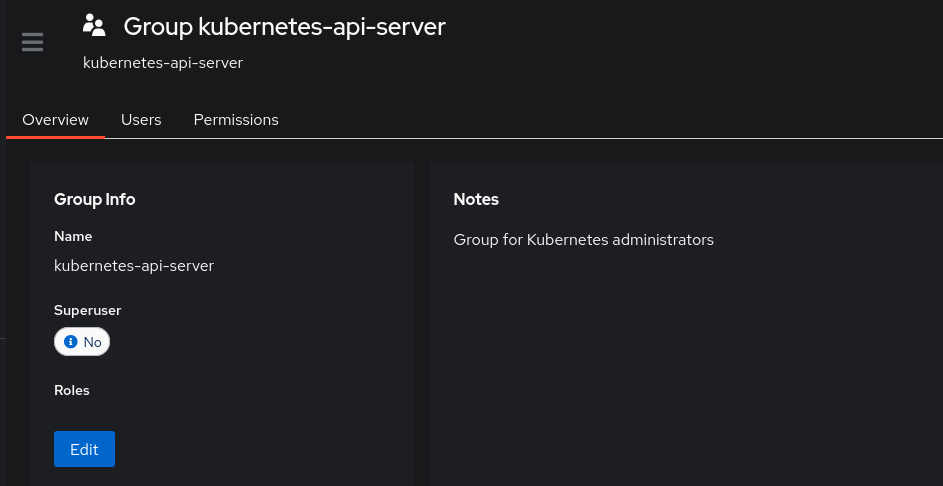
It is also at this stage that we will create a dedicated group for individuals who can authenticate to our cluster. Although it can be used for that purpose, the goal is not to use it in an Authentik policy but rather to provide information to the API server so that it can react differently based on the user’s groups.
I will create the group kubernetes-api-server and assign myself to this group.
Using Kubelogin
Natively, Kubectl cannot authenticate to an OIDC issuer. We need an additional utility for this.
This is where KubeLogin comes in, a plugin that allows adding this missing layer of OIDC to kubectl.

kubectl oidc-login setup \
  --oidc-issuer-url="https://goauthentik.us.une-tasse-de.cafe/application/o/kubernetes-talos-hb-01/" \
  --oidc-extra-scope=profile,email \
  --oidc-client-id=${CLIENT_ID} \
  --oidc-client-secret="${CLIENT_SECRET}"
During this step, Kubelogin will temporarily expose a web server on port 8000 or 18000 to retrieve tokens from GoAuthentik. Once the authentication is accepted and authorized, we should obtain a JWT like this:
{
  "iss": "https://goauthentik.us.une-tasse-de.cafe/application/o/kubernetes-talos-hb-01/",
  "sub": "coffee@une-pause-cafe.fr",
  "aud": "{{ CLIENT_ID}}",
  "exp": 1722259977,
  "iat": 1722259677,
  "auth_time": 1722112885,
  "acr": "goauthentik.io/providers/oauth2/default",
  "nonce": "redacted",
  "email": "goauthentik@une-pause-cafe.fr",
  "email_verified": true,
  "name": "Quentin JOLY",
  "given_name": "Quentin JOLY",
  "preferred_username": "quentin",
  "nickname": "quentin",
  "groups": [
    "authentik Admins",
    "Minio admins",
    "kubernetes-api-server"
  ]
}
The presence of this JWT confirms that GoAuthentik successfully authenticates our request through kubelogin. We can then create our user in our ~/.kube/config, I will name it talos-hb-01 in my case.
kubectl config set-credentials talos-hb-01 \
          --exec-api-version=client.authentication.k8s.io/v1beta1 \
          --exec-command=kubectl \
          --exec-arg=oidc-login \
          --exec-arg=get-token \
          --exec-arg=--oidc-issuer-url=https://goauthentik.us.une-tasse-de.cafe/application/o/kubernetes-talos-hb-01/ \
          --exec-arg=--oidc-client-id=${CLIENT_ID} \
          --exec-arg=--oidc-client-secret="${CLIENT_SECRET}" \
          --exec-arg=--oidc-extra-scope=profile \
          --exec-arg=--oidc-extra-scope=email
Let’s test a request to the cluster:
$ kubectl get nodes --user=talos-hb-01
Error from server (Forbidden): nodes is forbidden: User "coffee@une-pause-cafe.fr" cannot list resource "nodes" in API group "" at the cluster scope
The good news:
- The API server recognizes our user (the JWT is then accepted and functional).
The bad second good news:
- The API server does not assign us any permission.
We must create our ClusterRole ourselves (or use an existing one) and bind it to our user… or to our group (since the API server can see our groups on Authentik).
Let’s then generate a ClusterRoleBinding to obtain administrator permissions if the user is in the kubernetes-api-server group:
apiVersion: rbac.authorization.k8s.io/v1
kind: ClusterRoleBinding
metadata:
  name: oidc-cluster-admin
roleRef:
  apiGroup: rbac.authorization.k8s.io
  kind: ClusterRole
  name: cluster-admin
subjects:
- apiGroup: rbac.authorization.k8s.io
  kind: Group
  name: kubernetes-api-server # <---- notre groupe Authentik
New attempt:
$ kubectl get nodes --user=talos-hb-01
NAME   STATUS   ROLES           AGE   VERSION
cp-1   Ready    control-plane   17h   v1.29.1
cp-2   Ready    control-plane   17h   v1.29.1
Tadaaaa 🥳 ! We have successfully gained access to our cluster.
We can also have fun creating other cluster groups, here are a few examples:
- With the ClusterRole
view(read-only):
apiVersion: rbac.authorization.k8s.io/v1
kind: ClusterRoleBinding
metadata:
  name: oidc-app-developper
roleRef:
  apiGroup: rbac.authorization.k8s.io
  kind: ClusterRole
  name: view
subjects:
- apiGroup: rbac.authorization.k8s.io
  kind: Group
  name: developper
- With a role granting only permissions in the
defaultNamespace:
apiVersion: rbac.authorization.k8s.io/v1
kind: Role
metadata:
  name: read-write-role-default-ns
  namespace: default
rules:
  - apiGroups: [""]
    resources: ["pods", "pods/log", "configmaps", "secrets"]
    verbs: ["get", "list", "watch", "create", "update", "patch", "delete"]
  - apiGroups: [""]
    resources: ["services", "endpoints"]
    verbs: ["get", "list", "watch", "create", "update", "patch", "delete"]
  - apiGroups: ["apps"]
    resources: ["deployments", "daemonsets", "replicasets", "statefulsets"]
    verbs: ["get", "list", "watch", "create", "update", "patch", "delete"]
  - apiGroups: ["batch"]
    resources: ["jobs", "cronjobs"]
    verbs: ["get", "list", "watch", "create", "update", "patch", "delete"]
  - apiGroups: ["extensions"]
    resources: ["deployments", "daemonsets", "replicasets"]
    verbs: ["get", "list", "watch", "create", "update", "patch", "delete"]
---
apiVersion: rbac.authorization.k8s.io/v1
kind: RoleBinding
metadata:
  name: read-write-rolebinding
  namespace: default
roleRef:
  kind: Role
  name: read-write-role-default-ns
  apiGroup: rbac.authorization.k8s.io
subjects:
- apiGroup: rbac.authorization.k8s.io
  kind: Group
  name: kubernetes-developper
Let’s test this one:
$ kubectl get pods -n default --user=talos-hb-01-developper
No resources found in default namespace.
$ kubectl get pods -n kube-system --user=talos-hb-01-developper
Error from server (Forbidden): pods is forbidden: User "goauthentik@une-pause-cafe.fr" cannot list resource "pods" in API group "" in the namespace "kube-system"
We have permissions in the default namespace but not in the others!
Conclusion
GoAuthentik is a very powerful and flexible software. The choice of Python as the policy language is very interesting since we do not have the limitations that we usually have in other software (while keeping a simple syntax).
As a beginner in the very concept of SSO, the only constraint I discovered is the lack of management of strictly different populations (“realm”), where keycloak can. Authentik is actively in development, so we may see this feature in a future release.
My article is just a “discovery” of the solution and there is still a lot to say. Especially the automation part that I have not covered here, there is a Terraform provider as well as a very comprehensive REST API.
I hope this article has been able to convince you. Feel free to support my blog on Kofi if you wish.
Thank you for reading ☕